Learning how to install siding around windows isn’t just about aesthetics; it’s about protecting your home from water intrusion, sealing drafts, and creating a clean, finished appearance. This detailed guide walks you through the professional installation process of vinyl siding around windows step by step, combining building science best practices with real-world job site methods. Let’s get started!
Tools and Materials:
Before you start, make sure you have all the necessary tools and supplies. You’ll use these throughout the project:
- Utility knife and siding snips (for cutting)
- Tape measure and level
- House wrap (like Tyvek)
- Stapler and staples
- Expansion foam
- Peel-and-stick flashing tape
- Metal flashing/drip cap
- Vinyl siding panels
- Patch tape and construction adhesive
- Corner posts and mounting blocks
- Nails (use exterior-grade)
- Caulk or sealant
Step-by-Step Installation Process
1. Remove Old Materials Back to the Sheathing
Start by removing everything down to the wooden surface of the house wall, including the old siding and any exterior trim or window frames. This gives you access to the structure behind the window. If there’s a frame around the window, take it off carefully. You need a clean and flat surface to work with.
2. Seal the Window Perimeter with Foam
Once the window is exposed, you may notice small gaps between the window frame and the wall. Use expansion foam to fill these spaces. This foam expands and hardens to create a tight seal that keeps out drafts and moisture. Spray the foam evenly into the gaps and let it dry for a few minutes before doing anything else.
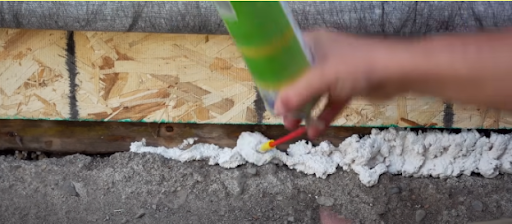
Figure 1
3. Wrap the Wall with House Wrap (Tyvek)
Next, you’ll apply house wrap like Tyvek to the entire wall surface. This wrap acts like a windbreaker and water shield for your house. Use a stapler to attach it firmly to the wood. When you have to overlap two pieces of wrap, make sure the top layer overlaps the bottom layer by at least 6 inches. At the bottom of the wall, where wood meets concrete, use foam to fill any gaps first, then wrap over it.
Use this step by step guide on installing Tyvek around windows. Also, make sure to avoid these mistakes during installation.
4. Install Metal Drip Cap Flashing
Now add a metal drip cap on the wall just under the window or where the wall meets stone. This metal piece helps guide water away from the wall and keeps it from getting behind your siding. Nail the flashing so the corners of the metal sit over any stone or brick areas. Then pull the Tyvek over the flashing and tape over all the seams.
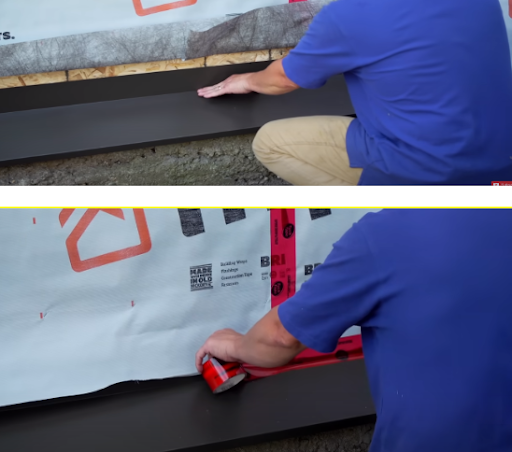
Figure 2
5. Install Window Frame and Cap
Now, put the window frame back into place and secure it with nails according to the manufacturer’s instructions. Cover around the frame with more flashing tape according to the instructions explained in this article.
6. Start the Siding Installation
Start with the corners of the wall. Install vinyl corner posts where two walls meet. If you need to use more than one piece, just align them and nail both sides of the post to the walls. You don’t need to overlap them. Place one nail every four or five holes.
Then, install the starter strip or metal base sheet at the very bottom of the wall. This strip gives your first piece of siding something to hook onto. Once the starter is in place, take your first siding panel, lock it into the starter strip, and push the ends into the corner posts. When it’s snug and level, nail it to the wall. Again, no need to use every nail hole, just nail every 4 or 5 holes.
This detailed Vinyl Siding Installation Guide walks you through the process step by step.

Figure 3
7. Install J-Channels
Before you install siding around windows, it’s important to add J-channels around the edges of the window. J-channels are vinyl trim pieces that create a finished border and help catch and direct water away from the window, preventing leaks behind the siding.
Start with the bottom J-channel. Cut it to match the width of the window and notch the ends so they overlap slightly past the window edges. This allows the side J-channels to rest over the bottom piece. Install the bottom J-channel so the open side of the “J” faces up. Nail it just like siding, and never too tight.
Next, measure and cut the two side J-channels. These should be long enough to run from the bottom of the window to just above the top edge. The ends of the side pieces should sit on top of the bottom J-channel and under the top piece. Nail them in securely, leaving a small gap at the top for the upper J-channel to slide over.
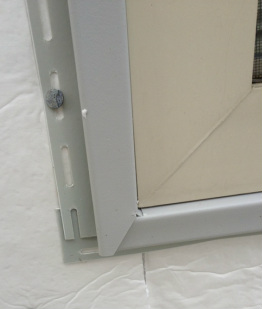
Figure 4
Finally, install the top J-channel. Cut it wider than the window so it overlaps the side J-channels. For extra protection, make small “ears” or flaps in the top piece that extend down over the side channels; this helps keep water from sneaking behind the trim. Nail the top J-channel in place, again leaving it slightly loose for expansion.
Make sure all four pieces are tightly fitted around the window, but with a little wiggle room where the siding will tuck in. Once all J-channels are installed, you’re ready to install siding around the windows.
8. Install Siding Around Windows
When you get near the window, you’ll need to measure and cut siding pieces to fit under and beside it. First, measure how far up the siding will go under the window, and cut your siding accordingly. Slide it into place, making sure it doesn’t push up under the window’s bottom edge. Nail it close to the edge of the window, but never under the bottom; this space must remain open for drainage.
If you have anything else on the wall, like lights, vents, or water spigots, you’ll need a vinyl mounting block. Start by attaching the lower half of the block to the wall. Then place the object on top of the block, seal around it with flashing tape, and cut your siding around the block. After you’ve nailed the siding around the edges, snap the top half of the mounting block into place to hide the seams.
9. Installing the Last Panel Under Soffit or Window Head
When you reach the top of the wall or the area just under a soffit or roofline, the final siding panel might not lock like the others. To fix this, screw a thin wood sheet (called a nail plate) to the wall. Slightly bend the edges of the siding panel inward so it fits tightly. Then, screw the final siding panel into the wood plate through the front face of the siding. This creates a clean, finished look.
Final Inspection Checklist:
- All window perimeters sealed with foam and membrane.
- House wrap overlaps by 6″ minimum.
- Bottom of windows left unsealed to drain.
- Siding edges lock tightly and are nailed properly.
- Obstructions are flashed and sealed.
- Final panel under window or soffit is securely fastened.
Pro Tips for Longevity:
- Never caulk the bottom edge of the window; let water out.
- Use stainless or galvanized nails to avoid rust stains.
- Always overlap flashing and wrap top-over-bottom like shingles.
- Don’t overtighten nails; siding needs room to expand/contract.
- Leave a ¼” gap between siding and trim (filled with J-channel or sealant if required).
Conclusion
Learning how to install siding around windows takes patience and careful work, but following the right steps will give you a watertight, professional-looking result that lasts. Always remember to let water drain from the bottom of the window, use caulk only in the right places, and build your layers from the bottom up.
Do you need help with your siding project or want it done by pros? Contact MatrixGC today for expert installation, repairs, or full exterior renovations. Schedule your FREE Consultation.


![Comprehensive Guide to Skylight Installation on a Roof Deck [2026 Guide]](https://matrixgc.com/wp-content/uploads/2025/06/Skylight-Installation-400x250.jpg)

0 Comments