Dupont Tyvek HomeWrap is a famous name in the construction industry. It is not just a simple covering; it is a critical component of any building’s exterior protection to protect your home from water and damage. Even though Tyvek installation might seem easy, the reality is that even the smallest mistakes can lead to water infusion and damage your property.
This article discusses common Tyvek installation mistakes people make when using Tyvek and how to fix them. Whether you are a professional builder or a DIY enthusiast, understanding how to use Tyvek HomeWrap is crucial to keeping your building safe from water and making it last a long time. Read this article before starting your installation!
1. Installing Tyvek at the Wrong Time
During Tyvek installation, timing is critical to avoid mistakes. It is important to install Tyvek HomeWrap at a specific stage during the construction process. Here’s when you should install it:
- After the roof sheathing is in place.
- After the step flashing
 and kick-out flashing
 are set up.
 - Before you put in the windows and doors.
2. Choosing the Wrong Type of Tyvek
Another common Tyvek installation mistake is choosing the wrong type of Tyvek. Not all Tyvek is the same. You should select one that fits your project. If you use the incorrect type, it may not function properly. So, make sure you pick the right Tyvek for your job to keep your home safe and dry.
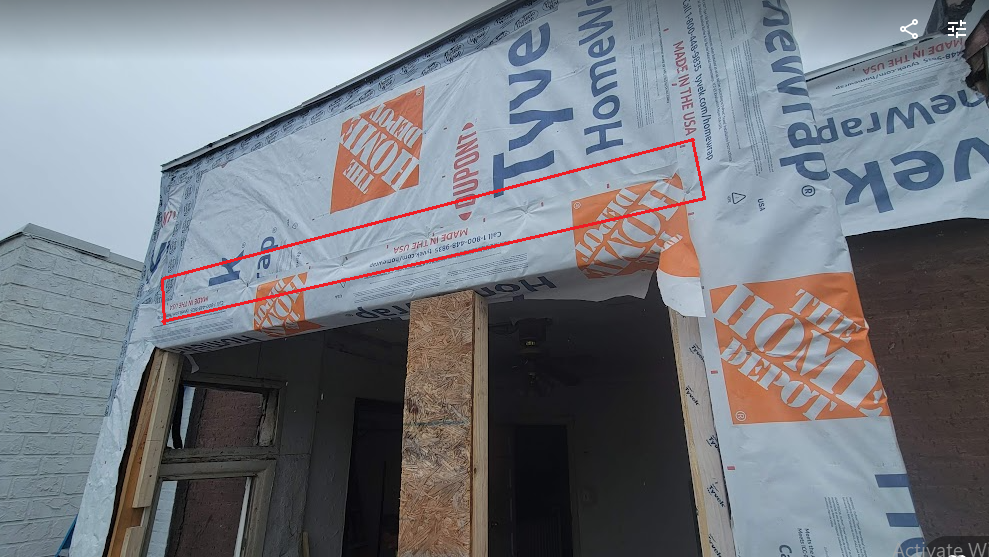
3. Failing to Consider Continuity
To install Tyvek HomeWrap correctly, you should start at the bottom and keep wrapping it all the way up. Each layer should overlap the one below by at least 6 inches. If this is not done correctly (see Figure 1), water can find its way in.
4. Not Properly Integrating Flashing
Another Tyvek installation mistake is not connecting it properly to the window and door flashing. Imagine Tyvek being a barrier that keeps water out, like a raincoat for your house. To ensure proper waterproofing, it is crucial to integrate it with window and door flashing to prevent water infiltration.
It is important to note that the first layer of Tyvek HomeWrap, at the top, should be placed underneath the roof’s drip edge. However, the lowest layer should be over the step flashing. This arrangement ensures that when water gets in, it will slide down the Tyvek paper and exit straight down at the bottom. This helps to keep your house dry and safe.
In Figure 2, the correct order is as follows:
The drip edge should be placed over the Tyvek layer.
The upper layer of Tyvek should overlap the layer below it.
The bottom step flashing should be placed over the Tyvek layer.
Figure 2

5. Skipping the Post-Installation Check
After you’ve wrapped your house with Tyvek, it’s important to double-check everything. Start by inspecting the roof to ensure that the installation is correct. Tyvek should act like a river, guiding water away from your home. If it’s not functioning properly, it could cause problems.
It’s advisable to inspect your work during rainy weather to ensure there are no leaks or water coming in. This way, you can catch any issues early and fix them before they become bigger problems. Remember to thoroughly check your Tyvek HomeWrap job after installation, especially during rainy weather.
6. Not Using Fasteners Properly
Using fasteners correctly will make your Tyvek HomeWrap stay securely in place. However, it is a detail that many people tend to overlook, yet it plays a vital role in the effectiveness of your Tyvek installation.
To get it right, position these fasteners along the vertical stud lines approximately 6 to 18 inches apart. But be careful not to put them within 6 inches of the sills and jambs (the bottom and side edges of your windows and doors) or within 9 inches of the top of your window openings.
It is crucial to use the correct type of fasteners as suggested by the manufacturer. Often, they will specify options like DuPont Tyvek Wrap Cap Nails, Screws, or Staples. You can also opt for equivalent fasteners from other brands that serve the same purpose. These small but vital details ensure that your Tyvek HomeWrap functions effectively.
7. Choosing the Wrong Window Flashing
It is important to use window flashing designed to work with Tyvek. If incompatible flashing is used, it does not fit well, especially in the corners. To make incompatible flashing work, you could end up folding and cutting multiple pieces like origami to fit around corners. This creates seams in different places, and where there are seams, water can find its way in.
To avoid this hassle and keep your home dry, it is best to go with a product like DuPont Flex Wrap. It works seamlessly with Tyvek, so you do not have to play around with folding and cutting. It easily fits around corners, helping you create a watertight barrier.
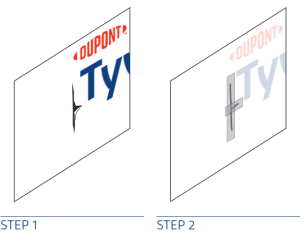
8. Taping Over Fasteners
When you attach Tyvek using fasteners, it might seem like a good idea to tape over them for better protection. However, this can create a problem. Taping over fasteners can allow water to sneak in and reach the fastener underneath. To avoid this Tyvek installation mistake, it is important to ensure that the fasteners are placed at least 6 inches away from any seams in the Tyvek. By doing so, you can prevent water from having a direct path to the fasteners, and keep them safe from damage.
9. Ignoring Damage
When installing Tyvek, it’s possible to come across small tears or holes in the material. While they may seem insignificant, they should not be ignored. Even the smallest holes can allow water to seep in, leading to significant issues.
To fix this, tape up all the tears. Use something like DuPont Tyvek Tape (2 or 3 inches wide) or DuPont Self-Adhered Flashing Products.
Figure 3
For holes larger than 1 inch, you might need to do a bit more.
Here is what to do:
- Cut a slit 2 inches above the hole, extending it at least 2 inches on each side of the hole.
- Measure and cut a piece of Tyvek to fit into the slit and cover the hole.
- Tuck the cut piece of Tyvek into the slit.
- Tape along the edges by starting at the bottom and folding the top tape over the bottom tape.
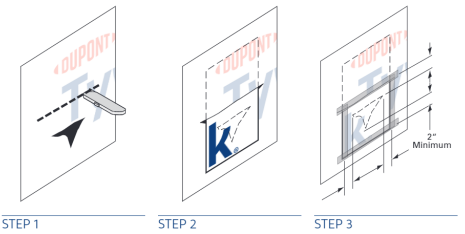
Figure 4
10. Ignoring the User Instructions
One of the simplest yet most common mistakes is ignoring the instructions that come with your Tyvek HomeWrap. When you get Tyvek, it usually comes with instructions on how to use it. Ignoring these instructions can lead to errors and reduce the protection Tyvek provides.
It is important to carefully read and understand the installation instructions included with your Tyvek HomeWrap. These instructions contain valuable information and tips to help ensure a smooth installation process and protect your home from water damage.
Conclusion
To sum up, Tyvek HomeWrap is an excellent material for waterproofing your building, but it must be used correctly to be effective. Tyvek installation mistakes can waste your time and money, and they may even cause significant issues for your property in the future. Therefore, it is crucial to carefully read and follow the instructions provided and avoid the mistakes we have mentioned based on our experience.
If you are uncomfortable handling Tyvek installation yourself, it is always a good idea to consult an expert. Our team at Matrix Company Solutions Corp. is here to support you at every stage of your home renovation project in the Philadelphia and South Jersey areas. Don’t hesitate to contact us for a FREE Consultation and Estimate. Your home’s protection is our priority.
Step flashing is a kind of flashing that is used to stop water from getting inside the walls where the roof and walls meet.
Kick-out flashing is like a slope or ramp that helps to move rainwater into the rain gutters.


Can tyvek tape be painted over?
Hi Kathy
Thanks for your comment. Yes, tyvek tape is paintable and compatible with many coatings and sealants. Ensure the tape is clean and dry, and use a compatible primer and paint for better adhesion. Note that its smooth surface may reduce long-term durability of the paint. Test a small area first for best results.
can you install tyvek weather protection over existing 15 pound felt paper on a vertical wall
According to the manual, you don’t have to remove the old building paper, but it’s not recommended. Leaving felt paper on reduces the wall’s breathability and can trap moisture, which risks mold and rot. The best practice is to remove it and then install Tyvek for better moisture management. However, if you insist on leaving felt on, as long as it is in real good shape, in most cases you would be fine.