Today, I’ll teach you how to fill large gaps correctly with caulk.
If you’ve ever done home renovations, you’ve probably encountered big gaps around windows, doors, bathtubs, or elsewhere. Initially, it might seem like a minor issue, but when you start filling it with caulk, you realize there’s a problem! Sure, caulk is excellent for sealing gaps, but how big of a gap can it handle? Can you fill a 1-inch gap with caulk? No! This article will elaborate on caulking tools and tips for adequately caulking large gaps.
Let’s get started!
How Big of a Gap Can You Fill with Caulk?
First, let’s address this question. If your gap is smaller than ¼ inch in depth and width, stop here and get the appropriate type of caulk to fill it.
But you’re dealing with a sizable gap if your gap is larger than ¼ inch. Caulking large gaps requires a different approach. Simply filling it with layers of caulk won’t cut it; it will shrink and crack over time. So, what’s the solution? Keep reading to find out!
You can’t rely solely on caulk when dealing with gaps more than a ¼ inch wide and deep. It would help to fill the gap with something else before caulking over it. The question is, what should you fill the gap with? There are two standard options for this purpose.
1. Caulking Large Gaps with Backer Rod Fillings
The first option for caulking large gaps is to use a backer rod to fill the gap and then caulk over it. The backer rod is a soft foam that goes inside the gap before you put the caulk on top. It helps keep the caulk from shrinking.
Here’s how it works:
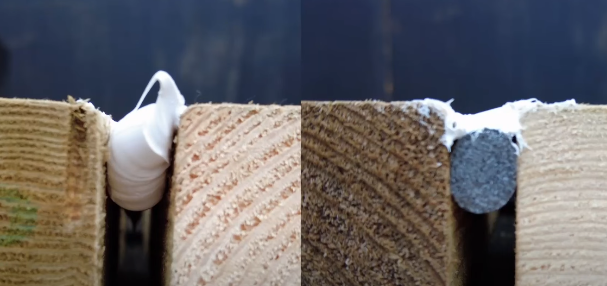
When you caulk, it should stick to the two surfaces you’re joining. The middle part of the caulk needs room to expand and contract. If it doesn’t have enough room, the caulk might pull away from the sides. If the caulk is too thick in the middle, it can’t expand and contract appropriately at the sides, which makes it come loose. The backer rod stops too much caulk from gathering in the middle.
Figure 1: Filling a large gap with and without a backer rod
Now let’s explain how to fill large gaps with backer rods:
Tools and Materials
- Backer rod
- Caulk gun
- Utility knife
- Sandpaper
- Caulk
- Caulk smoother or putty knife
- Painter’s tape
- Protective gloves and goggles
Installation
Step 1: Prepare the Area
Ensure the area is clean, dry, and free of debris. Using a utility knife or scraper, remove any old caulk or loose material from the gap. If necessary, sand the gap’s edges to create a smooth surface for better adhesion.
If desired, you can use painter’s tape along the gap’s edges to create clean lines and prevent excess caulk from spreading onto surrounding surfaces.
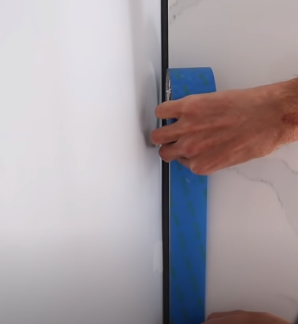
Figure 2: Covering the surface with painter’s tape
Step 2: Choose the Right Backer Rod
There are different types of backer rods. A closed-cell backer rod is used for filling large gaps outside, and small gaps that need water resistance, but only open-cell backer rods are used inside.
Also, make sure you pick the right size backer rod. It should be bigger than the gap so it fits snugly. Usually, the backer rod should be 25 to 50 percent bigger than the gap width.
Figure 3: Backer rod sizes

Step 3: Insert the Backer Rod
Start at the top of the gap and work your way down, putting the backer rod in the gap. Make sure the backer rod goes in evenly along the gap. It might shrink in weird ways and not lay flat if it’s not.
You don’t have to fill the whole gap with the backer rod. It should go in just enough so that when you put the caulk on top, it fills half the width of the gap.
You should use a special tool or a putty knife to ensure the backer rod goes in at the proper depth.
Trim off any extra backer rod with a utility knife.

Figure 4: Inserting the backer rod in the gap
Step 4: Get the Caulk Ready
Use a sharp utility knife to cut the caulk tube’s tip at a 45-degree angle with the opening facing down.

Figure 5: Cutting the caulk tube at a 45-degree angle
The caulk may have an inner foil seal you’ll need to pierce. Most caulk guns have a metal rod for this purpose. Otherwise, you can use a long nail to puncture the foil instead.
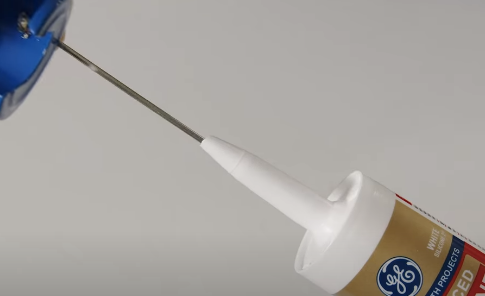
Figure 6: Puncturing the caulk tube inner foil
Press the release trigger on the handle and pull the plunger back. Then, insert the caulk into the gun.
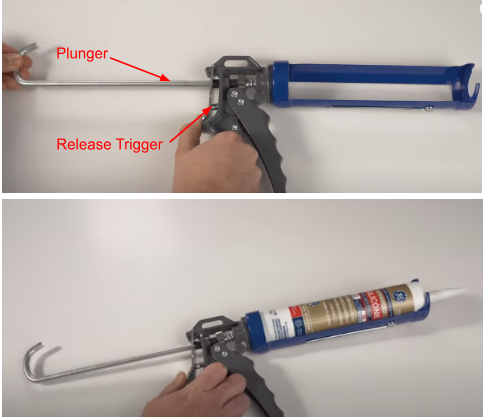
Figure 7: Inserting the caulk tube into the caulk gun
Step 5: Apply the Caulk
Start at the far end of the gap and squeeze the trigger to make the caulk come out.
Apply a bead of caulk over the filled gap, starting at one end and moving steadily along the length. Maintain a consistent bead size and pressure on the caulking gun for an even application.
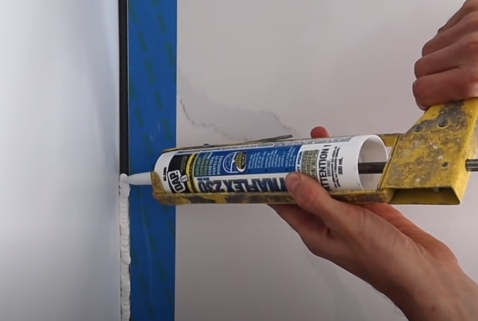
Figure 8: Applying caulk
Stop squeezing the trigger and twist the gun slightly to cut off the caulk when you reach the end.
Use your finger or a putty knife to smooth the caulk and make it slightly curved.
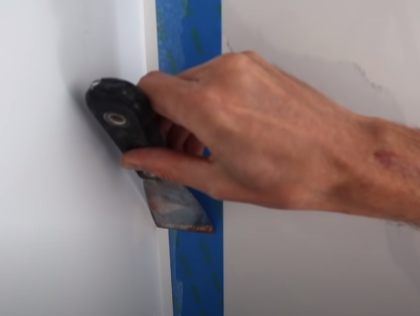
Figure 9: Smoothing the caulk with a putty knife
Step 6: Allow Caulk to Cure
Let the caulk cure according to the manufacturer’s instructions before exposing it to moisture or heavy use. The curing process typically takes 24-48 hours but may vary depending on the product and environmental conditions.
Step 7: Clean Up
Following the manufacturer’s recommendations, clean up any tools and materials with water or appropriate cleaning solutions.
Tips
- The backer rod should fit snugly in the gap. If it’s too small, use a bigger one.
- It’s best to use one long piece of backer rod instead of lots of small pieces. That way, the sealant will have good support and won’t squeeze out.
- Choose the correct type of caulk for your project. Ensure it’s compatible with the materials and conditions of your application.
- After a few days, check the caulk and see if it needs another layer to fill any gaps.
- Ensure the caulk overlaps both sides of the gap to create a complete seal.
- Once dry, remove the tape, and you can paint or finish the area as planned.
2. Caulking Large Gaps with Polyurethane Spray Foam Fillings
The next option for caulking large gaps is expandable polyurethane spray foam. This product is applied using a narrow straw and expands to fill larger gaps and holes. It’s suitable for sealing large gaps around openings and penetrations.
But how to fill large gaps with spray foam? Follow the below steps:
Tools and Materials
- Expanding foam sealant
- Caulk gun
- Utility knife or foam saw
- Sandpaper
- Caulk
- Caulk smoother or putty knife
- Painter’s tape
- Protective gloves and goggles
Installation
Step 1: Prepare the Area
Ensure the area is clean, dry, and free of debris. Using a utility knife or scraper, remove any old caulk or loose material from the gap. If necessary, sand the gap’s edges to create a smooth surface for better adhesion.
If desired, you can use painter’s tape along the gap’s edges to create clean lines and prevent excess caulk from spreading onto surrounding surfaces.
Step 2: Choose the Right Expanding Foam
Select an expanding foam sealant appropriate for your project. Ensure it’s suitable for filling large gaps and compatible with the materials involved.
Step 3: Apply Expanding Foam
Shake the can of expanding foam vigorously for about 30 to 60 seconds to ensure proper mixing.
Insert the nozzle into the gap and slowly squeeze the caulking gun’s trigger to fill the gap with foam. Start at one end and work along the length of the gap, ensuring even distribution.
Avoid overfilling the gap, as the foam will expand significantly. Leave some space for expansion. If unsure, start with a small amount and add more if needed.
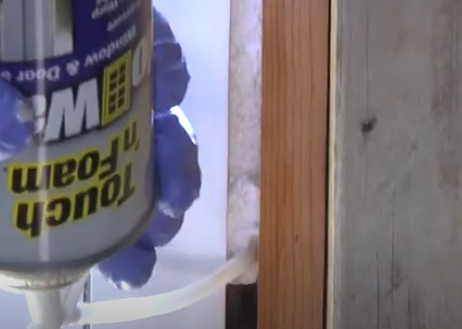
Figure 10: Applying expanding foam
Step 4: Allow Foam to Expand and Cure
Allow the foam to expand and cure according to the manufacturer’s instructions. The cure time typically takes several hours but may vary depending on the product and environmental conditions. Avoid touching or disturbing the foam during this time.
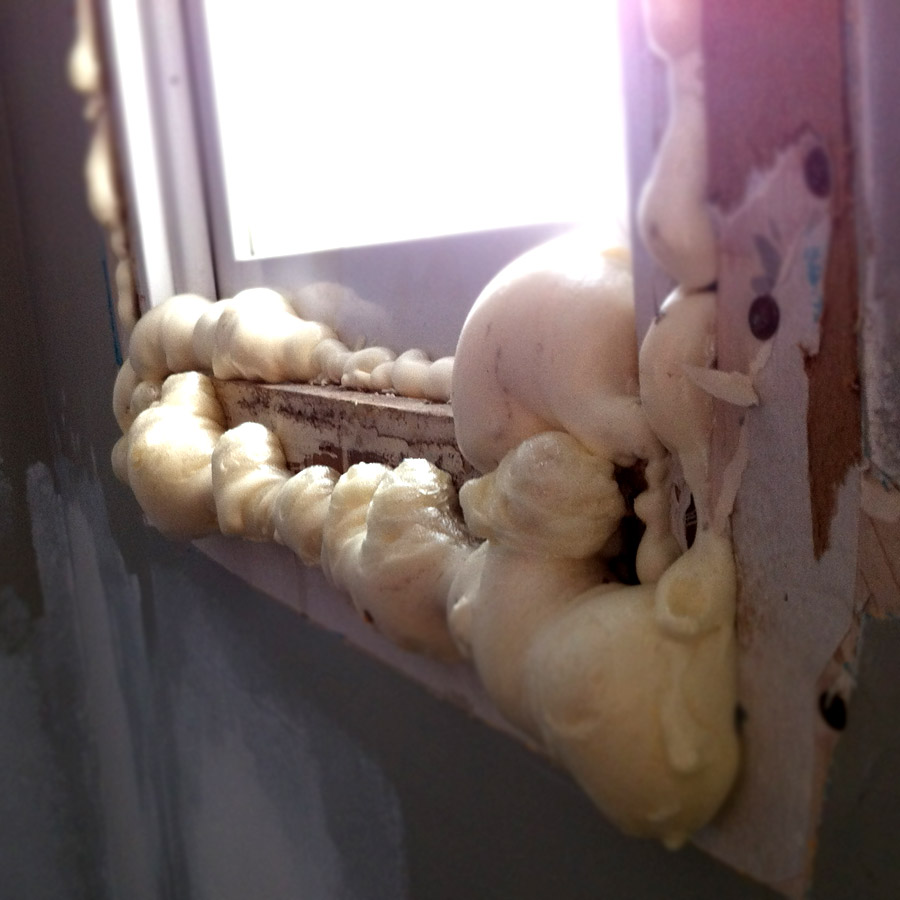
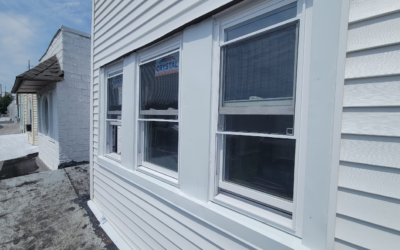
Figure 11: Cured and expanded foam around the window
Step 5: Trim Excess Foam
Once fully cured, use a utility knife or foam saw to trim any excess foam protruding from the gap. Cut it flush with the surrounding surface to create a smooth finish.

Figure 12: Trimming the extra foam
Follow the instructions outlined in Steps 4 through 7 from the preceding section.
Comparing Backer Rod to Spray Foam
Let’s compare the above-mentioned methods for filling large gaps with caulk to help you better decide which method to use.
Table 1: Comparison of backer rod with spray foam
|
|
Pros |
Cons |
|
Backer Rod |
|
|
|
Polyurethane Foam |
|
|
So the bottom line is:
- Polyurethane spray foam can be a good option if the gap is irregular and needs insulation and sealing. However, careful application and proper ventilation are crucial.
- A Backer rod is generally preferred for large gaps as it provides a controlled depth and reduces sealant usage. Choose a closed-cell backer rod for exterior applications and an open-cell for interior applications with good ventilation.
Conclusion
Thanks to the availability of new caulking tools and methods, caulking large gaps is no longer a significant concern. It’s generally best to avoid creating large gaps around openings, tiling jobs, and elsewhere. However, it’s only sometimes possible to do so. If you encounter a large gap, don’t panic and resist the urge to fill it with regular caulk. If you need experience with DIY projects, it’s best to seek professional assistance.
At Matrix Construction, we’re here to assist you with all your home improvement needs! We share our expertise in our blog to help everyone avoid costly mistakes in home improvement tasks. Please leave your feedback in the comments, and feel free to reach out for a FREE Consultation and Estimate!
Also, for experienced renovation contractors on Long Island who can help you with renovation projects, consider Creative Design Home Remodeling.


0 Comments