When you’re wrapping up a renovation or new construction, the final plumbing inspection isn’t just another box to tick; it’s the last safeguard between your work and potential future headaches. At Matrix Construction, we’ve learned that doing this inspection step by step saves time, money, and reputation. A good finish isn’t just about how things look; it’s about how they work behind the walls and under the sinks.
Let’s walk you through what a professional final plumbing inspection really looks like, straight from our on-site experience.
Step 1: Start with a Full Clean-Up
Before you inspect, clean everything: bathtub, sink, vanity, and countertops.
Why? Because dust, debris, and leftover materials can hide small leaks or imperfections. A clean space helps you spot problems right away and ensures that your inspection is 100% accurate. Besides, you want to make sure that once the homeowner steps into the house see everything clean and tidy.
Step 2: Check the Traps-P-Trap vs. S-Trap
This might seem like a small detail, but it makes a huge difference during your final plumbing inspection. One of the first things we always do at Matrix Construction is look under every sink and vanity to confirm that a P-trap is installed, not an S-trap. This simple check can mean the difference between a clean inspection and a costly callback.
Now, a lot of people assume that a P-trap must come directly out of the wall, and if it drops into the floor, it must be an S-trap. That’s not necessarily true. What defines a P-trap isn’t where it connects, but how it’s shaped and vented. A proper P-trap has a U-shaped bend followed by a short horizontal section (around four inches long) that connects to a vented drain line. That little horizontal section is what makes the “P”; it keeps air movement stable in the pipe and maintains the water seal.
An S-trap, on the other hand, loops straight down into the floor with no horizontal section. When water flows through it, it creates suction that siphons the water seal right out of the trap. Once that water seal is gone, you’ve got a clear path for sewer gases to escape back into the house. Besides the unpleasant smell, that’s a direct plumbing code violation, and it’s one of the most common reasons we see inspection failures on renovation projects.
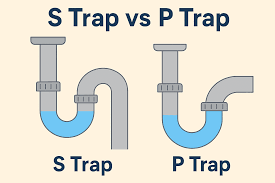
So, why is that little bit of standing water in the trap so important? It’s your natural barrier against sewer gases. Every time you use the sink, fresh water refills the trap and maintains that seal. But if the system isn’t vented properly or if it’s configured as an S-trap, that seal can break without you realizing it. The result? Odors, gurgling sounds, and, in worst cases, contaminated air coming up from the drain.
Step 3: Test Water Pressure and Temperature
Run every faucet in the house, kitchen, bathroom, laundry, and check that the water pressure is consistent and strong.
Next, make sure hot water reaches all faucets quickly. If there’s a delay, it could mean an airlock or a connection issue in the plumbing line.
This step might seem basic, but it’s often where hidden issues show up.
Step 4: Check for Leaks
Don’t just run the tap and glance under the sink. To properly check for leaks, do this:
- Put a cap in the sink or vanity so the water builds up.
- Let a good amount of water accumulate.
- Then lift the cap and let it drain fully.
- Immediately check under the sink or vanity, touching each pipe joint to make sure everything is dry.
Leaks often show up only under pressure; this method exposes them before your customer does.
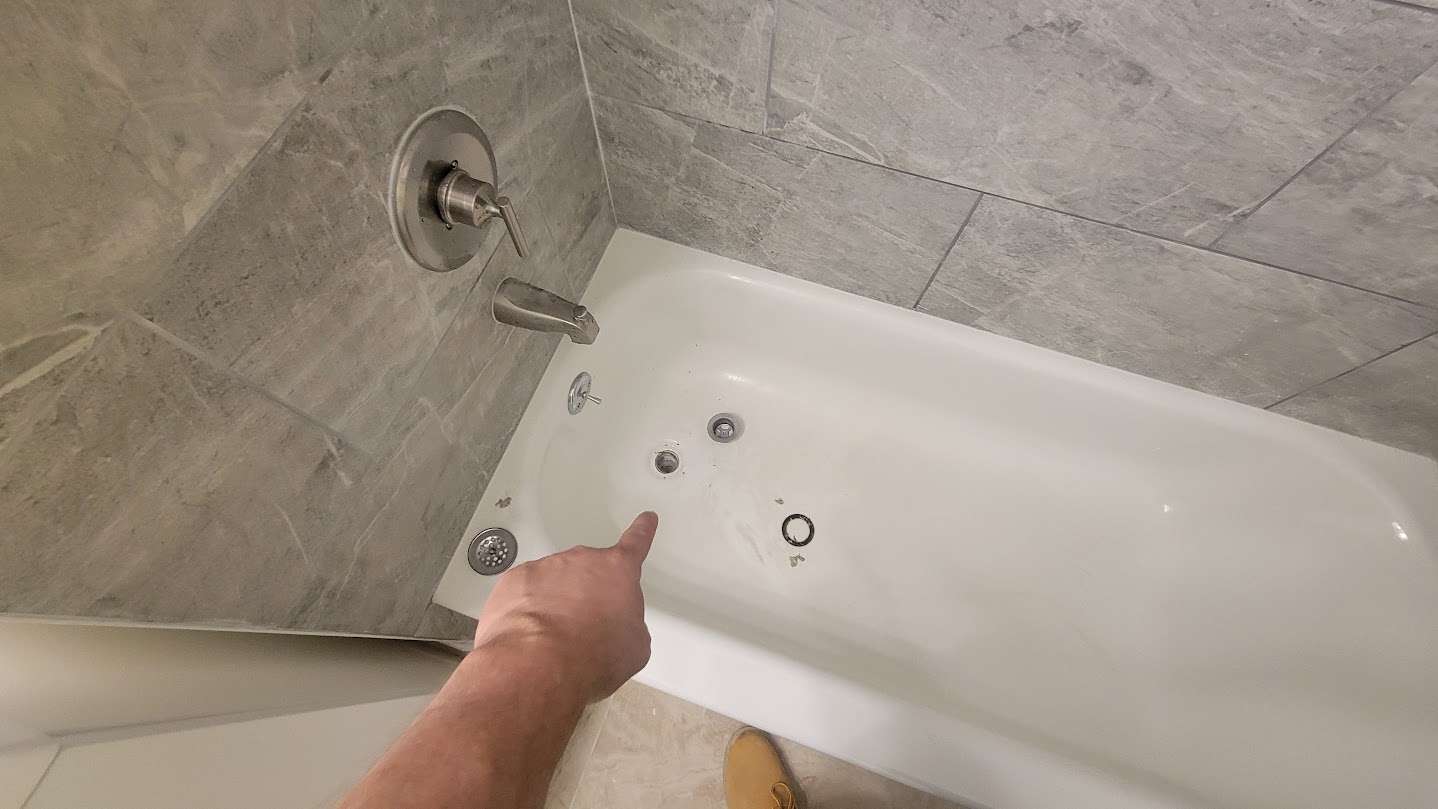
Step 5: Bathtub Leak Test
Here’s where field experience really matters.
Fill the bathtub all the way up; don’t stop halfway. Once it’s full, check the access panel behind the tub and make sure all the pipes are dry.
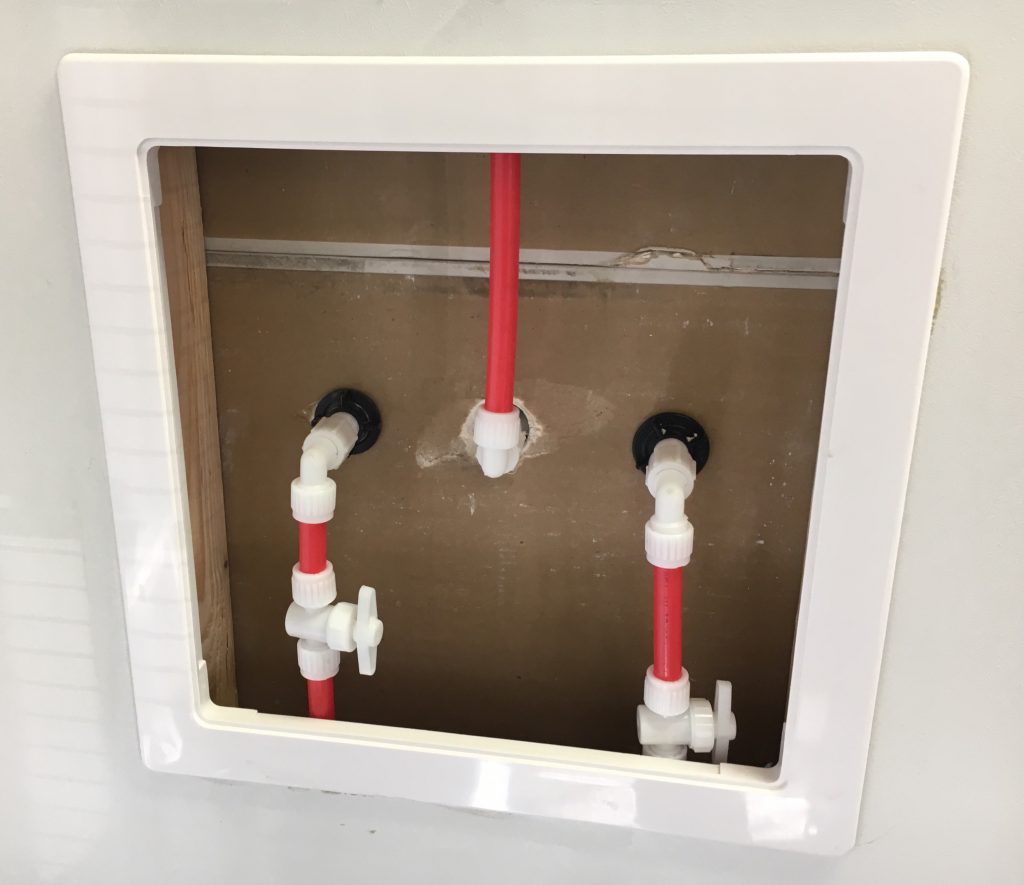
Next, let the water sit in the tub for a while, then check the ceiling below for any signs of leaks.
In one of our real projects, we actually found a leak through a light bulb on the ceiling below the bathroom. Turns out, the tub drain wasn’t installed properly. That’s the kind of issue you catch only with a full fill test.
Step 6: Test the Shower
Turn on the shower and check both pressure and flow. Make sure the diverter (if you have one) switches properly between the showerhead and tub spout.
A slow or uneven flow might point to mineral buildup or a valve issue that needs to be fixed before handover.
Step 7: Toilet Check
Finally, flush the toilet several times. Watch closely for:
- Proper flush and refill cycles
- No water leaking from the base or sides
- No rocking or shifting of the toilet base
A leak around the base can mean a poor wax ring seal, something you definitely want to fix immediately.
Inspect Everything, Not Just Plumbing
At the end of any renovation or construction job, it’s important to inspect every aspect of the project, not just the plumbing. You should go over electrical fixtures, finishes, flooring, doors, paint, and all the details that make the job complete.
However, we emphasize the final plumbing inspection for one simple reason:
Plumbing issues can destroy everything else.
A small leak under a vanity or behind a tub wall can silently damage fresh drywall, new flooring, or finished ceilings. By the time it shows up, it could ruin thousands of dollars’ worth of work.
That’s why, at Matrix Construction, once we’re 100% confident there are no leaks, we move on to everything else, knowing the rest of the job is safe.
Final Thoughts
A final plumbing inspection is your last chance to ensure the system is not just functional, but flawless. Taking the time to inspect each component carefully, from traps to tubs, reflects your professionalism and pride in your work.
At Matrix Construction, we treat every final inspection like it’s our own home. The goal is zero surprises, zero callbacks, and 100% client satisfaction.
Need a trusted team to handle your renovation?
Contact Matrix Construction today, where real experience meets quality workmanship.


![Philadelphia Sump Pump Installation Requirements [2026 Guide]](https://matrixgc.com/wp-content/uploads/2025/06/Philadelphia-Sump-Pump-Installation-400x250.jpg)
0 Comments