If you are looking for an easy way to waterproof the shower floor of your bathroom and eliminate moisture problems, the Schluter Kerdi Shower Tray may be the solution you have been looking for.
Water damage is a serious problem for most homeowners. It can cause mold, mildew, and structural rot, costing you thousands to repair and even more to replace structural elements like floor joists or ceiling supports. In most homes, the bathroom tends to be the room most prone to water leaks. With proper waterproofing techniques and materials, however, you can effectively prevent leaks from causing damage, ensuring your bathroom is waterproof for years to come.
The previous articles explained how to waterproof the bathroom floor using Schluter Ditra Underlayment and how to waterproof the walls around the bathtubs and shower pan using the Kerdi Board Kit. The following article presents a method to waterproof the shower floor using the Schluter Kerdi Shower Tray.
What is a Schluter Kerdi Shower Tray?
A Schluter Shower Kerdi Tray is a lightweight prefabricated sloped shower tray made of expanded polystyrene. These trays waterproof the shower floor and also create a perfect subfloor for tiling. Using a Kerdi Tray eliminates the need for a mortar bed, making waterproofing the shower floor quicker and easier than ever before. The only thing you need to do is to clear the subfloor, apply mortar, and put the Kerdi Tray in place.
Tools and Materials
· Kerdi Band
· Kerdi Kereck Preformed Corners
· Kerdi Shower Tray
· Kerdi Shower Curb (Kerdi Board SC)
· Kerdi Drain
· A ¼ inch x ⅜ inch square or V-notched trowel
· Utility knife
· Sponge
· Level
· Unmodified/Schluter mortar
· Tape measure
Step 1: Prepare the Subfloor
When using a Schluter Kerdi Shower Tray for the floor, you do not need to build a mortar bed; you can install the tray directly on the wood subfloor. These trays are sloped, and all you have to do is ensure that the wood subfloor is clean and even before installing the tray on it. It is important to make sure the floor is level and clean by using a damp sponge over the area. (see figure 1).
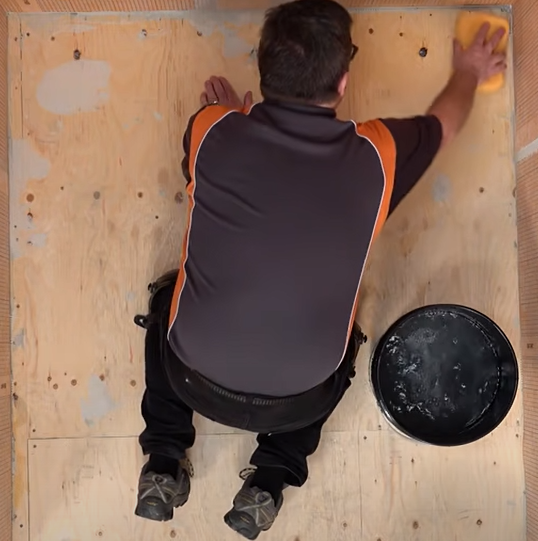
Figure 1
Step 2: Install the Shower Tray
Shower trays come in different sizes and types. Choose the one that fits your shower floor using the provided Brochure.
- Measure the shower floor and cut the shower tray to size if required using a utility knife.
- Apply a thin layer of mortar to the subfloor with the flat side of the trowel.
- Comb additional mortar using the notched side of the trowel in straight lines to ensure a strong bond between the substrate and tray. (see figure 2)
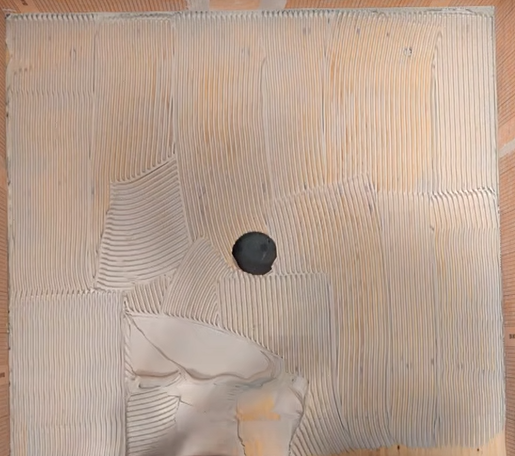
Figure 2
- Place the shower tray and embed it in the mortar.
Figure 3
Step 3: Waterproof Joints and Edges
To make sure that the entire surface is completely waterproof, you must seal all the joints and edges. To do so, follow the below steps:
First, start by installing the Kerdi Kereck inside the corners.
- Using the flat side of the trowel, apply thinset mortar to the area where the Kerdi Kereck is to be installed. Then, comb additional mortar using the notched side of the trowel.
Figure 4
- Embed the Kerdi Kereck to the mortar at the corner using the flat side of the trowel or a drywall finishing knife. (see figure 5)
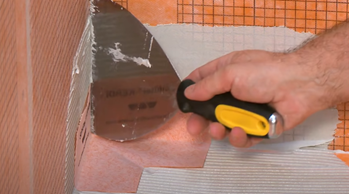
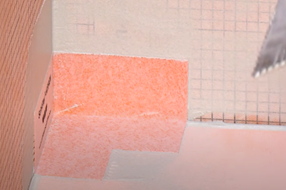
Figure 5
- Repeat this process for all the inside corners.
- Install Kerdi Band along the perimeter of the shower tray. Cut the Kerdi Bands to size. Remember that the Kerdi Bands should overlap by two inches at all joints.
A two-inch overlap can be achieved at the Kerdi Kereck corners without continuing Kerdi Band into the corner. This will prevent the build-up of membranes in these areas and make it easier to install small tiles. (see figure 6)
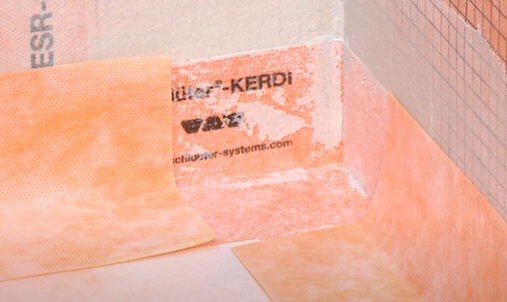
Figure 6
- Using the flat side of the trowel, apply thinset mortar to the area where the Kerdi Band is to be installed. Then comb additional mortar using the notched side.
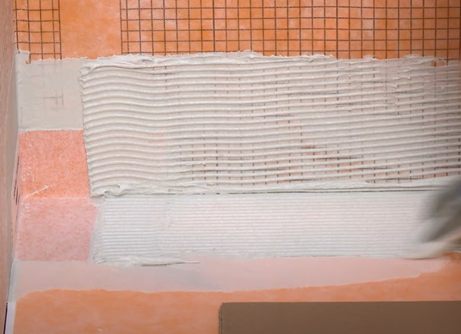
Figure 7
- Remember to fold Kerdi Band before placing it. Then, embed the Kerdi Band into the thinset mortar using the flat side of the trowel or a drywall finishing knife, apply pressure using a float, and remove excess mortar.
- Repeat this process for all the joints ensuring that the minimum two-inch overlap is achieved at all the transitions.
Step 4: Install the Kerdi Drain Flange
If there is no access to the plumbing from below, you should install and connect the Kerdi Drain to the waste line before installing the shower tray. In this example, we will discuss how to install the drain after installing the tray.
- Apply thinset mortar around the entire drain hole up to the subfloor cutout and install the Kerdi Drain bonding flange. (see figure 8)
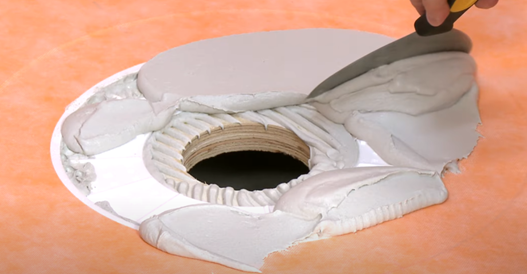
Figure 8
- Press the Kerdi Drain firmly into the mortar to ensure the flange is completely bonded. (see figure 9)
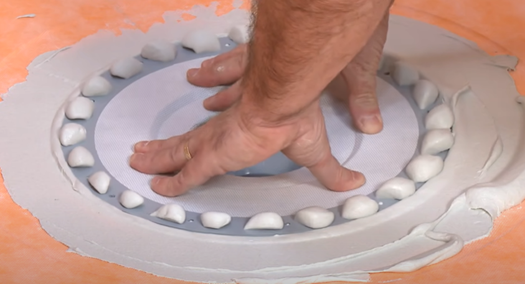
Figure 9
- Make sure that the flange is completely level (see figure 10).

Figure 10
- Using the trowel’s flat side, apply thinset mortar over the bonding flange and within the recessed area of the shower tray surrounding the drain. Then, comb additional mortar using the notched side of the trowel.
- Place the included Kerdi Collar over the Kerdi Drain, embed it with the trowel’s flat side or a drywall taping knife, and clean away the excess mortar.
Step 4: Install the Curb
For the shower curb, you can build it the traditional way, such as making it out of wood or concrete, before installing the Kerdi Tray. However, this article suggests using a prepared Kerdi Shower Curb, which is much easier and quicker than building a traditional one.
For installing the Kerdi Board SC for the curb, you can use any of the Schluter or an unmodified thinset mortar similar to the one used for the Kerdi-Shower Tray.
- Cut the curb to size using a utility knife. (see figure 11)
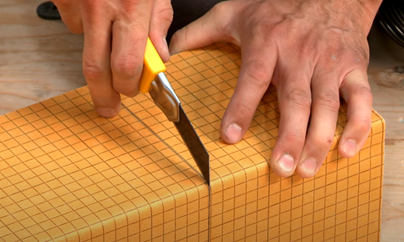
Figure 11
- Apply mortar everywhere the curb will be attached, including the subfloor, edge of the shower base, and walls using the flat side of the trowel and comb the excess mortar with the notched side. (see figure 12)

Figure 12
- Press the curb firmly into place and make sure it is level. (see figure 13)
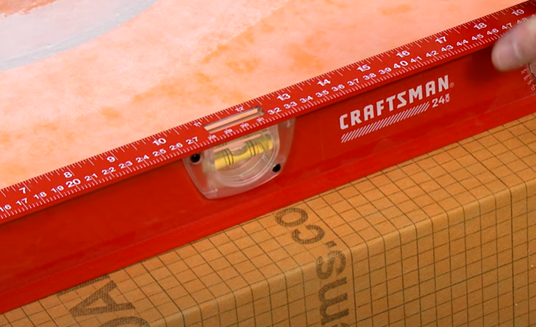
Figure 13
- Seal the inside corners of the curb using the Kerdi Kereck and the inside edge using the Kerdi Band, as described earlier. (see figure 14)
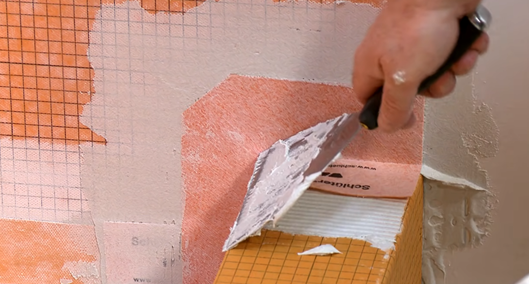
Figure 14
There you have it, the shower floor of your bathroom is entirely waterproof. For waterproofing the rest of your bathroom floor, you can use Schluter Ditra Underlayment (link to the previous article). This underlayment can be sealed to the Schluter shower system to give you complete bathroom waterproofing.
Before installing the tile, we recommend doing a water test to ensure a successful waterproofing installation. Also, install the grate assembly drain cover in conjunction with the tiles to make sure that the grate is flushed with the tiles.
The Bottom Line
The Schluter Kerdi Shower Tray for waterproofing the shower floor is one of the best systems today. Better yet, it is relatively easy to install and will last a long time If you install it carefully and according to the instructions. Ultimately, if you are planning a bathroom renovation and want a shower you can use without worrying about water damage, using this method to waterproof the surface beneath the tile is your best bet.
Waterproofing the shower floor is just part of the process when renovating your bathroom. If you are planning a renovation project, consider getting help from professionals. Matrix Company Solutions Corp. will assist you in turning your Philadelphia area house into your dream home. Feel free to contact us. We are here to help with your home renovation project.


0 Comments