In this article, we are going to talk about skylight installation and its transformative benefits.
Skylights have become an increasingly popular choice for homeowners who want to bring more natural light into their homes, enhance the aesthetic appeal, and improve energy efficiency. Whether you’re installing a skylight in a residential property or considering it as part of a renovation project, understanding the types of skylights, their installation methods, and specific considerations for different types of homes is essential.
This article covers:
- Types of skylights and when to use them
- Benefits of installing a skylight
- Common skylight installation methods
- Step-by-step guide to skylight installation on a roof deck
Let’s get started!
Types of Skylights and When to Use Them
Skylights come in various shapes, sizes, and materials, making them adaptable to different architectural styles and specific needs. Let’s explore the most common types of skylights and the best situations for their use:
1. Fixed Skylights
Fixed skylights are the simplest type of skylight. They are non-operable, meaning they do not open or close. These skylights are perfect for letting in natural light in areas that don’t require ventilation. Homeowners often use fixed skylights in spaces like hallways, bathrooms, and stairwells where ventilation isn’t necessary, but light is desired.
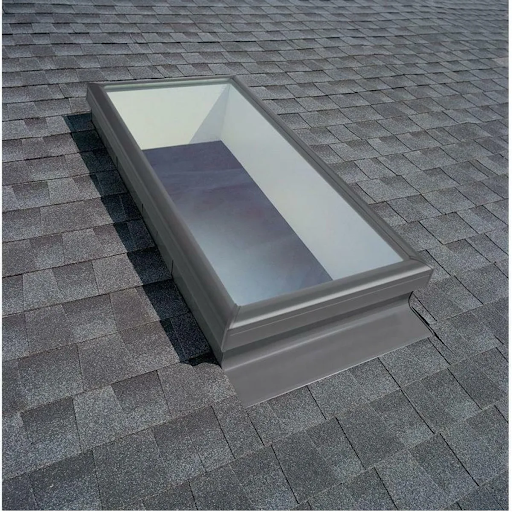
Figure 1: Fixed Skylight
2. Ventilated Skylights
You can open skylights manually or automatically to allow for ventilation. This feature makes them ideal for rooms that tend to get stuffy, such as kitchens, bathrooms, or laundry rooms. Ventilated skylights can help reduce moisture build-up, odors, and improve airflow.
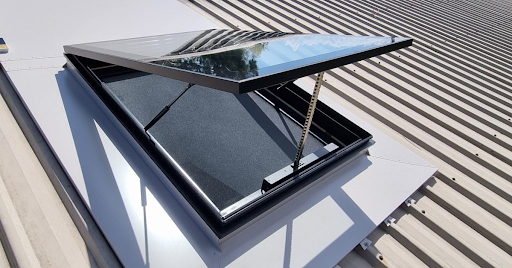
Figure 2: Ventilated Skylight
3. Tubular Skylights
Tubular skylights, also known as sun tunnels, are a compact version of traditional skylights. They use a reflective tube to channel light from the roof to the interior of the home. These are perfect for areas that have limited roof space or in smaller rooms like closets, corridors, or bathrooms.
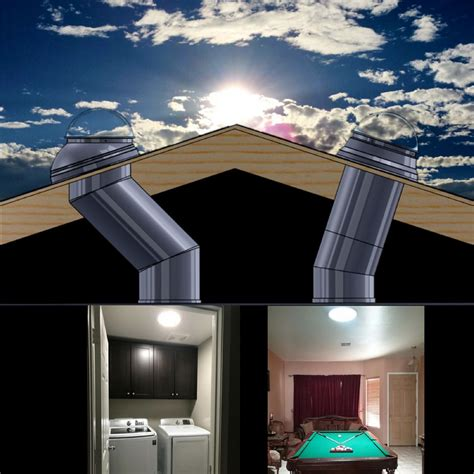
Figure 3: Tubular Skylight
4. Curb-Mounted Skylights
Curb-mounted skylights are commonly used in flat-roofed homes or buildings. These skylights are installed above a raised curb on the roof, creating a sealed environment that allows for more flexibility in positioning, especially when dealing with varying roof pitches or flat surfaces.
5. Dome Skylights
Dome skylights are made of acrylic or polycarbonate and are designed to shed water and snow more effectively than flat skylights. They are often used in areas with significant weather concerns, like areas that see heavy rain or snow.
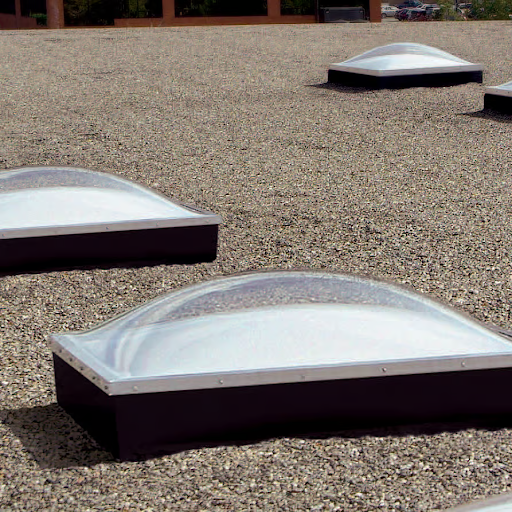
Figure 4: Dome Skylight
Benefits of Installing a Skylight
Skylights bring numerous benefits to a home, making them a great investment for many homeowners. Below are just a few of the benefits that can be gained from adding a skylight:
1. Natural Light
The most obvious benefit of installing a skylight is the influx of natural light it provides. Natural light has been shown to improve mood, productivity, and overall health by reducing stress and providing vitamin D. Skylights brighten up a room without the need for artificial lighting, reducing energy consumption.
2. Energy Efficiency
Skylights can also help with energy efficiency by reducing the need for artificial lighting during the day. High-quality, well-insulated skylights can help maintain indoor temperatures, keeping homes cooler in the summer and warmer in the winter. This can lead to reduced energy bills.
3. Improved Ventilation
In ventilated models, skylights allow hot air to escape, improving airflow and ventilation in a home. This is particularly useful in spaces like kitchens and bathrooms that tend to accumulate moisture and heat.
4. Aesthetic Appeal
Skylights can enhance the overall design of your home. Whether you have a modern or traditional space, a well-placed skylight can make a room feel more open and airy. It also adds architectural interest and increases the value of your property.
Common Skylight Installation Methods
There are a few different methods for installing a skylight, each depending on the type of roof and skylight. Let’s break them down:
1. Roof Curb Installation
Contractors commonly use roof curb installation for skylight installation, particularly in flat-roof homes or homes with a pitch. This method involves raising the skylight above the roofline using a wooden curb, which creates a base for the skylight frame. This setup makes the skylight more secure and weatherproof.
2. Deck-Mounted Installation
Deck-mounted skylights are ideal for sloped roofs, particularly gable or hip roofs. Instead of being raised above the roofline, the skylight is mounted directly to the roof deck. This method is more suitable for homes with a steep pitch and provides a more integrated look with the existing roofing system.
3. Tubular Skylight Installation
Tubular skylights require a different approach since they use a reflective tube to channel light from the roof to the room. The process involves cutting a hole through the roof and ceiling and installing the tube, which is then connected to the skylight on the roof. This method is ideal for smaller rooms where traditional skylights might not fit.
Step-by-Step Skylight Installation
For this specific project, we’re going to focus on a curb-mounted skylight installation on the roof deck in a Philadelphia row house. This type of installation is ideal for Philadelphia row houses, where a flat roof is typical. These homes often have limited natural light, and skylights can transform these darker areas into brighter, more welcoming spaces. Also, people can access the roof deck using this skylight. The skylight we used was Model 3690 – Inside Curb Rough Opening: 30.75 x 84.5 from Dayliter Skylights.
Let’s walk through the entire installation process step by step.
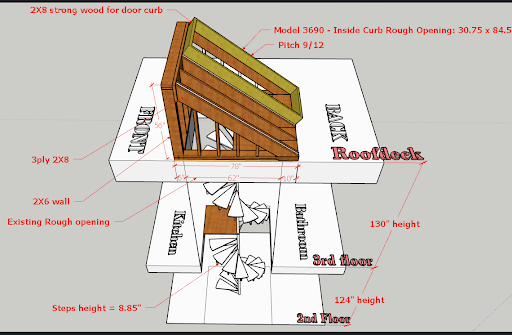
Figure 5: Curb-mounted skylight installation on a roof deck in a Philadelphia row house
1. Mark the Existing Opening
Before starting the installation, you’ll need to mark the location of the skylight on the roof. Begin by measuring and identifying the rough opening. The dimensions of the opening in this project are 62” x 62”, which matches the specifications of the skylight door model we are using. Using a tape measure and a pencil, mark the outline of the opening on both the roof deck and the ceiling below.
2. Frame the Base
Once the opening is marked, the next step is to frame the base of the skylight. This involves installing 2-ply 2x6s and 2-2x12s as base framing. These will form the foundation for the skylight curb, providing support and ensuring the structure remains secure. Make sure that the framing is level, square, and properly aligned.
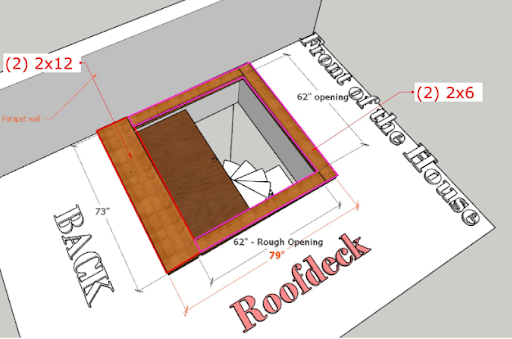
Figure 6
3. Install the Walls
Now, you’ll need to build the front and side walls for the curb of the skylight. Use 2x6s for the front wall frames. The back side of the curb wall should be 56 inches high to create the necessary slope for the skylight. You should construct the side walls based on the skylight’s model specifications to ensure the fit is perfect.
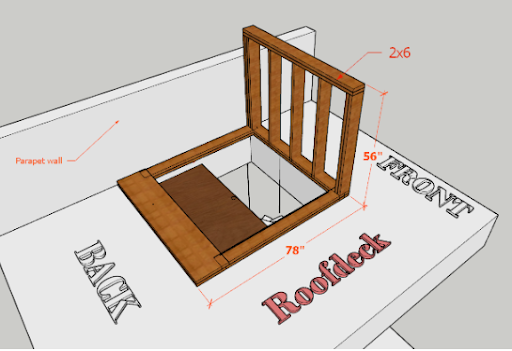
Figure 7
4. Add Reinforcement
To ensure that the framing area is strong enough to support the weight of the skylight, reinforce the framing with 3-ply 2x8s. These should be installed around the base of the skylight and should be secured tightly to the surrounding structure. Reinforcement helps prevent sagging or warping of the skylight structure over time.
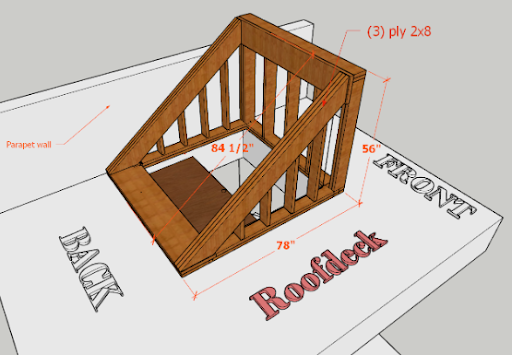
Figure 8
5. Install Roof Rafters
Install the roof rafters using a 9/12 pitch to create the desired slope for the skylight. These rafters will help support the pitched roof above the skylight. The pitch should align with the roof’s existing slope, allowing for efficient water runoff and preventing leaks.
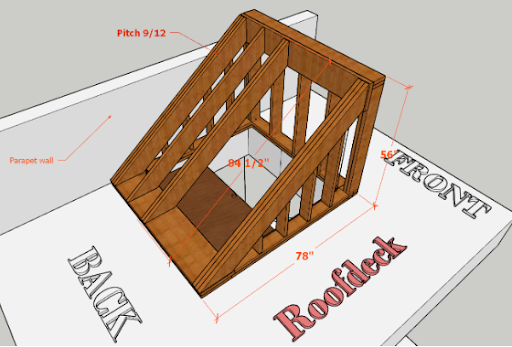
Figure 9
6. Install the Door Curb
The door curb is the platform on which the skylight door will sit. Use 2×8 strong wood for this structure to ensure it is sturdy and durable. You need to install the curb securely, as it serves as the foundation for the entire skylight assembly.

Figure 10
Pay attention to the curb details below.
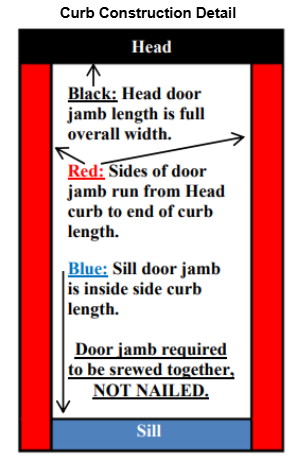
Figure 11
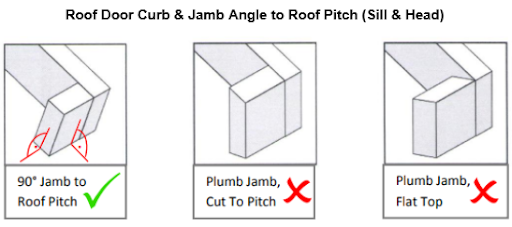
Figure 12
7. Install Plywood Sheathing
Once the framing and curb are in place, cover the structure with ¾” exterior-grade plywood or Zip wall sheathing. This will form the outer shell of the skylight installation, providing a solid and stable surface for the membrane wrapping.
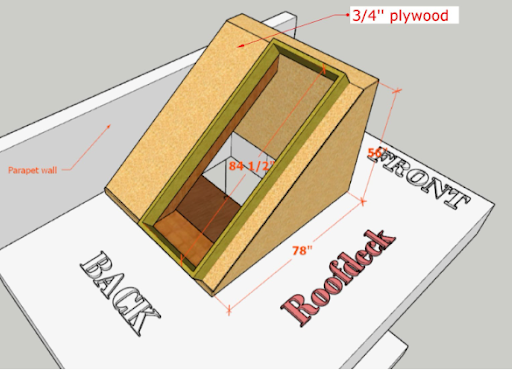
Figure 13
8. Apply the Wrapping Membrane
To protect the framing and skylight from water penetration, apply a Tyvek membrane to wrap around the framing and the door jamb. Follow the manufacturer’s instructions for Tyvek installation. This membrane creates a water-resistant barrier and ensures the skylight is fully sealed against the elements.
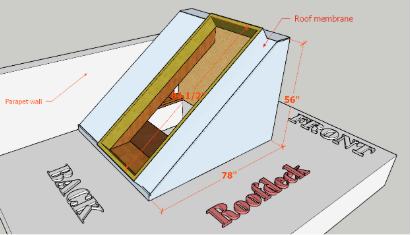
Figure 14
9. Flash the Door Jamb
Use 1-3/4” wide flashing around the door jamb. This flashing should be installed securely to ensure that water cannot seep through the edges of the skylight. Flashing helps direct water away from the skylight and prevents leaks.
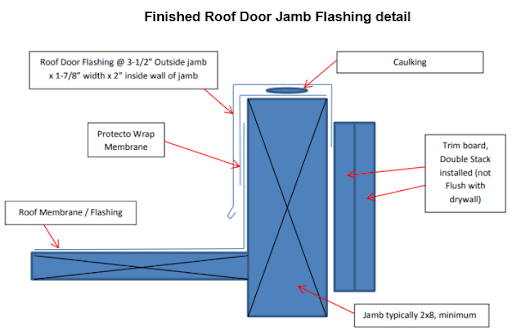
Figure 15
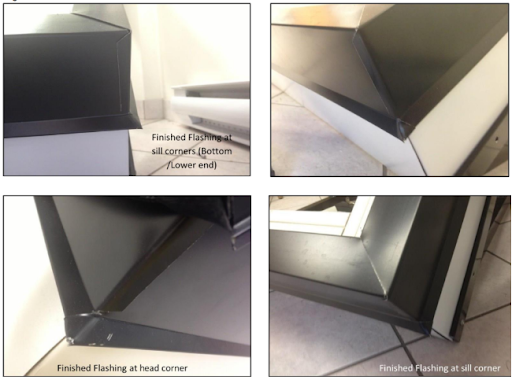
Figure 16
10. De-glaze the Roof Door
Before installing the roof door frame, remove the screws to de-glaze the door. This step allows you to work with the frame before it is permanently sealed.
11. Install the Roof Door Frame
Next, install the door frame for the skylight. This frame should be reinforced at the hinges to ensure the door opens and closes smoothly. Predrill hinge holes through the steel flashing and into the jamb, then attach the hinges using 10×2” screws.
12. Reglaze the Door
Once the door frame is in place, re-glaze the door by aligning the drilled holes around the cap with the inside vinyl frame holes. This ensures the door is properly sealed and secure.
13. Prop the Door Open
Use a 2×4 to prop the skylight door open. The 2×4 should be cut to a height of 80” to create a clear opening from the top of the step-out to the glass of the open door.
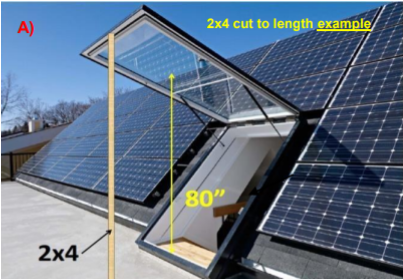
Figure 17
14. Determine Piston Location
Locate the position of the piston and screw the main bracket into the wall. The starting point for this is typically around 14” from the head and 3” below the door jamb edge. Test the position by moving the roof door up and down, ensuring the pistons are positioned perpendicularly to the door.
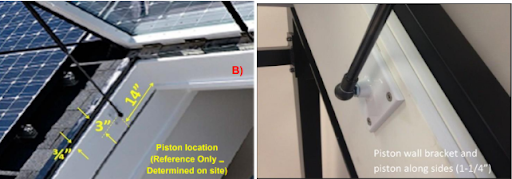
Figure 18
15. Install Trim Board
Install a double stack of 5/8” x 5-1/2” white trim boards to complete the interior finish of the skylight. The trim board should rest inside the jamb, leaving a ¾” gap from the top of the jamb.
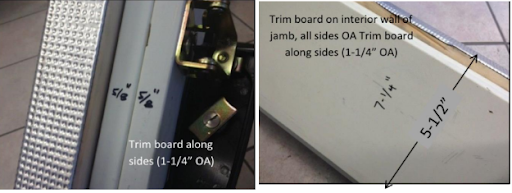
Figure 19
16. Install Locks and Shims
Install the locks in the standard location, 24” up from the bottom of the jamb opening, and add shims as needed for alignment.
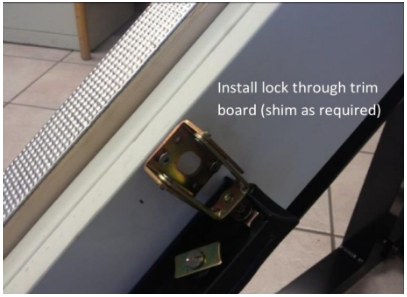
Figure 20
17. Install Handle (if required)
If your skylight door has a handle, drill a 9/64” hole and attach the handle using #10×2-1/2” SS FH SMS screws.
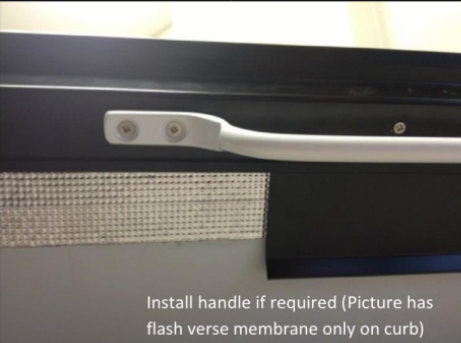
Figure 21
18. Install Siding and Flashing
Complete the installation by adding siding to the walls and applying flashing to the sloped surface for additional protection against the elements.
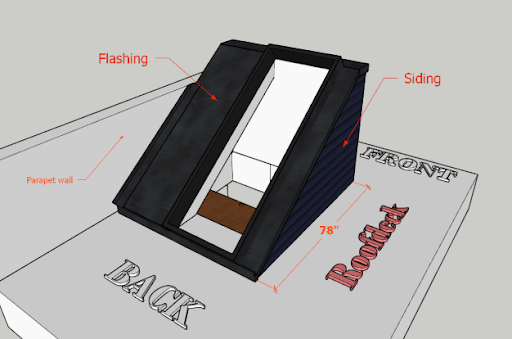
Figure 22
Conclusion
Skylight installation can bring both beauty and functionality to your home. With a proper understanding of the steps and methods, you can achieve a flawless installation. This guide has provided a detailed step-by-step approach to installing a curb-mounted skylight in a Philadelphia row house with a flat roof, ensuring a secure, weatherproof, and visually appealing addition to your home.
If you need renovation or addition services in Philadelphia or South Jersey, contact us via our FREE Consultation form.


0 Comments