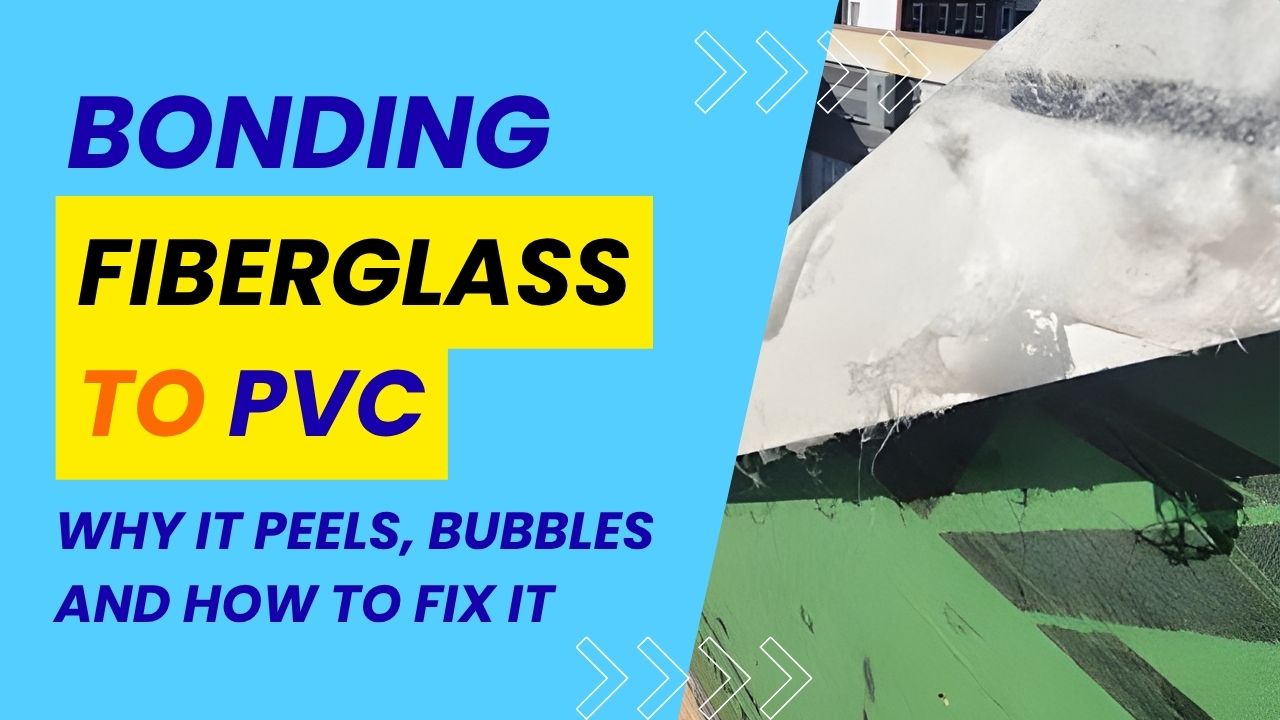
Bonding fiberglass to PVC can easily be a serious problem if you don’t know how to do it correctly. PVC is a plastic that resists chemical bonds with common fiberglass resins, which are typically polyester or epoxy-based. Fiberglass consists of glass fibers, not a bonding agent itself, and the resin doesn’t create a chemical bond with the PVC’s surface. So if you want to apply fiberglass to PVC sheets, you need to follow the steps to make that bond happen. This article is based on Matrix Construction’s experience with fiberglass to PVC adhesion. Thus, if you are looking for some practical advice, read on!
Why Do You Need to Attach Fiberglass to PVC?
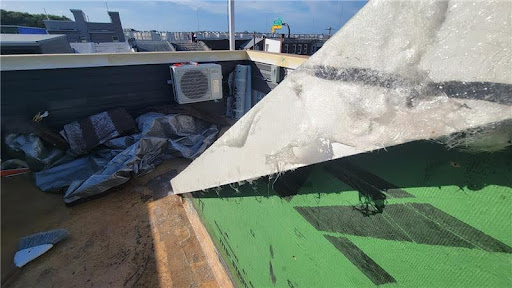
There are a lot of situations where this comes up. Sometimes it’s bonding fiberglass to PVC pipes for added strength or durability, other times it’s laminating fiberglass sheets over PVC panels for waterproofing, roofing, or exterior protection. In our situation, we were building a third-floor addition on a Philadelphia row house. The project included a deck and a pilot house, and we decided to cover the pilot house roof with PVC sheets. We then applied fiberglass and resin over the PVC as part of our waterproofing and durability strategy. On paper, it seemed like the perfect combination; PVC providing a smooth, stable base and fiberglass offering strength and weather resistance. But the reality was a little different… At first, everything seemed fine. The fiberglass adhered well to the PVC, and the resin applied smoothly. However, over time, we noticed some troubling signs: the resin took much longer to dry than we expected. Worse yet, as it began to cure, we noticed the fiberglass started to bubble and peel off the PVC surface. This issue created a major headache and slowed down the progress of the project.
Why is Bonding Fiberglass to PVC Difficult?
So, why did this happen? Bonding fiberglass to PVC isn’t as straightforward as it sounds. While PVC can provide a solid base, it’s a slick, non-porous material that can be challenging for resins to bond with. Without the right prep work, resin can have trouble adhering to the surface, leading to peeling, bubbling, or even complete detachment. Additionally, the environment played a big role. The temperature, humidity, and resin application process all affected how well the bonding took place.
How to Bond Fiberglass to PVC Properly
Bonding fiberglass to PVC can be a bit tricky, but with the right approach, it’s possible to get a strong, durable bond. Whether you’re working on a home addition, a boat deck, or any other project that requires fiberglass over PVC, here’s everything you need to do it the right way.
Tools and Materials
Before you begin, gather these tools and materials to ensure a smooth process:
-
- Filler (Short-strand fillers like Napa Pro Strand)
- Epoxy Resin (West System 105-A Epoxy Resin)
- Primer (TotalBoat-439901 TotalProtect Epoxy Barrier Coat System)
- Thinner (TotalBoat Epoxy Primer Thinner 200)
- Gelcoat (TotalBoat – 14308 Marine Gelcoat)
- Wax Additive
- Fiberglass Mat or Cloth
- Fine-Grit Sandpaper (180–220 grit) and Coarse-Grit Sandpaper (around 60 to 80 grit)
- Orbital Sander
- Electric drill-powered paint mixer
- Acetone
- Cotton Rags
- Paint Roller or Brush
- Grooved Roller
- Gloves and Protective Gear
- Measuring Cup
- Masking Tape and Plastic Sheets
- Deburring Tool or Utility Knife
- Heat Gun
Preparation
Proper preparation is critical for ensuring a strong bond between fiberglass and PVC. Here’s how to get started:
1. Sand PVC Rough Edges
Fiberglass does not adhere well to sharp corners because it has difficulty making the transition. To smooth rough PVC edges before applying fiberglass, start by trimming any jagged spots with a utility knife or deburring tool. Then, use fine-grit sandpaper (180–220 grit) or an orbital sander to sand the edges until they’re smooth and even.
2. Sand the PVC Surface
Sand the PVC surface using coarse-grit sandpaper (around 60 to 80 grit) or an orbital sander. The goal is to roughen the surface, creating micro-abrasions that allow the resin to adhere more effectively. Be sure to wear a mask while sanding to avoid inhaling dust.
3. Clean and Dry the PVC Surface
Use acetone to clean the surface of the PVC where the fiberglass will be applied. This removes dirt, oils, and any contaminants that could interfere with adhesion. The surface must be clean and, crucially, dry. A heat gun (like a Craftsman commercial-grade hair dryer) or even direct sunlight can be used to warm up the surface, which helps remove any moisture and warms the material in cooler temperatures. It’s important to move the heat gun continuously to avoid fire hazards
4. Filling Voids and Corners
Fill screw holes or any voids with a short-strand filler (e.g., Napa Pro Strand), ensuring a tight fill to prevent voids where the fiberglass would make contact. A bead of filler should also be applied to the inside corners to create a radius, as fiberglass does not like hard corners
5. Prepare the Fiberglass Mat or Cloth
Cut the fiberglass mat or cloth to fit the area you’re covering. It should be slightly larger than the surface area to ensure full coverage.
Installation Steps
Now that your surface is prepped, it’s time to apply the fiberglass and resin. Follow these steps carefully for the best results:
1. Mix the Resin
Follow the instructions on your resin packaging to mix the resin and hardener according to the manufacturer’s instructions. For the strongest bond to gelcoat, use this resin as follows: 3 parts resin to 1 part hardener ratio. Mix in small batches to avoid premature gelling.
2. Apply a Layer of Resin
Using a paint roller or brush, apply a thin layer of resin to the prepared PVC surface. Be sure to cover the entire area where you’ll be applying the fiberglass. Move the brush in multiple directions.
3. Place the Fiberglass Mat or Cloth
While the resin is still wet, carefully lay the fiberglass mat or cloth over the PVC surface. When applying multiple layers of fiberglass, stagger the widths of the strips (e.g., 9-inch, 8-inch, 7-inch) to create a smooth, gradual transition and avoid “hard points” where all layers end at the same place. For corners, avoid using one large piece of fiberglass, as it’s very challenging to make it conform without pulling. Instead, use multiple pieces.
4. Remove Air Bubbles
After applying resin and fiberglass, use a grooved roller with light pressure to work from the middle out, forcing out air bubbles. You can often hear a crackling sound as air is expelled. This process is crucial for preventing delamination and ensuring a solid bond.
5. Apply Additional Resin
Once the fiberglass is in place, apply more resin over the top. Use the paintbrush or roller to ensure the fiberglass is fully saturated with resin. Work in small sections to avoid the resin drying before you can apply it.
6. Allow the Resin to Cure
Let the resin cure completely according to the manufacturer’s instructions. Curing time can vary depending on the temperature and humidity, but it generally takes about 24 hours. Do not disturb the surface until the resin is fully set.
7. Apply Primer
Clean and degrease the application surfaces thoroughly. The product guide recommends cleaning with acetone and cotton rags, then sanding with 80-grit sandpaper to improve adhesion, and cleaning again after sanding. TotalProtect is a two-part system with a 3:1 mix ratio by volume (3 parts base to 1 part activator). The base is very thick, so it’s recommended to use an electric drill-powered paint mixer for thorough mixing. After mixing, allow an induction period of 15-20 minutes before thinning and application. TotalProtect is a thick coating that typically needs to be thinned to improve flow, especially for optimal application. Only use TotalBoat Epoxy Primer Thinner 200 for thinning TotalProtect; do not use other thinners, such as acetone, Goof Off, or denatured alcohol. Thinning with TotalBoat Epoxy Primer Thinner 200 can also help eliminate air bubbles and improve flow for brush or roller application, though it may increase cure time. Apply the primer using a brush (natural bristle), a roller (a 3/16″ nap or foam solvent-safe cover is recommended for best results), or a spray gun (airless, conventional, or HVLP). To create a watertight barrier, aim for a minimum of 8-12 mils Dry Film Thickness (DFT). This typically requires 4-5 coats when using a 3/16″ roller, 3-4 coats with a 1/4″ roller, or 2-3 coats with a 3/8″ roller. After applying the first coat, perform a thumbprint test after 45 minutes; if it’s not ready, check again every 15 minutes. The primer dries to a tough film overnight.
8. Apply Gelcoat
Gelcoat, a polyester or vinylester resin, creates a glossy, UV-resistant finish on fiberglass. Epoxy bonds strongly but degrades under UV, so applying gelcoat extends its life. After primer cures, clean the surface with acetone and rags, sand with 80-grit for adhesion, then clean again before applying gelcoat. Apply gelcoat when the ambient temperature is between 50-95°F, with 70-80°F being the ideal range for optimal work times and cure rates. TotalBoat Gelcoat comes with MEKP catalyst. Add pigment or polyester colorants before mixing in MEKP. For white gelcoat, tint up to 1% for pastel colors; for neutral gelcoat, up to 10–12% for dark or bold shades (12% for yellow, red, purple, light green, and orange). At 77°F, use 2% MEKP by volume (≈14–16 drops/oz or 2 tsp/pint). Adjust for temperature: up to 3% in cooler weather, or 1% in warmer conditions to extend working time. If the gelcoat needs thinning, only use styrene; do not use acetone. Apply the gelcoat in thin 5 mil layers using a brush (natural bristle), a solvent-safe roller, or a gelcoat-compatible spray gun. The formula is non-sagging and has high viscosity, allowing for great coverage. For initial layers or building up thickness, use gelcoat without wax. For the final layer, use gelcoat with wax to ensure a tack-free cure. Alternatively, if using gelcoat without wax for the final coat, you can add a paraffin wax additive (20 drops per ounce) or apply a PVA spray to achieve a tack-free cure. The pot life for gelcoat is typically 8-12 minutes at 77°F. Once the gelcoat is fully cured, it can be wet sanded, buffed, and polished to a super high-gloss, showroom finish. If wax was used, it can be dewaxed first. For maximum gloss and protection, finish with a marine wax.
Considerations for Bonding Fiberglass to PVC
1. Proper Surface Preparation is Key
When bonding fiberglass to PVC, you need to ensure the surface is properly prepared. This often means sanding the PVC to create a rougher surface and using a primer designed for PVC to improve resin adhesion.
2. Timing and Environment Matter
Temperature and humidity can impact how fiberglass resin cures. Working in high humidity or very warm temperatures can cause the resin to take longer to dry or cure unevenly, which can lead to issues like bubbling and peeling. Optimal temperatures for fiberglass application are mid-60s to mid-80s Fahrenheit, with 70°F being ideal, and low humidity
3. Choose the Right Material
-
- Resin: Not all resins are ideal for bonding fiberglass to PVC. It’s crucial to select a resin that’s specifically designed for bonding with slick, non-porous surfaces like PVC. Epoxy-based resins work well in this case.
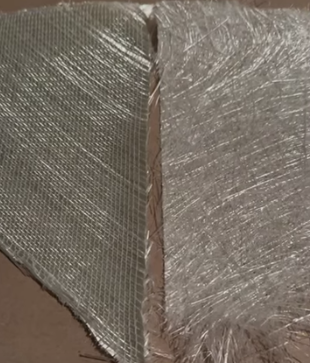
- Fiberglass: Depending on the surface area, you may need a fiberglass mat for more strength or fiberglass cloth for thinner applications. Chop Strand Mat (CSM), with its random fibers, is excellent for bonding and is often used as a final coat. It holds more resin and allows for feathered edges when torn, providing a smooth transition. 1708 Biaxial glass is a popular choice, consisting of two layers of glass strands sewn together at 45-degree angles, with a layer of CSM on the back.
4. Test Before Full Application
Always test a small area first before applying fiberglass resin to a large section. This will allow you to spot any potential issues before they turn into major problems.
5. Managing Resin Heat (Exothermic Reaction)
Mixed resin undergoes an exothermic reaction, generating heat, especially in larger volumes, which can cause it to cure very quickly, smoke, and release fumes. To prevent this, work with smaller batches and spread excess resin thinly in a paint pan, or pour it out on a thinner surface, or set the container outside away from combustibles to manage heat and fumes.
How to Repair a Damaged Fiberglass to PVC Attachment
After realizing the problem, we knew we needed to address the peeling and bubbling before continuing with the project. We used ForteGlass TXP200 Polyester Laminating Resin, a Polyester resin that works well over plywood but not over PVC. So if you face the same situation, you can choose one of the solutions below:
- Take out the PVC sheets (if applicable) and replace them with exterior-grade plywood, then use regular resin.
- Peel out all that fiberglass over the PVC sheet, then use Epoxy resin and fiberglass over the PVC.
In the end, this experience taught us a lot about how to properly bond fiberglass to PVC, and we’re sharing our lessons here so that you can avoid the same mistakes.
Conclusion
Bonding fiberglass to PVC may seem straightforward at first, but as you’ve seen, it requires attention to detail for a successful result. While this guide provides a solid starting point, we strongly recommend letting a professional with experience handle the job if you’re unfamiliar with the process. As always, if you’re in need of renovation services in Philadelphia or South Jersey, don’t hesitate to reach out to us through our FREE Consultation form.


![Comprehensive Guide to Skylight Installation on a Roof Deck [2026 Guide]](https://matrixgc.com/wp-content/uploads/2025/06/Skylight-Installation-400x250.jpg)

0 Comments