Tiling has been around for centuries, but even today, it is still a brilliant way to enhance the look of your bathroom. A beautifully tiled bathroom will last for years and give you a splash of style and peace of mind when it comes to hygiene. Tiled bathrooms are one of the most practical and cost-effective ways to update the look of any home!
Whether doing this as a DIY project or leaving it to a contractor, tiling a bathroom comes with some need-to-know important tips. To tackle the job, you need more than just some time on your hands and strong arms — you need some knowledge!
Here is a step-by-step guide that uses a simple and useful bathroom tiling method explained in two parts. In each step, we first introduce the tools and materials needed for the job and then explain how the job should be done. In the first part of this series [ Click here to read part one ], we explained how to prepare the shower walls and floor for tiling. This article is Part 2, here we will explain how to do the tiling job.
Step 1: Apply RedGard on Cement Boards.
Tools and Materials:
- RedGard
- Fiberglass tape
- Modified mortar
- Scraper
- Brush
- Roller
- Impervious gloves
- Eye protection
After preparing the bathroom walls and floor, you can start tiling. You should apply RedGard to make sure the substrate is waterproof. RedGard is a liquid-applied waterproofing and crack-prevention substance. After applying the RedGard, you must wait for it to cure and form a membrane. One coat of this product will prevent cracks in tile and grout, two coats will waterproof the surface.
- Apply fiberglass mesh over all the joints and cracks and cover it with a layer of modified mortar.
- Sand the surface using a scraper to ensure it is completely smooth.
- Stir the RedGard well. Make sure the chemicals are blended together.
- Apply the RedGard to cracks, joints, and corners using a brush. Force RedGard into cracks with a roller or brush and extend 6 inches on either side.
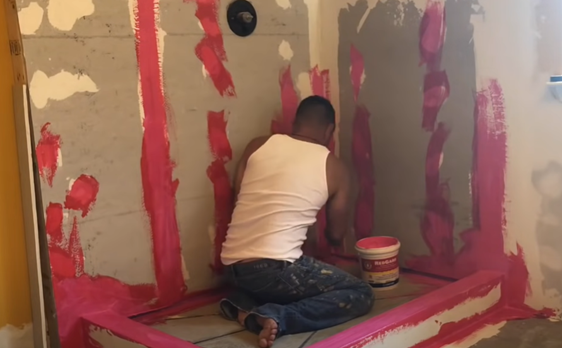
- Apply RedGard with a roller to the entire surface, walls and floor.
Put two coats of RedGard on the entire surface and a third coat on any holes, cracks, or joints. Wait for the RedGard to dry, and then begin installing the tiles.
Note: RedGard is dry when it turns solid red, with no visible pink color. Typically, drying time is 1-1.5 hours.
Step 2: Tile Shower/Tub Surround.
Tools and material:
- Tape measure
- Pencil
- Hole saw
- Circular saw
- Wet saw
- Work gloves
- Safety glasses
- Level
- Tile spacers
- Chalk line
- Trowel
- Bucket
- Drill mixing paddle
- Ceramic Tile
This is the beginning of your tiling process.
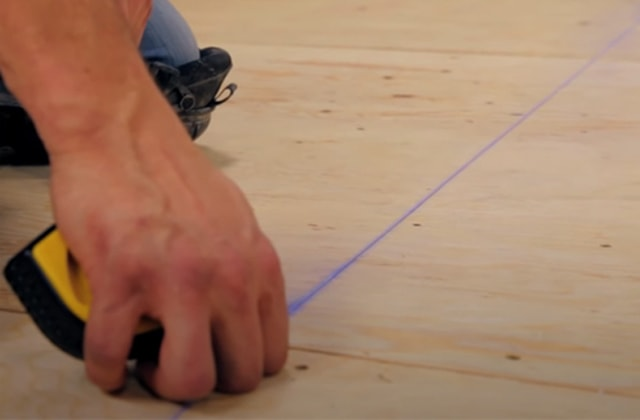
- Find a vertical reference line to make sure you have a symmetrical layout. The center of the back wall is the best reference line to consider using.
- Take measurements and cut the tiles where needed, such as at the corners and around the shower valve and shower head.
- Apply thinset on the back of each tile and start installing the tiles from the lowest level of the wall.
- Draw horizontal level reference lines (the horizontal line height = the height of each row of tiles plus the height of the spacer) as you move up to make sure all the tiles in each row are on the same level.
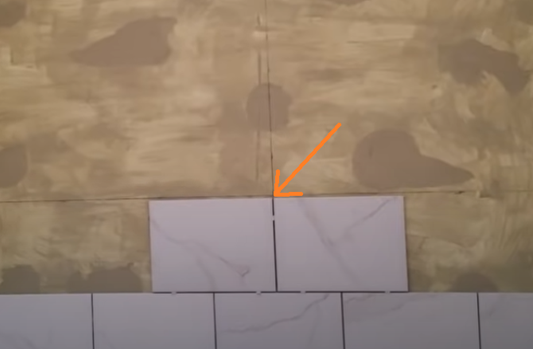
- After finishing each row, move to the next row. Remember to keep the tiles aligned in the corners and install all the tiles in each row on all walls before moving to the next row. (do not install the tiles on one entire wall and then go to the next wall). Also, use 1/8 inch spacers between rows and columns.

- When you have finished installing the tiles, do not remove the spacers until the next day. For best results, let the mortar set overnight.
Step 3: Tile Bathroom Floor.
Tools and Materials:
- Ceramic tile
- Floor adhesive mortar mix
- Chalk line
- Drill mixing paddle
- Bucket
- Notched trowel
- Tile spacers
- Wet saw
After installing the wall tile, it is time to install the bathroom floor tile.
- Lay out the tiles before applying the adhesive to determine the best configuration. You should lay down the tiles in two directions: from right to left and front to back. For this process, remember to keep the tiles 3/16 inch away from the wall.
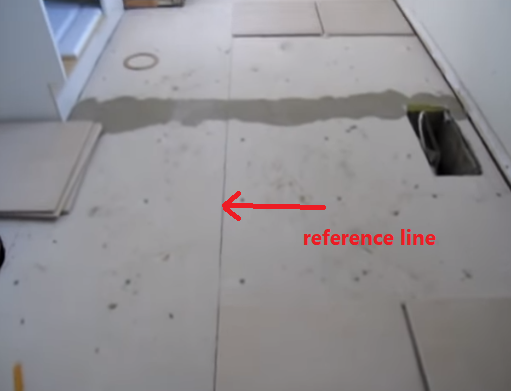
- Create a reference line. To do this, mark the center of the bathroom with the distance your reference line should be from the wall. Then measure and mark the same distance at the room’s two ends. Use a chalk line to draw a line connecting these points. This is your reference line.
- Lay out the tiles and make all the necessary cuts.
- Mix the mortar in a bucket.
- Once you are sure the layout is good, apply mortar to the back of each tile using a notched trowel and start sticking them down, considering the reference lines.


After placing each tile, remember to put in the spacers so that you have the same space between each tile.
- As you put down the tiles, keep an eye on your reference lines to ensure you are following them.
When cutting and placing the perimeter tiles, it is better to have the factory edge (not the cut edge) next to the adjacent tiles. This is the edge you can see when the job is finished, the other edge will not be as smooth as the factory edge so it is better to keep it near the wall where it is not exposed.
- After all the tiles are installed, remember to avoid walking on the tile floor for at least 24 hours.
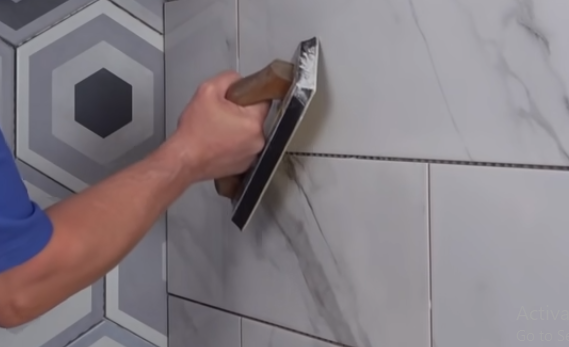
Step 4: Grout after Tiling.
Tools and Materials:
- Grout
- Sealer
- Two buckets
- Grout sponge
- Grout float
- Paper towels
- Drill
- Drill mixing paddle
- Putty knife
- Caulk
- Caulk gun
The last step of the tiling job is grouting. This is an easy but essential job. You should grout the walls first, and then grout the floor. Remember to use unsanded grout for walls and vertical surfaces and use sanded grout for floors.
- Remove the spacers and clean the surface using a sponge.
- Mix the grout according to the package instructions. If instructions do not specify for how long to mix, generally mixing slowly for 3-5 minutes is adequate.
One crucial point to remember when making the grout is to add the powder to the water, not the other way around.
- Use the grout float to apply the grout between the tiles and press on it to fill in the gaps. Hold the grout float at a 45-degree angle with the spaces between the tiles and push the grout into the gaps.
- Once the grout is set, clean the surface with a wet sponge. Remember that you can start cleaning up when you press on the joint with your finger and the grout does not stick to your finger.
- If necessary, fill in any areas that did not fill with grout completely; use your finger to apply additional grout.
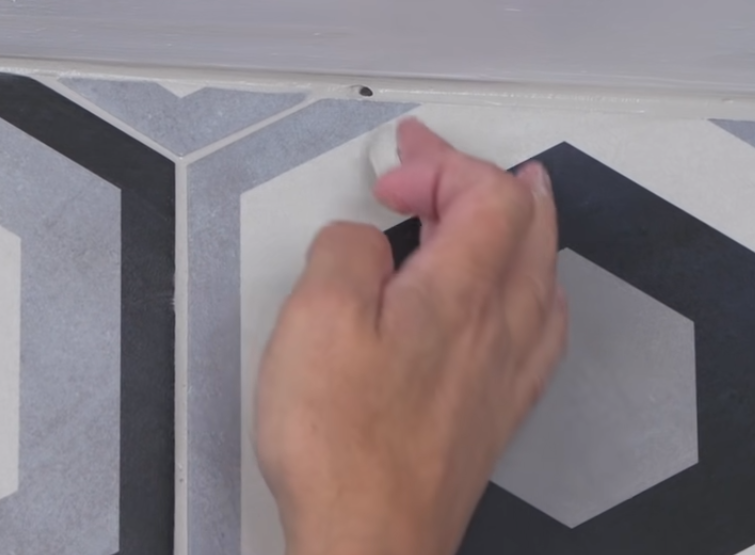
- Clean the area using a sponge again
- The next day, clean the tiles using a paper towel.
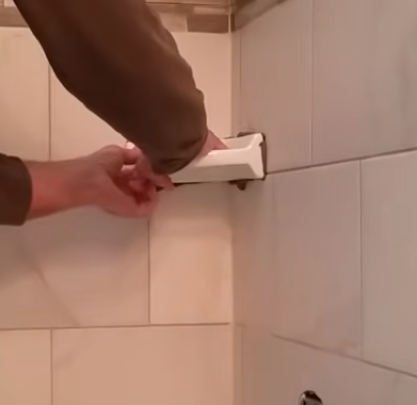
- Caulk the corners.
- Install accessories, such as soap dishes, using mortar. To do this, apply the mortar to the back of the accessory, press it into place on the tile, and push it until it comes in contact with the tile’s surface. Remove the excess mortar that is squeezed out. You can use some masking tape to hold the accessory in place until the mortar sets. Finally, caulk all the way around the accessory.
You can grout the bathroom floor the same way you did the walls. Once all the grout work is done, the bathroom tiling job is complete.
Bathroom Tiling Made Easy.
Installing new bathroom tile on the floor, walls and around the shower is not an easy job. But with proper bathroom tiling preparation, the right equipment and materials, and a few step by step tips from the experts, you can accomplish the job. Like most home renovation projects, if you hire an experienced contractor to do the tiling job, you will not have to worry about how the finished bathroom will look. Matrix Company Solutions Corp. does bathroom tiling as part of home renovation projects in the Philadelphia area. Our team of experts will work with you to make sure every detail in your home renovation job is done correctly and to your satisfaction. Contact us today and we will guide you through your home renovation project.


This was a delight to read. You show an impressive grasp on this subject! I specialize about Cosmetic Treatment and you can see my posts here at my blog UQ5 Keep up the incredible work!
Thanks Kayla!