In our previous article “Why You Should Consider Porcelain Tile for Your Home”, we discussed porcelain tiles from different points of view and compared them with typical ceramic tiles to help you get an understanding of these tiles before choosing them for your home. After purchasing the tiles the most important part begins: porcelain tile installation.
In this article, we will give you the step by step process to prepare and install porcelain like a pro.
Prepare the Concrete Floor for Tiling
Like any other tile installation, preparing the area for tiling is the first step you should take. Remember that professional porcelain tile installation starts from here. Without proper floor preparation, you will not get the desired look at the end of the job and might eventually need to undo the tiles and start over again. You probably understand that when we say “preparation,” we do not just mean sweeping and cleaning the floor. So let’s go ahead and explain what is involved in floor tiling preparation.
Measure the Room and Decide on the Pattern
The first step is to measure the room area to see how many tiles you need to cover the entire floor. Then, you should decide on the tiles’ pattern. The pattern in which you lay your tiles significantly affects the overall look of your floor. You can lay your tiles horizontally, vertically, diagonally, or even combine different sizes and directions. Although tile installation pattern is a matter of personal preference, we provide a few tips here that we believe following them will improve the aesthetics of your home.
- Room Size and Shape: If the room is long and narrow, it can be visually balanced by laying the tiles parallel to the shortest wall. On the other hand, if the room is square or rectangular, you can lay the tiles diagonally to create a dynamic and visually interesting pattern (see Figure 1).
Figure 1
- Tile Size and Shape: If you use large or irregularly shaped tiles, it may be best to lay them parallel to the longest wall to avoid cutting them into small pieces.
- Room Layout: If the room has a fireplace or other architectural feature, you may want to lay the tiles perpendicular to the feature to draw the eye towards it. Additionally, laying the tiles horizontally makes the room feel wider, and laying them vertically makes the room feel narrower. If the room is small and you want the room to feel larger, you can lay the tiles diagonally.
- Room Style: If you want a traditional look, you may want to lay the tiles parallel to the walls. For a more modern look, you can lay the tiles diagonally or in a herringbone or chevron pattern (see Figure 2).
Figure 2
Choose the Correct Thinset Mortar
The type and size of the tiles determine the thinset mortar that you should use. Modified and unmodified thinset mortar can be used for installing tiles. You can use unmodified thinset mortar for most tile installations, except when you need a stronger bond, such as for heavy tiles. In general, for porcelain tiles, you should use modified thinset mortar to achieve an optimum bond between the tile and concrete floor. Using modified mortar reduces the chance of cracks forming in the tiles.
If for any reason you want to use unmodified mortar, you should add latex or polymer admixture to it to increase the adhesion and bond strength. Additionally, for large and heavy tiles, you should use a mortar that could be applied thicker and does not shrink after it cures.
We suggest using Mapei Ultraflex LFT White – Large Format Tile Mortar for large porcelain tiles (see Figure 3). This is a polymer-enriched thinset mortar that you can use for floor and wall tile installation for residential or commercial use.
Figure 3
Make Sure the Floor is Clean and Flat
Cleaning the floor is essential to ensure that the mortar will adhere to the concrete floor properly. Therefore, sweep the floor and dampen the surface with water. Then mix the degreasing cleaner with warm water and scrub the floor using a scrub brush. We suggest using Rust-Oleum Clean & Etch or Zep Driveway, Concrete & Masonry Cleaner (see Figure 4). Using these products improves the penetration and adhesion of the mortar.
Figure 4
Mix the product with water according to the manufacturer’s instructions. Next, scrub the surface and rinse the floor with water. Pay attention that the contact time of the mixture with the concrete floor varies for each product. Then let the floor dry completely.
After cleaning you should check for any cracks or holes. If exists, fill them with concrete patching compound (see Figure 5) and sand them to ensure they are completely smooth and flat.
Figure 5
Find Your Starting Point
The final part of the preparation phase of the porcelain tile installation is finding your starting point. You can either start installing the tiles from the center or the corner of the room. Generally, it is recommended to start from the center and work your way outwards to have a symmetrical look. But what if the symmetrical tiling does not give us the desired look we are looking for? In fact, different factors can help you decide where to start tiling. To name a few:
- Room Layout: Sometimes starting from the center, which is the general rule, does not work for you. If the room is rectangular or square, you may want to start tiling in the center of the room. This will allow you to evenly distribute the tiles and create a balanced look. But if the room has a fireplace or other architectural feature, you may want to start tiling around the feature to draw the eye toward it.
- Tile Size and Shape: If you are using large or irregularly shaped tiles, it may be best to start in the center of the room and work your way outwards to minimize cutting the tiles into small pieces.
- Tiles Direction: If you want to lay the tiles parallel to the walls, you would better start in the center of the room. But if you want to lay the tiles in a diagonal or a herringbone pattern, starting from the corner looks more attractive.
- Doorway Location: If you are tiling a floor, you will need to consider the location of the doorways. You would better start tiling from the corner near the door threshold so that you will get the best look if you have full tiles to be in view when the door is open (see Figure 6).
Figure 6
Make Sure the Starting Corner is Square
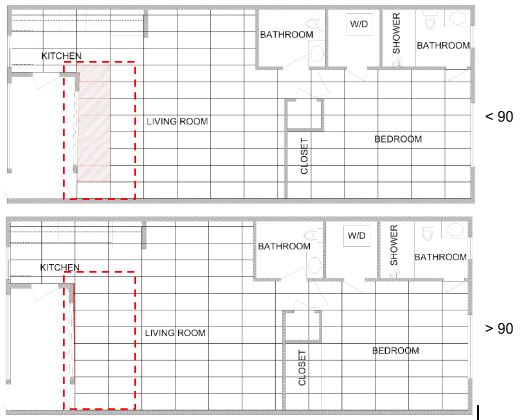
There are many online resources that explain how to start installing tiles from the center. So, we decided to bring an example here to show you how to start installing the tile from the corner. This is a condo renovation that we have done in Florida. For this project, we decided to start installing the tiles from the entry corner because that area grabs the most attention when someone walks into the home. So we wanted full tiles there. You can see two alternatives (cut tiles and full tiles in the corner) that we have designed for this project in Figure 7.
Figure 7
When you want to start tiling from the corner, you should make sure that the corner is completely square. If you start from a corner and the corner would be some degrees off then all of that error will end up in the opposite corner.
So, use a square and a level. Line one side of the square with one side of the wall and put a level in line with the other side of the square and measure the distance between the wall at the corner and the level (see Figure 8), then measure the distance between the end of the level and the wall.
Figure 8
If the two dimensions are not equal then the corner is not square. To do it more precisely, you can use a laser. Place the laser straight on the level. Compare the distance between the level and the wall at the corner with the distance between the wall and the laser light at the wall end (see Figure 9).
Figure 9
You should do this for both corner walls. Then you should lay your tiles in line with one wall and you will have cut tiles along the other wall. Figure 10 illustrates how the tile configuration will look when the wall is at an angle greater than 90 degrees and less than 90 degrees. To end up with a nicer look, lay your first tile in line with the wall that is more visible and you prefer to have full tiles along that wall.
Dry Fit the Tiles
After you decide on the porcelain tile installation pattern and the starting point, we suggest dry fitting the tiles. This will help you to see what the floor looks like if you lay the tiles. In case you see any problem or the overall appearance of the floor is not appealing, do every modification needed, including changing the pattern or starting point in this step.
Step by Step Installation
Now, let’s jump into the article’s most interesting part, which is the porcelain tile installation. In order to make it easier to follow, we divided this section into three parts.
Laying the Tile
The first part of the porcelain tile installation process is to lay the tiles. Follow the below steps in order to ensure a perfect installation.
- Mix the Thinset Mortar: Using a mixing paddle, mix the thinset mortar with water according to the manufacturer’s instructions(see Figure 11). Remember to add mortar to the water, not the other way.
Figure 11
- Clean the Tiles’ Back: Clean the back of the tiles with a damp cloth or sponge to get rid of dust and dirt (see Figure 12). This will help to have a stronger bond between the tile and mortar and ensure that the tile does not absorb the thinset water.
Figure 12
- Apply Mortar to the Floor: Use the flat side of the trowel to spread a layer of thinset mortar on the concrete floor then comb the mortar using the notched side of the trowel. Remember to apply mortar for one tile at a time.
- Apply Mortar to the Tiles’ Back: Applying mortar to the tiles’ back is a technique called tile back buttering. We suggest using this technique mostly for large tiles and porcelain tiles. You should apply a thin layer of mortar to the back tile in a way that covers the whole surface. It fills all voids and enhances the bond ensuring that the tiles do not move after being installed.
- Lay the Tile: Place the first tile carefully on the thinset mortar in its predetermined position (see Figure 13).
Figure 13
- Make Sure the Tile is Level: Using a rubber mallet gently tap the tile into place, making sure it is level and evenly spaced. Place the level on the tile in different directions (see Figure 14). If it is not level, use the rubber mallet again and tap the area that is higher.
Figure 14
- Place the Spacers: After laying the tile put spacers on both sides of the tile to make sure that you leave enough space for grout lines between the tiles. There are different types of spacers on the market. We prefer to use the one that comes with a hole on top of it for a spacing clip. It is recommended to use at least two spacers per side; depending on the tile size you might use more. For this project, for the 19” 39” porcelain tiles, we used three spacers on the length and two spacers on the width of the tile (see Figure 15).
Figure 15
- Continue Laying the Tiles: Now just follow the above steps and lay the tiles outwards from the corner (see Figures 16 and 17).
Figure 16
Figure 17
Remember: For every tile that you lay check if it is on the same level as adjacent tiles. In Figure 18 you can see a tile that is not placed correctly.
Figure 18
- Place Tile Leveling Clips: Remember to put leveling clips between the tiles to the hole above the spacer (see Figure 19). These clips remove lippage and ensure that tiles remain level.
Figure 19
- Cut the Tiles Where Needed: Although you should avoid having a lot of small pieces to have a nicer look, cut tiles are inevitable in almost all projects.
Figure 20
Therefore, try to use cut tiles under cabinets, appliances, or furniture.
As mentioned in the previous article, porcelain tiles are harder to cut than ceramic tiles. So, you should use a wet saw to have cleaner cuts. However, working with a wet saw needs experience and we highly recommend leaving this part to professionals if you do not have enough experience. But if you insist on making the cuts yourself follow the manufacturer’s guide to ensure a good cut.
An important point in working with a wet saw is that it creates a lot of mess and noise. Therefore, you should place it in a secluded area, ensuring that all the noise and mess do not bother anyone (see Figure 21).
Figure 21
- Remove the Spacers: You should remove the spacers after 20-30 minutes the mortar begins to set. If you remove them soon, it will cause the tiles to shift, and removing them late causes the spacers to stuck.
- Let the Thinset Mortar Dry: Allow the thin-set mortar to dry according to the manufacturer’s instructions. This will typically take 24-48 hours.
Grouting the Tile
When you are done laying the tiles and the thinset mortar dried completely, you should grout the lines between the tiles. Grouting provides you with numerous benefits including adding rigidity to your porcelain tile installation, keeping between the tiles clean, and giving your floor a uniform look.
For grouting follow the below steps:
- First using a utility knife clean the grout lines from the dried mortar. Then dry vacuum the grout lines and the whole floor.
Remember: Do not sweep the floor because you will sweep all the dust and debris into the grout lines.
Figure 22
- Mix the grout with water according to the manufacturer’s instructions.
- Spread the grout over the tiles using a grout float.
- Wipe away any excess grout with a damp sponge, and allow the grout to dry according to the manufacturer’s instructions.
- Once the grout has dried, clean the waste grout from the surface of the tiles and vacuum the floor. Then, apply a sealant to the grout lines to protect them from stains and moisture. Follow the manufacturer’s instructions for application and drying times.
Protecting the Tile During Renovation
It is of great importance to protecting the finished tiled floor from getting scratched or broken during renovation. So, if you still have some renovation jobs left, such as spackling, painting, cabinet installation, etc. cover the tiled floor with contractor paper. These papers come in rolls with a width of 36 or 48 inches. So, you should tie the papers together using tape and make them like one piece of carpet to cover the whole floor. Using tape all the way across the paper joints rather than using individual pieces of tape secures the papers together, protecting your floor for a longer period of time (see Figure 23).
Figure 23
Additionally, you can provide more protection by putting cardboard on the contractor papers (see Figure 24).
Figure 24
Care and Maintenance After Installation.
One feature that distinguishes porcelain tiles from other tiles is their simple maintenance. They are durable and have more than 60 years of life expectancy. Hence, the only thing you should do regarding care and maintenance is cleaning the tiles which can be divided into two phases. The first cleaning phase is related to maintenance right after the installation. Using contractor paper and cardboard is a huge help to make this cleaning phase easier. There might be paint, grout, sealer, or wax on the finished tile. You can clean the tiles using a mixture of soap and hot water or vinegar and water. If you need a stronger cleaner you can use sealer and wax adhesive remover.
The second phase includes routine care and cleaning that you can do weekly with warm water and mild soap to keep your tiles’ good appearance. You can also use a multipurpose spray cleaner to remove stuff like soap scum and mildew. Always remember to dry the tiled surface completely after cleaning.
A word of caution: Remember to use a little amount of water while cleaning the tiles to protect the lower floor ceiling because too much moisture could damage it.
Conclusion
Are you now prepared to install your porcelain tiles? I know it seems like a daunting task to someone without any experience in this area. But trust me, with this step by step guide and some professional help you can make it done not necessarily in a perfect but in a satisfying way.
However, there is always a more secure way to get your floor done perfectly. Call a professional and leave your floor porcelain tile installation to someone who has experience working with tiles.
Matrix Company Solutions Corp. is your ultimate choice if you are looking for a professional porcelain tile installation service in the Philadelphia area. We take care of every home renovation service that you are looking for. Feel free to contact us for more information. We would be more than happy to help.


![Top 20 Reasons for Failing a Plumbing Inspection in Philadelphia [2025 Guide]](https://matrixgc.com/wp-content/uploads/2025/05/Common-issues-causing-failing-a-plumbing-inspection-in-Philadelphia.png)


In what instances would you use an uncoupling membrane like ditra? And how do you recommend handling high and low spots particularly with large format tile (like 30″x60″).
An uncoupling membrane like DITRA, manufactured by Schluter Systems, is typically used in tile installations to decouple the tile covering from the substrate (such as concrete, plywood, or cement backer board). It offers several benefits, including crack isolation, waterproofing, and load distribution.
Here are some instances where you would use an uncoupling membrane like DITRA:
Cracked or Uncertain Substrates: If you’re working with a substrate that has existing cracks or is prone to cracking, using an uncoupling membrane can help prevent those cracks from transferring to the tile surface. DITRA is designed to absorb lateral movement and stress, protecting the tiles from cracking due to substrate movement.
Wood Substrates: When tiling over wood substrates, such as plywood, an uncoupling membrane can help prevent the differential movement between the wood and tile. Wood expands and contracts with changes in temperature and humidity, which can lead to cracks in the tile. DITRA allows for independent movement between the wood and tile, reducing the risk of cracks.
Large Format Tiles: Large format tiles, like the 30″x60″ ones you mentioned, can be more susceptible to cracking due to their size and weight. An uncoupling membrane helps distribute the load across the surface, reducing the stress on individual tiles and minimizing the risk of cracking.
Now, regarding handling high and low spots with large format tiles, here are some recommendations:
High Spots: If there are high spots on the substrate, they should be leveled before installing the uncoupling membrane. High spots can cause uneven support for the tiles, leading to lippage (uneven edges between tiles) or even tile breakage. Depending on the severity of the high spots, you might need to grind them down or use a self-leveling underlayment to create a flat and even surface.
Low Spots: Low spots can be addressed by using a suitable leveling compound or a self-leveling underlayment to fill in the depressions and create a level surface. It’s important to follow the manufacturer’s instructions for the leveling product and ensure that the substrate is properly prepared before installing the uncoupling membrane.
Subfloor Preparation: Regardless of high or low spots, it’s crucial to ensure that the substrate is clean, dry, structurally sound, and meets the manufacturer’s requirements for the uncoupling membrane. Proper subfloor preparation is essential to achieve a successful and long-lasting tile installation.
It’s worth mentioning that the specific installation requirements and techniques may vary depending on the manufacturer’s instructions, the type of uncoupling membrane used, and regional building codes. Therefore, it’s important to consult the manufacturer’s guidelines and consider seeking advice from a professional tile installer for your specific project to ensure the best results.
Great post! Installing porcelain tile over a concrete floor requires careful preparation and attention to detail to ensure a professional finish. Properly cleaning and leveling the concrete surface, using the right adhesive and grout, and ensuring even spacing are key steps to achieve a durable and aesthetically pleasing result. Attention to these details will help ensure your tile installation not only looks great but also lasts for years to come.
Thanks for your comment