So you removed your old rubber roof and you need to install a new one. Installing a new rubber roof can be a significant investment, but it is also an opportunity to upgrade your home’s protection and energy efficiency. With the right installation methods and materials, a rubber roof can provide long-lasting durability and weather resistance, making it a wise investment for many homeowners.
There are different methods for installing a rubber roof including ballasted¹, mechanical fastening², applying adhesive³, and the torch down method. In this article, we will explain the torch down method. It involves using a propane torch to melt the rubber membrane and then pressing it onto the roof surface. As the rubber cools, it bonds tightly to the roof’s surface and creates a watertight seal. Torch down roofing is typically used on flat or low-sloped roofs. However, it requires a high level of skill and experience to make sure that the membrane is properly installed and the torch is used safely.
Read on to learn the steps required to install a rubber roof using the torch down method.

Figure 1
¹This method involves placing the rubber membrane on the roof deck and weighing it down with large rocks or pavers.
²This method involves securing the rubber membrane to the roof deck using fasteners such as screws or nails.
³This involves gluing the rubber membrane directly to the roof deck using an adhesive.
Tools and Materials
Just like every other roof installation job, the first thing you need to do is gather the required tools and materials. Here are the items we used for our project:
- 340,000 BTU Propane Torch Self Igniting with Turbo Blast Trigger and Flow Valve
- 14.1 oz. Propane Gas Cylinder
- Cutter
- Nail puller
- Hammer
- PTry bar
- Torch down trowel
- Wire bristle brush
- Heavy duty gloves and work boots
- Safety glass
- Rooftop Safe,Tie Bucket Kit
- Ladder
- Galvanized Panel Sheathing Clip (If wood sheathing needs to be replaced)
- 42 in. x 286 ft. DuPont Tyvek Roof Protector Underlayment
- Drip edge
- 1 inch Nail with Galvanized Cap
- Galvanized Steel Pipe Flashing
- Flashing for chimney
- Asphalt Spray Primer
- Silicone coating (finishing)
- 208R Rubberized Wet Patch 10.1 oz. Roof Cement Leak Repair
- Torch down roof (SBS or APP)
Preparation
1. Measure the Roof’s Pitch
Before you begin installing the torch down roof, you will need to measure the roof’s pitch to see if you can install this type of roofing. The roof must have a slope of 1/4:12 or greater (2% slope). There is no strict requirement for the maximum roof slope, but we know that torch down roofing should be used for low-sloped roofs with a maximum slope of nearly 1:12. So first, measure the roof’s pitch and make sure it is suitable for installing a torch down roof.
2. Replace Damaged Wood Boards
The next important step is to inspect the wood boards underneath the old roof for any signs of water damage or rot. Replace any damaged boards before installing the new rubber roof.
To replace the boards follow the below steps:
- Start by identifying damaged plywood on your roof. Use a hammer and a nail puller to remove all the nails from the plywood sheets (see Figure 2).

Figure 2
- Use a nail puller and pry bar to pull up and loosen the damaged plywood a little from its edge (see Figure 3). This will make it easier to remove the plywood entirely.

Figure 3
- Use a hammer or any leverage to completely pull up the damaged plywood (see Figure 4). Be careful not to damage the surrounding plywood sheets while doing this.


Figure 4
- After removing the damaged plywood, check the nails that remain on the plywood. Use a hammer to push down any nails that are sticking up or remove them entirely.
- Before installing the new plywood sheet, use a Galvanized Panel Sheathing Clip on the adjacent boards to hold the new board in its position (see Figure 5). These clips are essential in ensuring that the new plywood sheet stays in place during the installation process.

Figure 5
- After putting the clips in their position, slide the plywood into the clips. Ensure that the new plywood sheet is aligned with the surrounding plywood sheets.
- Finally, nail the plywood close to the edges to fasten it on the joists. Make sure to use galvanized nails that are long enough to go through the plywood and into the joists.
3. Check the Torch Equipment
When using a torch, it is very important to carefully follow the instructions in the manual to make sure you are doing everything safely. Before you start using the equipment, make sure everything is properly connected and the hoses are in good shape. To check for leaks, put soapy water on the connections. If you see bubbles, there is a leak. Never use the flame if a leak is suspected. (see Figure 6).

Figure 6
When you are ready to ignite the torch, make sure the valve is set to the lowest possible setting and the trigger is not engaged. If you are using an older model, you will need a spark striker, but make sure you are holding it at a safe distance in front of the torch head. By taking these precautions, you can use your torch safely and avoid any accidents.
4. Decide on the Roll Alignment
When installing the roofing membrane on a slope that is less than 3 inches per foot, make sure to place the membrane perpendicular to the slope (see Figure 7).

Figure 7
On the other hand, if the slope is greater than 3 inches per foot, you should place the membrane vertically or parallel to the roof slope (see Figure 8).

Figure 8
When overlapping the membrane rolls, make sure the overlapped edges are in line with the slope, either parallel or perpendicular, so that water flows smoothly and does not run against the overlapped edge (see Figure 9). This is important to ensure that the roofing system remains waterproof and effective for a longer time.


Figure 9
5. Clean the Roof Surface
Before installing the torch down roofing, clean the roof’s surface to remove any debris, dirt, or other materials that may interfere with the adhesion of the roofing material. Ensure the surface is dry and free from any sharp or bumpy objects, especially nails. Use a hammer to push down any nails that are sticking up.
6. Consider Safety Precautions
Installing a torch down roofing system can be dangerous. Therefore, it is essential to wear heavy-duty gloves and work boots to protect yourself from the flame and melted asphalt involved in the process. You may need to use your hands and feet to press or roll the roofing membrane, also known as the bitumen membrane, as it could bubble. To make sure that your safety gear is heat-resistant, choose materials like Kevlar. Additionally, it is a good idea to wear long-sleeved clothing to further reduce the risk of injury.
Installation
Now you are ready to start installing the torch down roof.. Carefully follow the steps below to ensure a perfect installation.
Note: It is not a good idea to work on a torch down roofing system when the temperature is below 45 degrees Fahrenheit. When the temperature is too low, the asphalt used in the roofing process can become brittle and may not adhere properly to the surface.
1. Install the Underlayment
The first thing you need to do is install an underlayment which will provide an extra layer of protection against water damage. Install the layers from the bottom of the roof to the top. Make sure to use 1 inch nails with a galvanized cap in all of the pre-printed locations on the roll (see Figure 10).

Figure 10
It is important to note that the underlayment layer should have a Fireproof class A rating.
Install the other layers horizontally with a minimum of 4 inches overlap when installing the second layer.
Note: To install the underlayment and the torch down roofing around obstacles such as vent pipes, cut a piece of underlayment from the roll and mark the center. Then, cut an X-shaped opening the size of the pipe in the membrane using a cutter. Install the membrane over the pipe. (see Figure 11).


Figure 11
2. Unroll the Membrane
When beginning the installation of the roofing membrane it is important to unroll the membrane completely and allow it to relax for a while. This will help smooth out any wrinkles that may cause misalignment or lead to the membrane bending or saging in a downward direction. One way to do this is to have one person stand on one end of the roll while another person shifts the membrane at the other end from side to side. By doing this, you can ensure that the membrane lays flat and aligns correctly without any wrinkles.
Start at one end of the roof and unroll the membrane until you reach the other end. Repeat this process with each roll until the entire roof is covered.
Overlap the membrane rolls by 3 inches on the sides and 6 inches on the ends to ensure proper coverage. Stagger the overlaps from adjacent end overlaps by at least 18 inches to prevent them from lining up with each other.(see Figure 12). If the ends of the overlaps are not staggered or are not the proper distance apart, a full width piece of membrane must be installed over the ends at the overlap

Figure 12
When you come across a wall or parapet while installing the roofing, make sure the rolls extend beyond the roof’s edges by 8 to 14 inches (see Figure 13). This ensures that the entire roof is properly covered.

Figure 13
If the roof edges are slightly higher than the roof surface, make sure to cover the entire roof completely (Figure 14).


Figure 14
3. Install the First Layer of Membrane
You need to reroll the membrane after unrolling it in order to install it. Take the first membrane and begin rolling it tightly until you reach the midpoint of the roll. This will ensure that you have a manageable size to work with during installation. Once you have rolled the first membrane to the midpoint, install the part that is rolled. After completing one end of the membrane, reroll the opposite end and install it in the same manner. Figure 15 illustrates the process of installing one roll of membrane step by step.
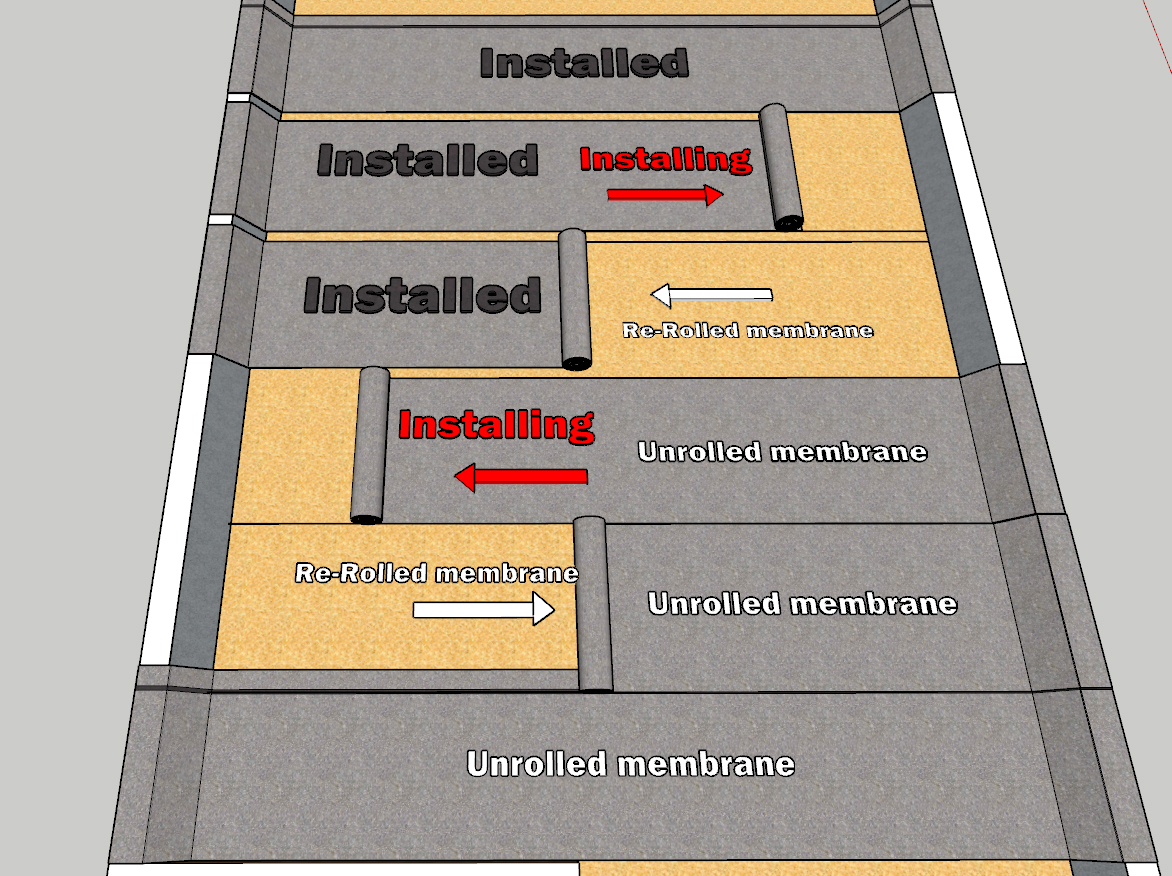
Figure 15
It is important to note that the roofing material is primarily made of bitumen and it also contains granules. When installing the rolls of this roofing material, they need to be heated with a torch. The heat melts the surface of the rolls slightly, allowing the bitumen to act as an adhesive and securely attach to the underlayment.
How to do the installation
First, refer to the manufacturer’s instructions to safely ignite the torch. Once the torch is lit, position the blue tip of the flame against the membrane roll. Slowly move the torch back and forth along the roll to heat it evenly. Use your foot to push the melting membrane toward the end of the roof. After the rolls are attached to the underlayment, you should inspect the overlaps to make sure they are firmly attached. A good indication of complete adhesion is when you press on the overlaps and see that bitumen flows out.
When using the torch down method, the propane torch flame should be applied evenly across the exposed underside of the membrane and overlap areas until the compound reaches the right temperature. You can tell if the temperature is right by looking for a slight sheen on the compound (see Figure 16). If there is heavy smoke, it means that too much heat is being applied, and you need to adjust the flame. Make sure to burn off the underside of the membrane completely.

Figure 16
Under normal conditions, move the flame in an L shape from side to side, applying about 80% of the heat to the membrane and 20% to the substrate (see Figure 17).

Figure 17
If you are working in colder temperatures, you may need to apply more heat to the substrate by reversing the proportions, 60% to the membrane and 40% to the substrate (see Figure 18). You may also need to move the flame at a slower pace to ensure proper heating.

Figure 18
For best results when torching (see Figure 19):
- Start at the overlap side, Position1, and work across the roll to Position 2
- Move to Position 3, which is the junction of the substrate and roll
- Move toward Position 4 which is at the start of the overlap side
- Move to Position 5 along the length of the roll
- Move back up the overlap area to the starting point, Position 6

Figure 19
Note: To achieve proper adhesion at the seams, a minimum of ⅜ inch bitumen flow out is required (see Figure 20). You can use a roller to ensure this. When using a roller, make sure to follow behind the torch at a distance of 3 to 4 feet to ensure that the membrane is at the correct temperature. Be careful not to overheat the membrane, as bitumen flow out should not exceed 1 inch.

Figure 20
Repeat this process for each roll until you have covered the entire roof.
4. Trowel the Seams
Inspect all the seams to ensure that they are fully and evenly attached. Any areas where the seams have not properly adhered together are not acceptable. In heated areas, dry overlaps must be lifted using a heated trowel and resealed by lightly heating the seam area with a torch. Use pressure or a roller to ensure that there is at least ⅜ inch of bitumen that has flowed out (see Figure 21).


Figure 21
5. Cover the End Overlaps
As mentioned earlier, at end overlaps you will need a minimum of 6 inches of overlap.
First, cut the corner of the underlying membrane at a 45-degree angle to prevent a buildup of excess material at the adjacent overlaps intersection. This is the intersection of the first roll’s end and the second roll’s beginning. (see Figure 22).

Figure 22
Heat the top side of the membrane that will be on the bottom to a point where you see the granules begin to sink down and the bitumen compound come up between the granules. This will ensure proper adhesion of the membrane that will overlap. (see Figure 23).

Figure 23
Then heat the underside of the top membrane thoroughly to properly adhere the two membranes together (see Figure 24).

Figure 24
Finally, press or roll the top membrane into place to achieve the required bitumen compound flow out (see Figure 25).

Figure 25
6. Install Flashing for rubber roof
Flashing is an essential component of the roofing system that prevents water from entering around roof obstacles such as chimneys (see Figure 26), vent stacks (see Figure 27), drip edges, and along the intersection of the roof and parapet walls. You should install flashing in these areas to ensure proper water drainage.
It is recommended to install flashing between two layers of torch down roofing to make sure it is completely watertight and sealed. This is really important because the flashing is installed with nails. Where the nails are placed can be entry points for water to get under the rubber roof. By adding a second layer of torch down roofing over the flashing, you can ensure that no water will seep through and cause damage to the rubber roof.
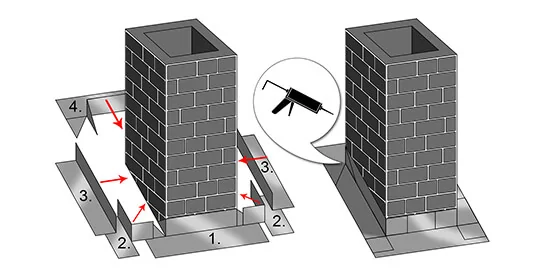
Figure 26


Figure 27
Depending on where you install the flashing, there will be specific installation details, but the general steps to install flashing are as follows:
To begin flashing installation, position it in the correct location, then cut and attach additional pieces as necessary to fit around corners. Use galvanized nails to attach the flashing to the roof, as these nails are more resistant to water damage than regular nails. Choose a nail length long enough to penetrate the flashing and any roofing material below it, typically about 1 ½ inches, though longer nails may be needed depending on the roof. The required spacing between nails varies depending on the flashing type (drip edge, chimney flashing, etc)
Before applying the torch down roofing, spray the flashing with a bitumen primer that is compatible with the torch down roofing. Be sure to choose a primer that matches the manufacturer’s recommendations. Hold the spray nozzle about 6 inches from the flashing, moving it across the surface to achieve an even, opaque layer of primer. Now you can install the next layer of rubber roofing on top of it.
7. Install the Second Layer of Membrane for rubber roof
Installing a torch down roof usually includes installing two or three layers of the rubber membrane. So when you have finished installing the first layer and all the flashing, install the second layer of the rubber membrane, in the same manner as explained in step 3.
Consult with a professional contractor to see how many layers you need to install for your particular roof.
8. Cover the Seams with Granules
If your roofing material has a granule surface, you can cover the bitumen flow outs from the seams with granules by spreading them over the seams while the flow out is still hot. This will provide an aesthetically pleasing finish to the roof.
Note, the loose granules can be purchased separately.
9. Coat the Rubber Roof
As the last step, you can put a silicon coating on to protect the roofing membrane from sunlight (see Figure 28). This will help the roofing material last longer.

Figure 28
Final Thoughts
As you can see, installing torch down roofing is not an easy job. It includes many details and requires experience so that you end up with a properly installed rubber roof. It may seem like a tough job. However, with the right guidance and tools, it can be done successfully. If you are not confident in your ability to complete this project, consider seeking the help of a professional roofing contractor who has experience in the torch down method.
At Matrix Company Solutions Corp., we have a team of experts with years of experience in all types of home renovation projects, including roofing. We understand that a quality roof is essential to protecting your home and providing you with peace of mind. Our experienced team can help you select the right materials, choose the appropriate installation method, and complete the job safely and efficiently.
With our help, you can rest assured that your rubber roof using the torch down method will be installed to meet the highest standards of quality and durability. Contact us today to learn more about our renovation services and how we can help you achieve a reliable, long-lasting roof that will provide you with years of protection and comfort.


![Comprehensive Guide to Skylight Installation on a Roof Deck [2026 Guide]](https://matrixgc.com/wp-content/uploads/2025/06/Skylight-Installation-400x250.jpg)
0 Comments