Installing a CSST flexible gas line, also known as yellow/black flex pipe, is a great way to provide a home with reliable and efficient gas service. CSST stands for Corrugated Stainless Steel Tubing. It is a type of flexible piping system used for gas supply in residential and commercial buildings. This type of gas line is easy to install and provides a safe gas distribution line throughout the building.
This guide will go through how to properly install a CSST flexible gas line in a home. This article provides a list of tools and materials needed and goes through the steps of the installation. With this guide, a CSST gas line can be installed safely and securely. Matrix Company Solutions Corp. strongly recommends having a professional install or replace any gas lines.
This guide assumes that the iron gas line needs to be replaced with CSST because a leak was found. Therefore, before starting it is recommended to analyze the old gas line for leaks; please refer back to our previous article to find out how to do that.
Note: This article does not include information about obtaining permits or following codes and regulations regarding installing a CSST gas line. These topics will be covered in another article.
Why Use a CSST Flexible gas line?
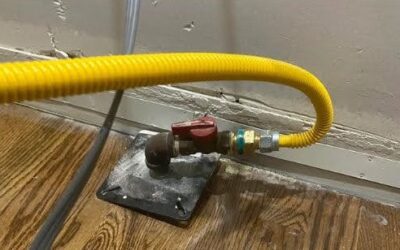
A CSST gas line provides many benefits. It is designed to be flexible, durable, and easy to install, allowing for quick installation. It can be easily routed through tight spaces and around obstacles with minimal disruption to the existing structure, reducing the number of fittings needed and speeding up the installation process. CSST is made from corrugated stainless steel that is coated with a yellow or black polyethylene plastic outer layer (see Figure 1). This outer layer provides protection against corrosion while allowing the pipe to flex as needed. CSST has become increasingly popular due to its ease of installation, safety features, and cost savings compared to traditional rigid gas lines.
Figure 1
Based on this explanation, it makes sense to use CSST to replace a gas line.
Tools and Materials
Below is the list of what is needed to install a CSST gas line.
- CSST Flexible Gas Line
- Flexible Gas Connector
- Proper Fittings
- Thread Tape
- Pipe Lubricant
- Reciprocating Saw
- Adjustable Wrench
- Plumbing Wrench
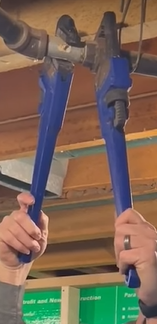
- Steel Tubing Cutter
- Utility Knife
Preparation
There are a few important steps before starting the installation process.
1. Make Sure to Choose the Right CSST Size
When replacing gas lines, use a CSST gas pipe that is the same size as the existing gas pipe. To determine the size of the existing gas pipe, use the following methods:
- Measure the outside diameter of the pipe using a tape measure or ruler.
- Some gas pipes have markings that indicate the size, either stamped or written on the pipe.
- If there is access to the building plans or previous records, the pipe size may be indicated there.
- If unsure about the size of the pipe, consider hiring a licensed plumber or contractor to measure it.
If installing a CSST gas line from scratch, first figure out what size to use. Typically most residential gas lines use ½ or ¾ inch pipes. However, the size of a gas pipe for a home is determined by several factors, including:
- The amount of gas used.
- The distance from the main gas line to the location where the gas will be used.
- The number and capacity of gas-powered appliances in the home.
- Local building codes also dictate the minimum size of the gas pipe required for the specific area.
Consider these factors when determining the size of the gas pipe to ensure that it can meet the demands of the home and comply with local building codes and regulations. Calculating the gas pipe size requires expertise and knowledge. Therefore, we highly recommend the installation of a CSST be done by a licensed contractor.
2. Make Sure to have the Right Fittings
Before starting the installation, remember the fitting (or connector) must be compatible with the CSST.
There are different types of fittings that may or may not be needed depending on the gas line plan (see Figure 2). Remember, each manufacturer’s CSST pipe works with its own unique fittings. Therefore, consult with the manufacturer to determine which fittings are needed.
Figure 2
Step by Step Installation
Installing a CSST gas line is a task that requires careful planning and attention to detail. The following are step-by-step instructions on how to properly install a CSST gas line in a home.
1. Shut Off the Main Gas Valve
The first step, as with any gas-related work, is to turn off the main gas valve. The street side valve is located before the gas meter and the house side valve is inside the home attached to the pipe where the pipe enters the building. Make sure to shut off the street side valve by turning the valve perpendicular to the pipe with an adjustable wrench. (see Figure 3).
Figure 3
2. Remove the Existing Gas Iron Pipe
This is probably the toughest part of the job, especially if the existing iron pipes are old. It is important to note that CSST should not be connected to the gas meter directly. So, DO NOT detach the iron pipe from the gas meter. Before transitioning to CSST, a minimum length of black iron pipe coming from the meter is required. The minimum amount is determined by the CSST manufacturer and local codes.
Once the minimum amount is determined, cut the pipe from that point using a reciprocating saw. If a union exists in that spot, consider unscrewing the union instead of cutting the pipe.
To unscrew the union, hold the union tightly using a pipe wrench and grasp the pipe with a second pipe wrench (see Figure 4). Turn the union by pushing on the pipe wrench. Then, carefully lift the pipe from the union.
Figure 4
The fittings may not turn because corrosion has welded the threads together. If this is the case, spray some lubricant on the threads, wait a while, and try turning the pipe once more. Lubricant may have to be applied several times before the pipe will turn.
Loosen all the fittings including unions, tees, and drips using the above method and disconnect the pipes from all the appliances.
3. Connect the CSST to the Iron Pipe
Once all the pipes have been removed, it is time to connect the CSST to the iron pipe where it was cut. For this connection, connect the nut to the CSST and the female or male connector to the iron pipe.
Figure 5
Follow the below steps to connect the nut to the CSST pipe:
- First, cut the CSST to length along a valley in the corrugation using a steel tubing cutter (see Figure 6).
- Determining the length needed will depend on several factors:
- The distance between the main gas supply and the location of the appliance requiring gas.
- The layout of the building.
- Any obstacles that may be in the path of the new gas line.
The best way to determine the exact length of the CSST gas line is to have a detailed installation plan that figures in all of the above factors. This plan should be provided by a licensed plumber or a professional engineer.
Figure 6
- Depending on the CSST brand, the fitting will have either one or multiple rings (see Figure 7).
Figure 7
- For three-part fittings with just one ring, count three valleys (or indentations) on the pipe and score the yellow cover with a utility knife, make another perpendicular score, and remove the cover (see Figure 8).
Figure 8
- Then, slide the nut over the tube with the threads facing the connection (see Figure 9).
Figure 9
- Next, slide the retainer ring over the first valley. To tighten the ring use a wrench to squeeze it together ensuring it sits completely in the valley and then slide the nut over the ring (see Figure 10).
Figure 10
- For fittings with three rings remove the yellow cover up to the fifth valley and slide the nut over the tube with the threads facing the connection (see Figure 11).
Figure 11
- Install the retainer ring in the fourth valley and tighten it by squeezing, with a wrench. Then install the metal washer and the rubber o-ring. Finally slide the nut over the rings (see Figure 12).
Figure 12
Now attach the female connector to the iron pipe.
- First, apply thread tape on the iron pipe’s threads (see Figure 13).
Figure 13
- Then, connect the CSST female fitting to the iron pipe and tighten it with a wrench (see Figure 14).
Figure 14
- Finally, fasten the nut and the female connector with an adjustable wrench. Grab the female connector with one wrench and turn the nut with another wrench. Remember not to turn the female connector (see Figure 15).
Figure 15
4. Attach Tee Fittings Where Branches are Needed
Tee fittings are typically used to branch off the main gas line to an area where a gas appliance, such as a stove, furnace, or hot water tank, is located. (see Figure 16) The tee fitting should be installed to the CSST near the appliance; the gas connector will run from the tee fitting to the appliance.
Figure 16
Installing the tee fitting is pretty much the same as installing the nut to the CSST as explained earlier. To install the tee fitting, cut the main gas line to the appropriate length using a tubing cutter, remove the yellow cover, the amount needed depends on the tee fitting type, install the rings, and then slip the fitting onto the CSST and tighten it using a wrench.
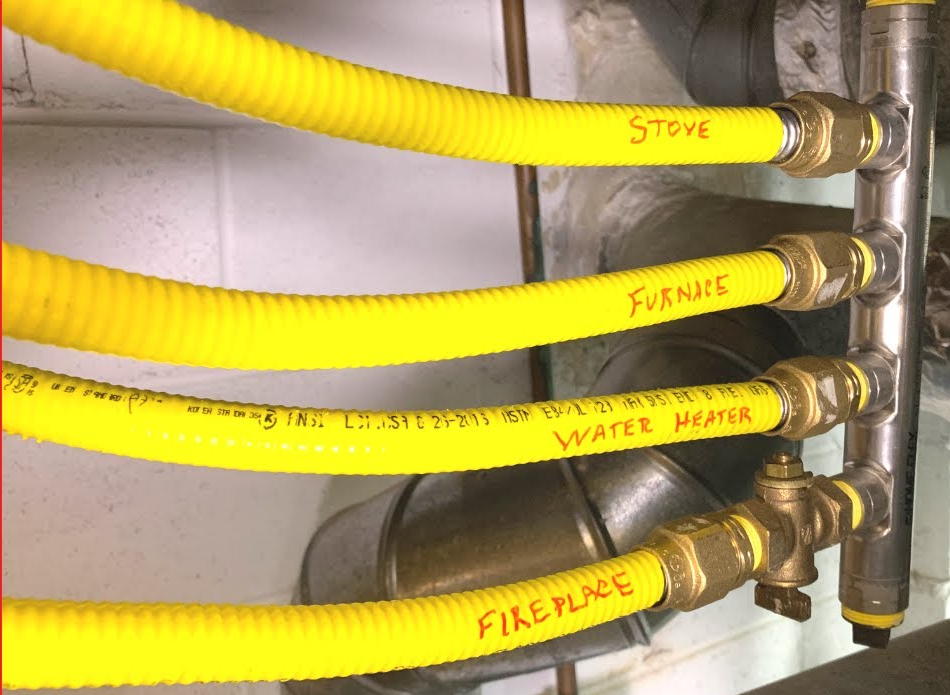
A manifold can be used in place of a Tee fitting. A manifold is a fitting that provides multiple outlets allowing for the distribution of gas to various points. (see Figure 17)
Figure 17
5. Attach a Termination Flange Where Required
A CSST termination flange is used to transition between a CSST and gas connector, valve, or an appliance’s steel pipes. This fitting is needed when securing the CSST to a wall or floor or making a transition. The flange provides a secure and permanent connection, ensuring it is tight and safe.
When attaching the termination flange to the CSST:
- First, cut the CSST to length, remove the yellow cover as needed depending on the fitting type, and slide the flange over the CSST.
- Then install the ring and slide the female connector over the CSST and connect it to the flange. To tighten this connection remember to turn the flange with a wrench.
- Now install the flange to the floor or wall using screws.
Figure 18
6. Connect the Gas Connectors to the Tee Fitting or Termination Flange
A gas connector is used to connect a gas appliance, such as a stove or furnace, to a gas line. The main difference between CSST and a gas connector is that CSST is used as a main gas supply line, while a gas connector is used to connect an appliance to the gas supply. (see Figure 19)
Figure 19 – Gas Connector
For this step, first check the compatibility of connectors and appliances and make sure you have the right connector and fittings.
To connect the gas connector to the CSST:
- First, cut the gas connector to the appropriate length, ensuring a proper fit and allowing enough slack for movement.
- Attach the gas connector to the tee fitting or termination flange, making sure they are fully seated and properly aligned.
- Secure the connection using a wrench to tighten the fitting according to the manufacturer’s instructions.
Connect the appliance shut-off valve to the fitting at this step and then connect the gas connector to the shut-off valve (see Figure 19).
Figure 19
7. Connect the Gas Connectors to the Appliances
This is the last step of the installation process:
- Begin by applying thread tape to the fitting, and connect it to the appliance’s inlet valve.
- Then connect the gas connector to the fitting and hand-tighten the connection and then use a wrench to tighten it further.
Figure 20
At this step, install a shut off valve for each appliance on the gas line if one was not installed previously.
8. Check for Any Gas Leaks
Installing a CSST Flexible gas line is a task that requires expertise and careful attention to detail. After installation, it is essential to check for any potential gas leaks related to improper installation. This can be done through a variety of methods.
To check for gas leaks:
- Check all the connections for tightness and proper installation. Make sure that all fittings and valves are tightened to the proper torque and that they are free from damage or defects.
- Check for any visible signs of damage or wear along the CSST Flexible gas line, such as holes, cracks, or corrosion.
- Plug all open ends of gas pipes with a cap fitting. (see Figure 21 below)
- Before turning on the gas supply, have the CSST Flexible gas line checked for leaks by a professional or the local gas company.
Figure 21 Cap Fitting
It is important to remember that gas leaks are very dangerous and can cause fires or explosions. If a gas leak is suspected, call for professional help immediately.
9. Bond the CSST Flexible gas line to the Ground on the Electrical Panel Box
Bonding the CSST to the ground on the electrical panel box is an important safety measure that should not be overlooked. This process helps to prevent potential gas-related explosions and fires caused by lightning strikes, power surges, and other electrical malfunctions. It also helps to protect people from electric shocks and burns due to faulty wiring or equipment.
To bond the CSST to the ground on the electrical panel box, follow these steps:
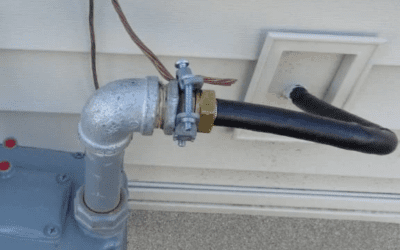
- Attach a bonding clamp to the first fitting of the CSST or to the black iron pipe before the CSST (see Figure 22). If attaching it to the iron pipe remember to sand the black iron where you want to attach the bonding clamp. This is important to ensure the bonding system functions properly. It removes any oxidation or rust on the iron’s surface, ensuring good electrical conductivity between the clamp and the iron.
Figure 22
- Run a grounding wire from the electrical panel box to the bonding clamp. The wire should be at least 16 gauge copper.
- Connect the grounding wire to the bonding clamp. Make sure the clamp is properly tightened to ensure a good connection (see Figure 23).
Figure 23
Final Thoughts
This guide gives an overview of how to install a CSST gas line. Remember to label the system properly, and make sure to keep a record of the installation, including the date, name of the installer, and any other relevant information.
One final word, safety is the most important thing when it comes to gas-related work. It is important to note that installation of CSST gas lines, and gas piping systems in general, should be done by licensed professionals and all local and national codes and standards must be followed. In our next article, we will explain how to get a permit to install a CSST Flexible gas line and go over the codes and regulations related to this work.
If you are thinking of contacting a professional for a CSST Flexible gas line installation or any type of renovation work in the Philadelphia area, Matrix Company Solutions Corp’s. team is here to help. Contact us via our FREE Consultation Service for more information.


![Philadelphia Sump Pump Installation Requirements [2025 Guide]](https://matrixgc.com/wp-content/uploads/2025/06/Philadelphia-Sump-Pump-Installation-Requirements-2025-Guide.png)


0 Comments