Grab bars grab attention, and they have a place in every bathroom. They have a significant role in bathroom accessibility and are used to provide support when getting in and out of a bathtub, washing your hands, or showering.
The most important role of a grab bar is to help prevent falls that cause injuries; they are not just for the physically disabled but also for children and the elderly. Besides improving accessibility, they can affect your bathroom’s overall look and feel and make it more beautiful. If you are wondering how this can happen, keep reading this article.
We will provide valuable information regarding grab bar types, design ideas, and requirements for a grab bar installation in your bathroom. So let’s take a closer look.
What Are the Advantages of Bathroom Grab Bars?
There are many reasons why you might want to install grab bars in your bathroom. Most importantly, it improves the accessibility of your bathroom. It helps children and adults with disabilities maintain balance and avoid slipping and falling on the wet shower or tub floor. It helps them stay independent, avoids them having to ask for help from others, and allows them to enjoy their shower experience.
However, there are also aesthetic advantages to consider when designing a bathroom that includes grab bars. You can consider numerous design options for a grab bar installation to make sure your bathroom is beautiful.
What Are the Different Grab Bar Types?
There are many types of grab bars with different styles and materials on the market. Here, we are going to classify them into five major categories to help you identify which one best fits your needs and preferences.
1. Wall-Mounted Grab Bars
As its name suggests, this grab bar is installed on the wall using screws, anchors, or even suction cups. This is the most common type of grab bar seen in bathrooms. Wall-mounted grab bars can be straight or wavy, and you can install them horizontally, vertically, or at an angle. (see Figure 1)

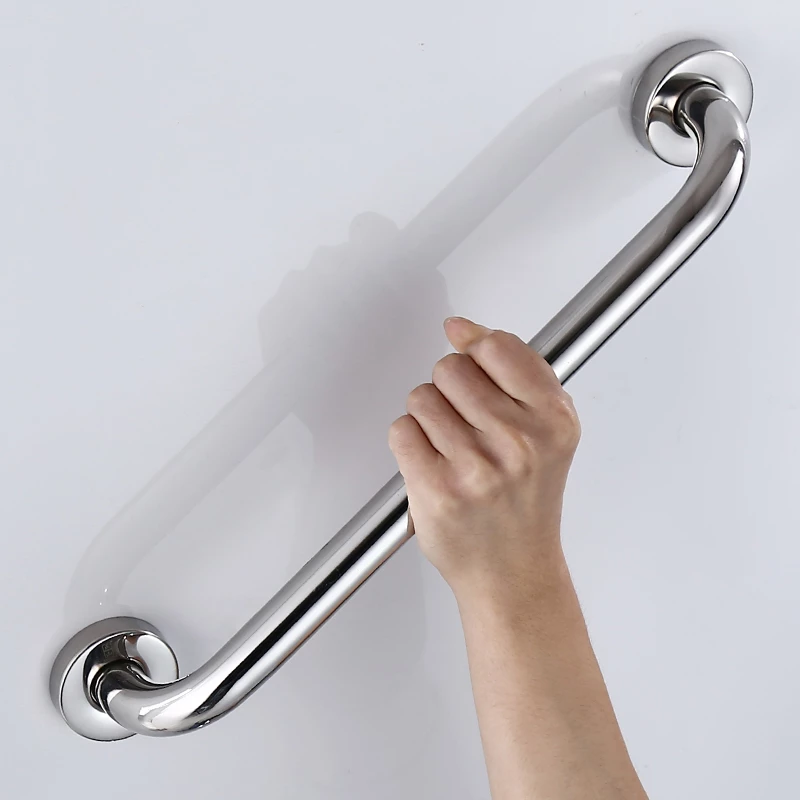
Figure 1
2. Tub-Mounted Grab Bars
For the bathtub, you can install a tub-mounted grab bar. This grab bar can be bolted onto your tub wall or installed to the tub itself (see Figure 2). It helps provide stability for getting in and out of the tub.


Figure 2
3. Flip Up or Flip Down Grab Bars
Just like the folding shower seat, you can have grab bars that can be folded when not in use. You can flip them up to save space, especially in small bathrooms. They can be attached directly to the wall or floor using a base. You may use these grab bars around the toilet, bathtub, or shower area. (see Figure 3)

Figure 3
4. Slide Bar Grab Bars With Handheld Showerhead
A shower slide bar looks like a handle attached to the wall, and many individuals, young and old, will naturally use it as support. However, most of the showerhead slide bars are not intended to be used for support. They are designed to change the shower head’s height, but some shower slide bar models do function as a grab bar. (see Figure 4)

Figure 4
5. Free-Standing Grab Bars
A free-standing grab bar does not require any screws, nails, or formal installation. These grab bars can be floor-to-ceiling and work by twisting a jackscrew mechanism to extend the bar to a length between the floor and ceiling that firmly locks it in place.
A toilet enclosure with free-standing rails and a safety base to aid with sitting down and standing up is another type of free-standing grab bar. (see Figure 5)
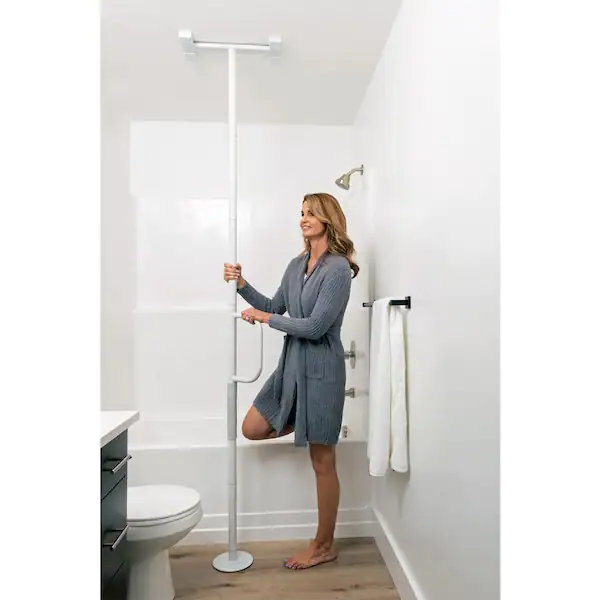

Figure 5
Cool Design Ideas for Your Bathroom Grab Bar
Grab bars are no longer unattractive accessories installed in the bathroom. Your grab bar will look cool if you combine it with other features like shelving, towel bars, and toilet paper holders. There are other creative design ideas to make your bathroom more aesthetically pleasing. HealthCraft Products is a company that creates several innovative products to help make your bathroom more appealing. Let’s look at a few examples:
1. Grab Bar with a Shelf

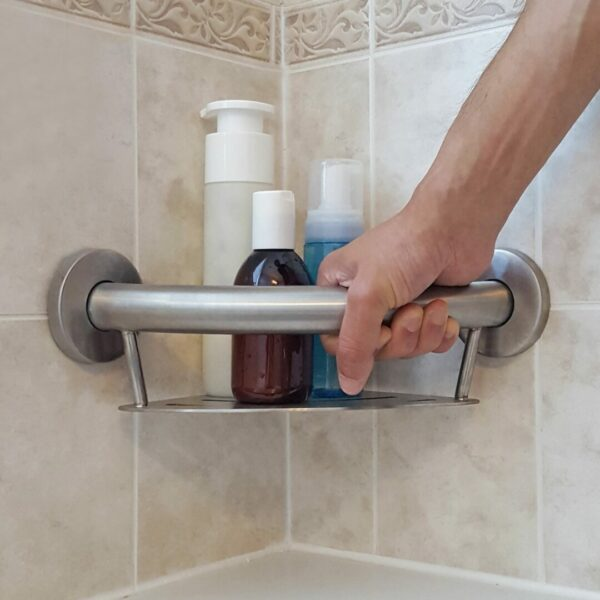
Figure 6
2. Grab Bar with a Towel Holder

Figure 7
3. Grab Bar with a Toilet Paper Holder

Figure 8
4. Illuminated Grab bar
One of the brand-new grab bar types is the illuminated grab bar. The model that you can see in figure 9 is made from polished stainless steel. It comes in different lengths and can support up to 550 lbs. It has LED lights at both ends to provide soft illumination in the dark and turns on when sound is detected.
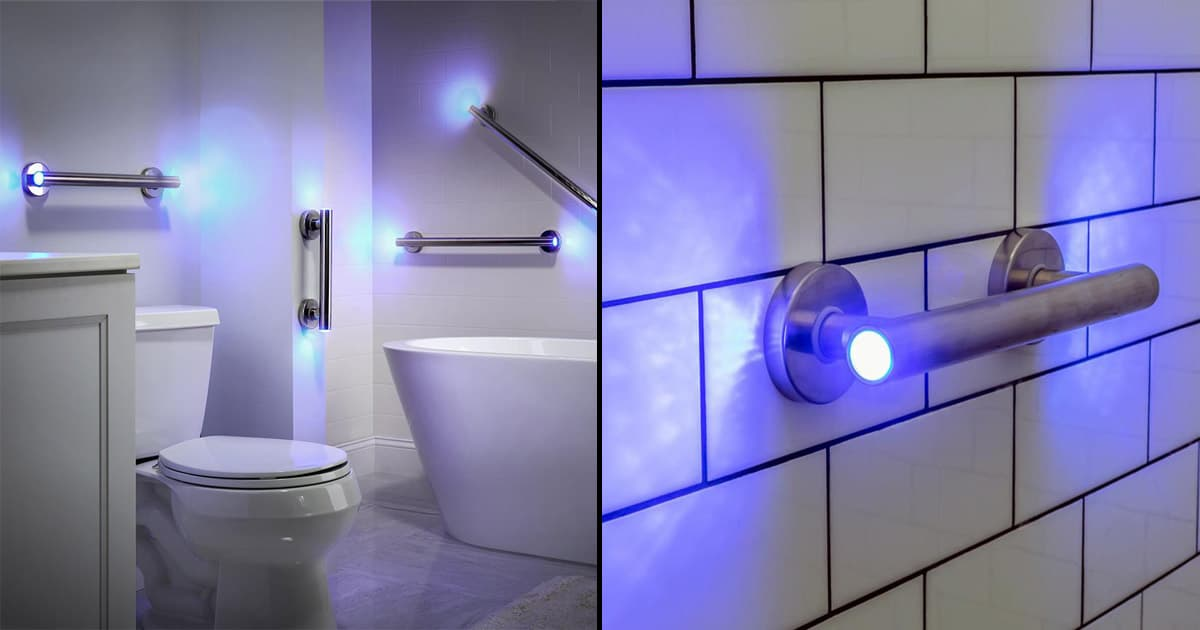
Figure 9
5. Custom-Designed Grab Bars
Some companies design custom grab bars for customers’ specific needs and preferences. A custom-designed grab bar might be one that matches your fixtures and other accessories (see Figure 10) or it could be something special and different that provides a new look (see Figure 11).


Figure 10


Figure 11
Grab Bar ADA (Americans with Disabilities Act) General Requirements
Up until now, we have discussed different types of shower grab bars, their features, benefits, and effect on a bathroom design. But the question is: What type of grab bar is right for you and is it functional? Does the grab bar provide the accessibility that you are looking for? The best answer is to take a look at the ADA requirements for grab bars before deciding. Keep in mind that bathroom grab bars should comply with the ADA 609 standards.
According to the ADA, grab bars should be able to withstand up to 250 pounds of force, and should be installed horizontally. It is also important that all the surfaces around the grab bar and the grab bar itself do not have any sharp edges in order to avoid injuries.
Additionally, the grab bar’s cross-section should comply with the following requirements:
- If it has a circular cross-section the outside diameter should be 1 ¼ to 2 inches.
- If it has a non circular cross-section, the cross-section dimension should be 2 inches maximum and the perimeter dimension should be 4 to 4.8 inches maximum (see Figure 12).

Figure 12
This standard does not state a specific shape or type of grab bar; you can use whichever type you like that meets the mentioned requirements.
Where Should You Install the Grab Bars According to the ADA?
Obviously, the position of a grab bar determines if it provides the accessibility and performance you are looking for. Although you can install grab bars on almost any wall surface, such as tile, wood, or drywall, we highly recommend attaching them directly to the wall studs. This will ensure a secure grab bar installation. Therefore, grab bars should be installed in the most convenient and safest place available.
Keep in mind that you can use any method to install the grab bar as long as it provides a secure grip. Also, the grab bars should not block the bathroom’s required clear floor space.
This part of the article breaks down the ADA’s grab bar installation requirements into four sections: General Spacing Requirements, Installation Requirements for Water Closets, and Installation Requirements for Grab Bars Around Bathtubs and in Shower Compartments. So, let’s get down to it.
General Spacing Requirements
As per the ADA, the general spacing requirements are:
- 1 ½ inch space between the wall and grab bar,
- A minimum of 1 ½ inch space between the grab bar and projecting objects below and at the end,
- The space between the grab bar and projecting objects below and at the ends shall be 11/2 inches minimum.
- A minimum of 12 inches of space between the grab bar and the projecting object above. The space between the grab bar and shower controls, shower fittings, and other grab bars above shall be permitted to be 11/2 inches minimum (see Figure 13).

Figure 13
- 33 to 36 inches of space between the top of the gripping surface of the grab bar and the finished floor, 18 to 27 inches in water closets for children (see Figure 14).

Figure 14
Grab Bars for Water Closets
Grab bars for water closets should be installed on the side and rear walls.
You should place the side wall grab bar 12 inches maximum from the rear wall and extend it at least 54 inches from the rear wall. Also, the length of the grab bar should be at least 42 inches.
The rear wall grab bar should be placed 12 inches maximum from the back wall and extend 12 inches minimum on one side and 24 inches minimum on the other side. Also, the length of the grab bar should be at least 36 inches (see Figure 15). It can be 24 inches long when a 36 inch grab bar is not applicable. Keep in mind that you can change the location of this grab bar in case it conflicts with the location of the flush valves.


Figure 15
Grab Bars for Bathtubs
You need two grab bars on the bathtub’s back wall. One should be on the back wall 33 to 36 inches above the ground, the other 8 to 10 inches above the tub’s rim. There should also be a 24 inch minimum long grab bar on the control end wall.
If the tub has permanent seats you should install the grab bars 12 inches maximum from the control end wall and 15 inches maximum from the head end wall (see Figure 16).
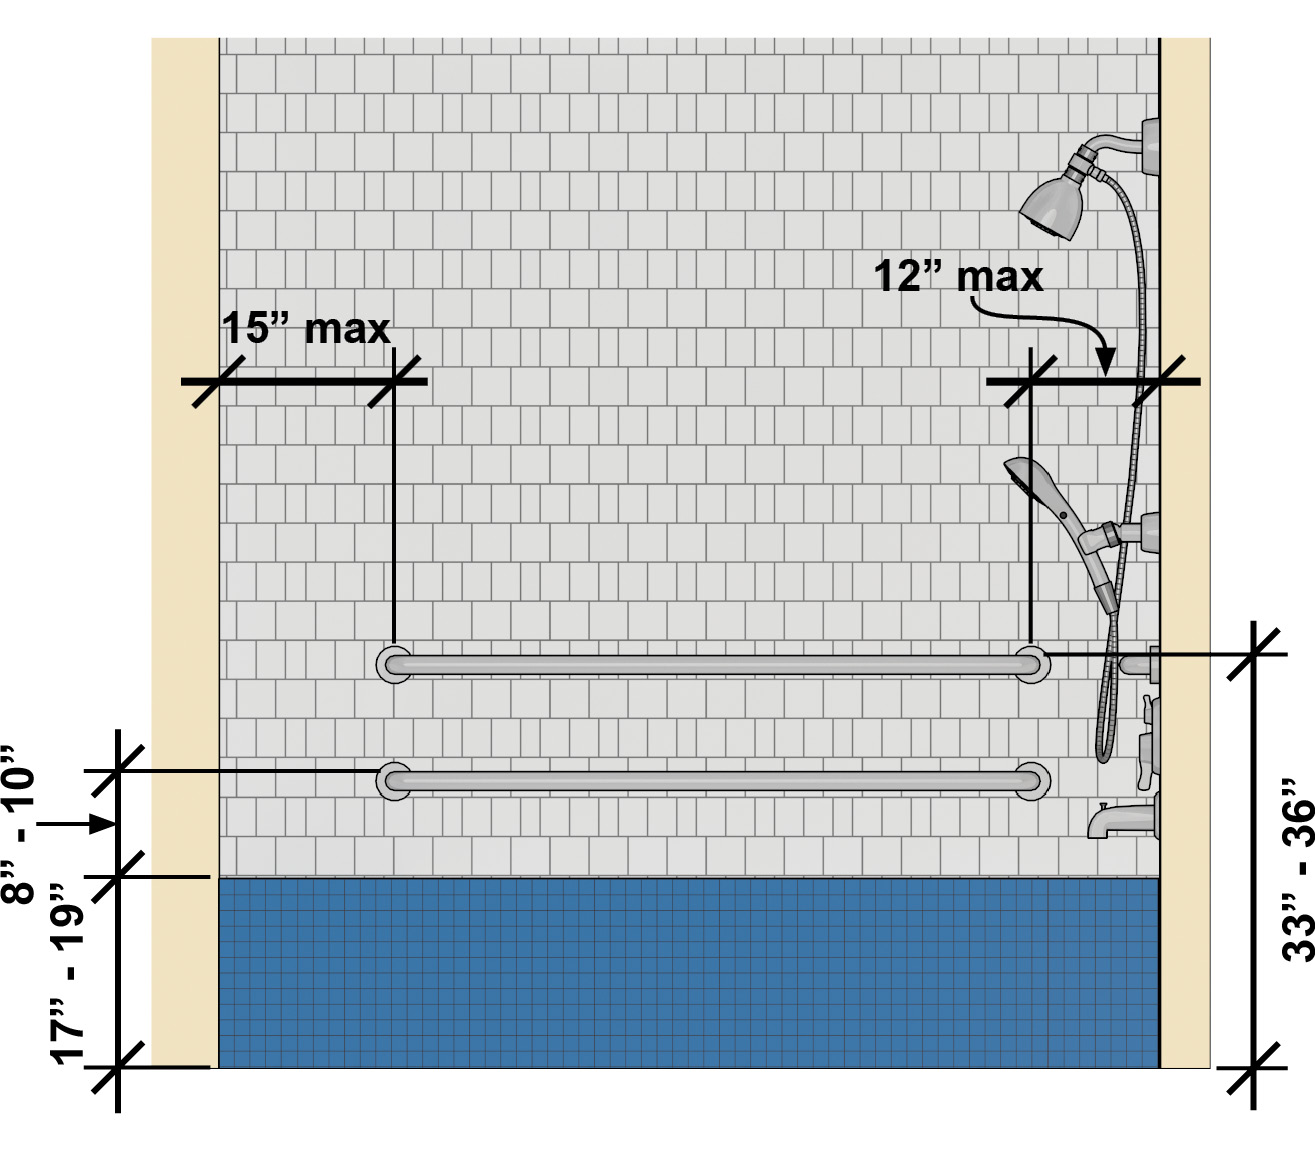
Figure 16
When the tub does not include a permanent seat, the bars should be 12 inches maximum from the control end wall and 24 inches maximum from the head end wall. Also, the bars should be at least 24 inches long. There should be a 12 inch minimum long grab bar on the head end wall for these tubs (see Figure 17).

Figure 17
Grab Bars for Shower Compartments
If you have an ADA-compliant shower, it will usually be a transfer-type, roll-in type, or alternate roll-in type.
Grab bars must be installed across the control wall and back wall of a transfer-type shower and extend 18 inches from the control wall (see Figure 18).

Figure 18
In a roll-in shower, there should be three grab bars; one on each wall, and they should have a maximum of 6 inches distance from adjacent walls (see Figure 19). Remember that if the shower includes a seat, you are not allowed to install a grab bar above the seat, so that wall would not have a grab bar.

Figure 19
Grab bars must be installed on the rear wall and the side wall farthest from the entry in alternative roll-in showers. Again you cannot install a grab bar above a seat and grab bars must be installed no closer than 6 inches from adjacent walls (see Figure 20).

Figure 20
How Much Does it Cost To Add a Grab Bar?
Different factors, including the grab bar size, material, and type, affect the cost of installing a grab bar. The average cost to install a grab bar is $340, and labor and material expenses typically cost between $90 and $400. Simple grab bar replacement jobs might run as low as $80, while complex jobs can cost upwards of $600. Although, if you are looking for a custom-designed grab bar, you should expect higher costs.
Wrapping Up…
Grab bar installations might seem unnecessary, but they can make all the difference when you want to ensure that your bathroom is as accessible and functional as possible. With the right features and upscale materials, these bars will not look out of place in even the fanciest bathrooms. Their true value lies in offering safety for people with limited mobility or children.
Safety is one of the most important things you need to consider in a bathroom renovation. If you have physically disabled people or the elderly in your family, there should be a greater focus on designing for their needs; this can be achieved by installing grab bars. When you reach out to a company that specializes in home renovations, they will be able to find the best grab bar type or design grab bars according to your exact needs.
Call us today for a FREE consultation.


My site QH7 covers a lot of topics about Cosmetics and I thought we could greatly benefit from each other. Awesome posts by the way!