Have you recently bought a dishwasher? If so, that’s great! Everyone knows how to use a dishwasher but do you know how to install one?
Even if you are a handyman, you may balk at the idea of installing a dishwasher all by yourself. You are not alone, many people decide to install the dishwasher themselves instead of paying for a professional service. Fortunately, it is not too difficult as long as you follow the steps in this article.
We will explain how to install a GE Dishwasher in this article. But don’t worry if you bought a built-in dishwasher of another brand. The installation method for most built-in dishwashers is generally the same. By following the steps below, you will end up with a perfectly installed dishwasher. Grab your tools and let’s install a dishwasher together!
Tools and Materials
Like every other installation job, preparing your tools and materials is the first step in a dishwasher installation. Some of the items on the list below, like the mounting brackets, screws, and drain hose, may come with the dishwasher. Also depending on your home’s plumbing situation you might already have a waste tee, air gap, or shut-off valve. Therefore before starting the installation, gather any materials that you do not already have. Additionally, keep in mind that you might require different types of materials depending on the dishwasher model you are installing and the installation method you select for the drain, water supply, and power supply.
Installation Package (Included with Dishwasher)
-
- Junction box cover and #10 hex-head screw
- Hose clamp
- Drain hose (approximately 58” long)
- Drain hose hanger
- 2 #8-18 hex head screws to secure brackets to washer tub frame
- 1 top trim piece (on some models)
- 2 side trim pieces
- 2 mounting brackets for wood countertops or side cabinets
- 2 #8-18 x 5/8” Phillips special head screws, to secure dishwasher to underside of countertop or to side cabinets
- Plug buttons
- Literature, samples and/or coupons
Materials
- 90° elbow (3/4” hose internal thread on one end, opposite end sized to fit water supply)
- UL-listed wire nuts (3)
- Masking Tape
For new installation only:
- Air gap for drain hose, if required
- Waste tee for house plumbing, if applicable
- Electrical cable or Power Cord Kit WX09X70910 (5.4 Ft) or WX09X70911 (7.9 ft) depending on your installation method
- Hose clamp (if needed for optional drain hose)
- Strain relief for electrical connection
- Hand shut-off valve (recommended)
- Hot Water Line–3/8” minimum
- Copper tubing (including ferrule, compression nut) or GE Appliances Part # WX28X326, flexible braided hose
- WD24X10065 drain hose (12’ long), if needed.
Tools
- Phillips-head screwdriver
- 1/4” and 5/16” nut driver
- 6” Adjustable wrench
- Level
- Carpenter’s square
- Measuring tape
- Safety glasses
- Flashlight
- Bucket to catch water when flushing the line
- 15/16” socket (optional for skid removal)
- Gloves
- Pliers
For new installation only:
- Tubing cutter
- Drill and appropriate bits
- Hole saw set
Preparation
Before getting started, you need to make sure that everything is prepared to install the new dishwasher.
1. Turn off the Water and Electricity
Before dishwasher installation, to avoid the risk of a water leaking or shock, turn off the water and electricity. The water’s shut-off valve is typically found underneath the kitchen sink and is connected to the hot water line that regulates water flow to the dishwasher and faucet at the same time. If you cannot find the shut-off valve, you must shut off the home’s main water valve. Next, find your home’s breaker box and turn off the electricity to the kitchen, make sure the electricity is off to the dishwasher prior to starting the installation process.
2. Remove the Old Dishwasher
If you are replacing your current dishwasher with a new one, the first thing you should do is remove the old dishwasher.
Start by turning off the water and running the old dishwasher for approximately 30 seconds to clear out any remaining water in the dishwasher. Then disconnect the drain line and water supply from under the kitchen sink. To avoid damaging your floors, cover the area with cardboard. Remove the trim pieces (if they exist) and toe-kick. Remove any screws or bolts securing the dishwasher to your countertop or cabinets. Carefully pull it out onto the cardboard. To make room for the new unit, move the old one out of the way.
3. Unpack the Dishwasher
Unpacking the dishwasher is the easiest part of the installation process. But here is an important point that is definitely worth mentioning. Dishwashers usually come in a box, with instructions printed on the box, that show how to open the box. It is important to follow these instructions to make sure that you do not damage any part of the dishwasher. So, to start, unpack the dishwasher according to the instructions.
4. Read the Installation Manual
As mentioned earlier, the steps of installing a built-in dishwasher are the same for different brands, but there may be minor differences. Therefore, we highly recommend carefully reading the manual that comes with your dishwasher before going through the installation process. It is also important to follow the manufacturer’s installation instructions to keep from voiding the warranty.
5. Prepare the Dishwasher Enclosure
The typical dimensions of a standard dishwasher are 35 inches in height, 24 inches in width, and 24 inches in depth. However, we suggest double-checking the dishwasher’s size and ensuring that it fits properly in the space, especially if you are going to install a compact or oversized dishwasher. Remember that the dimensions of dishwashers are defined by the opening size they are designed to fit into, not by the dimensions of the dishwasher itself.
Also, allow at least 27 inches of clearance in front of the dishwasher to ensure you can open the door all the way.
If you install the dishwasher in a corner, allow two inches between adjacent appliances, walls, and cabinets (see Figure 1).
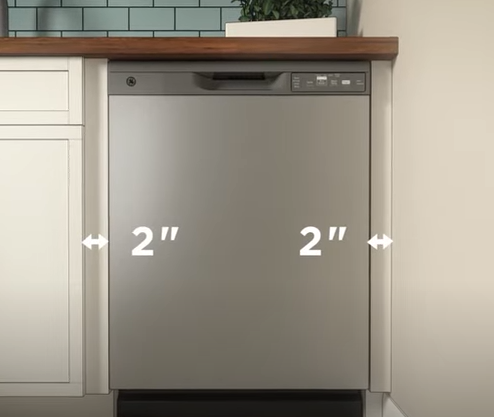
Figure 1
A final point, ensure that the dishwasher enclosure’s back wall is free of pipes and wires. Once the dishwasher is installed any pipes or wires will be very difficult to access or they may prevent the dishwasher from being pushed back completely into the enclosure.
6. Check the Door Balance
It is important to make sure that the dishwasher door is balanced and can be opened and closed easily. To check, hold the top of the dishwasher securely and open the door. The door should close itself within 20° from vertical, maintain its position between 20° to 70°, and fall fully open beyond 70° (see Figure 2).
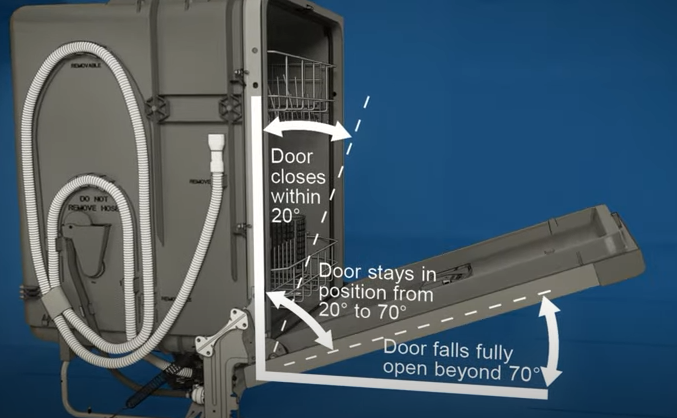
Figure 2
You might have to adjust the door spring tension if it is not balanced. The door balance spring prevents the dishwasher door from falling down. If the tension is too low, the door will sag; if it is too high, the door will swing forcefully. You can increase or decrease the tension by pulling the spring clip out and moving it to the next slot for more tension or to the previous slot for less tension. The adjustment method might be different depending on the dishwasher model. If your dishwasher seems to be different, refer to your dishwasher installation manual to adjust the spring. (see Figure 3)
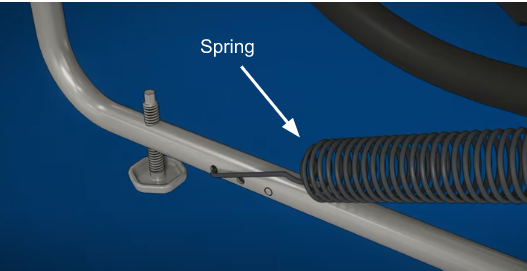
Figure 3
Also, make sure to check that the spring cable routing is held in place on the pulley (see Figure 4).
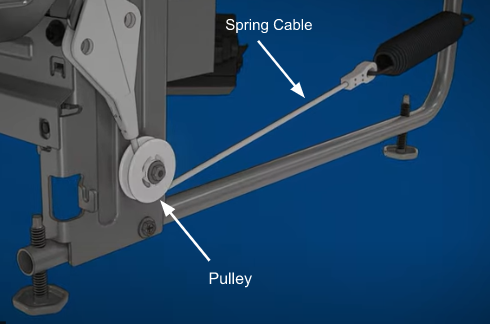
Figure 4
7. Evaluate the Plumbing Situation
A hot water supply and a drain line connection are required when installing a dishwasher in your kitchen. If you are replacing your dishwasher simply use the connections that already exist. But if you are installing a dishwasher from scratch, make sure you have these connections in place before installation. Keep in mind, you can connect your dishwasher to the water supply that provides water to the sink. There are three methods for connecting the dishwasher water line to the water supply:
1. If there is a two-way shut-off valve on the hot water supply under the sink, remove it and install a three-way shut-off valve (see Figure 5). The three-way valve will allow you to connect the dishwasher water line to this valve.
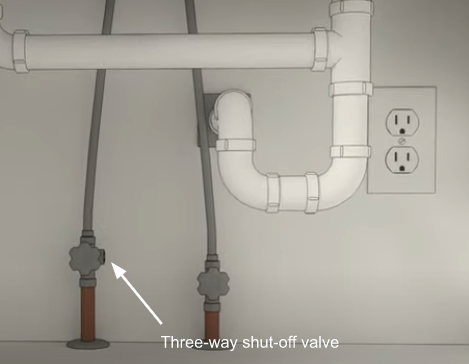
Figure 5
2. An alternative is to install a tee connection to the hot water supply. This provides two branches. You can install shut-off valves for each branch and connect water lines for the dishwasher and sink separately to each branch. (see Figure 6)
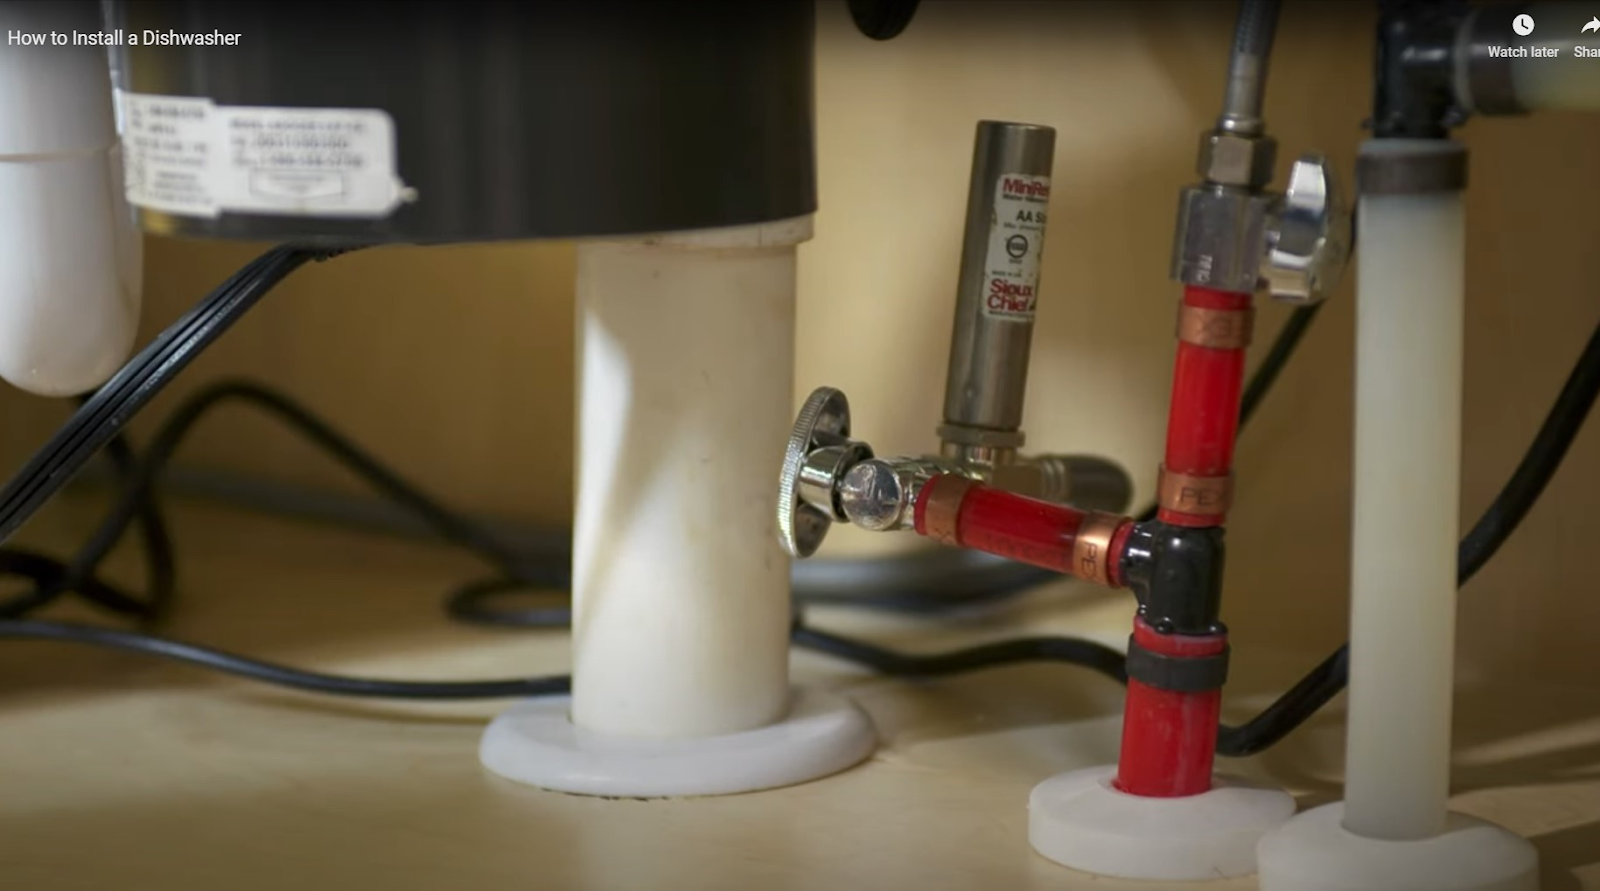
Figure 6
3. The last option is to install a manifold to the main hot water supply if you want to have multiple branches.
Remember to adjust the temperature of the water heater to between 120°F and 140 °F and the water pressure should be 20 to 120 PSI.
For more information on testing the water pressure with a pressure gauge, watch this video.
For the drain hose connection, there are two systems:
1. Installing the drain hose to an air gap fitting installed on the countertop or sink deck with a waste tee or disposer (see Figure 7).
An air gap is a small metal or plastic fitting that is fitted on the countertop or sink with a decorative cap. Two hose fittings are located on the device’s underside, below the sink or countertop. The incoming dishwasher drain line is connected to one fitting, while a secondary hose runs from the other fitting to the kitchen sink drain pipe or disposer.
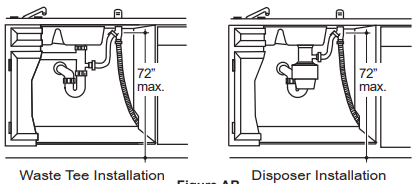
Figure 7
2. Using a high-loop system and installing the drain hose to the disposer or waste tee (see Figure 8).
In this method, the dishwasher’s drain pipe is looped up as high as it can go under the countertop to the drain system. Then, the drain hose is connected to the disposer or waste tee.

Figure 8
A word of caution: If you have a garbage disposal under your sink, make sure to remove the drain plug.
If you are installing a dishwasher for the first time, you need to drill a hole in the cabinet’s side to put the water and drain hoses through and a separate hole for the electrical cable to go through if the plug is in the adjacent cabinet or sink base. (see Figure 9)

Figure 9
8. Evaluate the Electrical Situation
The NEC (National Electrical Code) requires that dishwashers include GFCI (Ground Fault Circuit Interrupter) protection. Also, a separate circuit from the electrical service panel is required for the dishwasher. Consider installing a new circuit before installing a dishwasher if yours is not already wired this way. Another point to consider is that dishwashers might plug into an outlet using a standard appliance cord or can be physically connected to the household wiring (hardwiring).
Working with electricity can be dangerous. For this step, we highly recommend calling an electrician to make sure that your electrical is prepared and safe for the dishwasher installation.
Step by Step Installation
Whether you are replacing your dishwasher or installing a new one from scratch, you can follow the below steps to ensure a perfect installation.
Remember: Depending on the dishwasher brand and model, some steps might be slightly different. Always refer to your dishwasher’s installation manual for further information.
1. Connect the Water Line to the Dishwasher
To provide the water supply for the dishwasher, you will need a water line and a 90° elbow. All dishwashers are supplied with a ⅜ inch compression fitting that connects to the water valve. When connecting the water line to the dishwasher, you will need a 90° elbow. To have better access, lay the dishwasher on its back.
First thread the elbow onto the water valve and make sure the rubber gasket is located between the valve and the elbow (see Figure 10). You can use an adjustable wrench to tighten the elbow but be careful not to over tighten it.
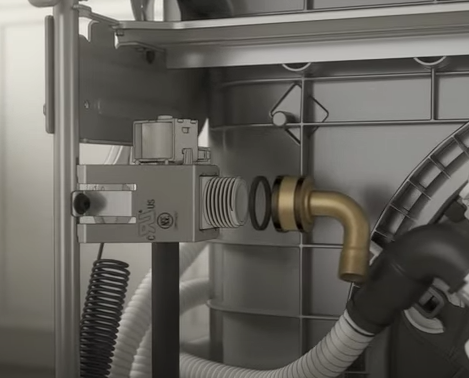
Figure 10
Next connect the supply line to the 90° brass elbow.
If a flexible braided hose connection is being used, use an adjustable wrench to secure the nut to the 90° elbow (see Figure 11, left). If using a copper tubing connection, slide the compression nut and then the ferrule over the end of the water line. Then, connect the water line to the 90° elbow and secure the ferrule to the elbow using a compression nut (see Figure 11, right).
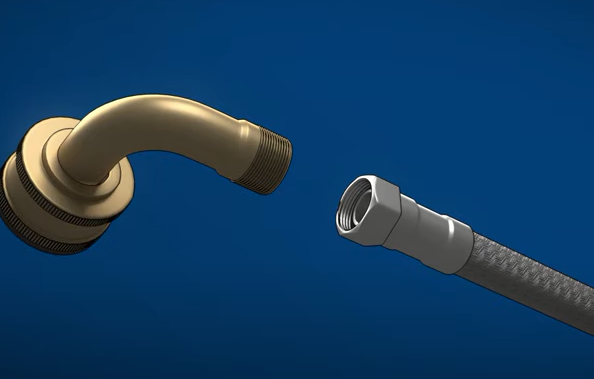

Figure 11
2. Connect the Drain Hose to the Dishwasher
Typically, the dishwasher will have the drain pipe attached. If not, you can connect it now. You just need to connect the hose to the dishwasher and secure it using a hose clamp.
If the hose is already attached to your dishwasher, pay attention to the installation manual for detaching the hose. For example, in Figure 12 you can see that for better drainage some parts of the drain hose should not be detached from the dishwasher.
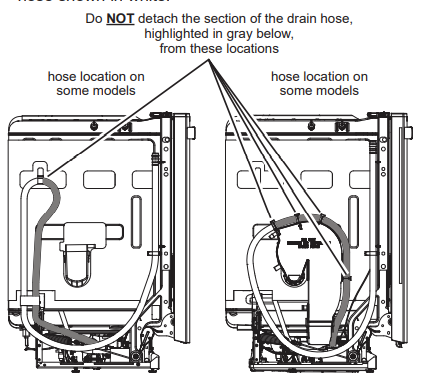
Figure 12
3. Connect the Power Line to the Dishwasher
For the power supply some dishwashers might have a power cord with a plug, if this is the case skip this step. But if the power line is not connected to the dishwasher pay careful attention since you need to do some electrical work.
You can find the electrical wires behind an access panel usually located on the front bottom of the dishwasher. First, find the panel and remove the cover. You should see three wires (green is the ground wire, white is the neutral wire, and black is the hot wire). Next connect these wires to the power line. The power line also has three wires in green, white, and black. So just connect the wires to the same color and cover them with wire nuts (see Figure 13).


Figure 13
Some dishwashers have terminal blocks with screws instead of wires. In this case you will need to connect the wires from the cord to the provided screws.
This type of connection is known as a “screw terminal” connection. It is important to make sure that you connect the wires to the correct terminals and that they are securely tightened. It is a good idea to follow the manufacturer’s instructions or consult with a professional electrician to ensure that the installation is done correctly.
When you are done, replace the panel cover making sure that the wires are not pinched under the cover (see Figure 14).
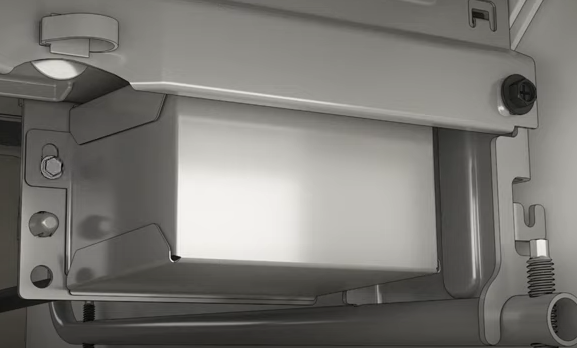
Figure 14
4. Adjust the Dishwasher Legs
Most dishwashers come with three or four adjustable legs so you can adjust the height of the dishwasher depending on the enclosure height. To do so, just turn the legs with your hands or an adjustable wrench to change their height when the dishwasher is laying on its back. (see Figure 15).
You can also adjust the height after you have put the dishwasher in its final position. It may be a bit tough to access the legs in this situation.
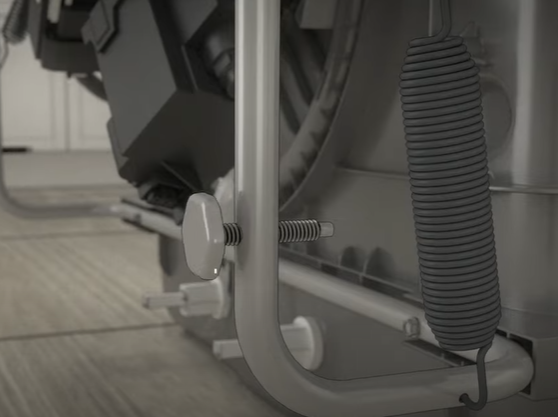
Figure 15
5. Position the Insulation Blanket
Not all dishwashers come with an insulation blanket. If yours has one, stand the dishwasher upright and cover it with the insulation blanket (see Figure 16).
Figure 16
6. Position the Dishwasher
Move the dishwasher close to its final position. Pass the power cord, water line, and drain hose through the slots in the sidewall of the cabinet. If your power plug is on the dishwasher’s back wall and not in the cabinet, attach it now (refer to step 13).
Next, grasp the sides of the dishwasher and slide it into position under the kitchen counter slowly a few inches at a time. As you proceed, pull the drain hose, water line, and power cord through the cabinet. Stop pushing when the dishwasher is about 6 inches from being adjacent with the cabinets.
7. Install the Trim Pieces and Mounting Brackets
If your dishwasher includes trim pieces, install them now. First, install the top trim piece. Line up the center of the trim piece with the dishwasher top latch and press it onto the tub flange (see Figure 17).
Repeat this process for the left and right trim pieces.
Remember that If the space is tight enough, you do not need to use the trim pieces


Figure 17
One of the items that usually comes in the installation package is the mounting bracket for anchoring the dishwasher. You should install the bracket to the dishwasher before placing the dishwasher in its final position.
Dishwashers could be anchored to the countertop or at the sides. Now it is time to decide whether you want to anchor the dishwasher to the countertop or to the sides. If your countertop is something similar to granite, that you can not screw into, secure your dishwasher to the sides.
Here we will follow the second method for a GE dishwasher. However, you can follow the same steps for installing the bracket to the top. If you have another dishwasher brand, look at the installation manual for this part as it might be slightly different.
To install the bracket, first determine if the bracket is too long and extends beyond the edge of the cabinet. If it does, break off the excess length at the provided areas. (see Figure 18).

Figure 18
Place the bracket by sliding the tabs through the tub frame’s slots. Using pliers, bend and twist the tabs to fasten them (see Figure 19).


Figure 19
8. Push the Dishwasher into its Final Position
Push the dishwasher slowly into position until the front panel is flush with the adjacent cabinets. Without moving it too far back, align the appliance with the opening’s center. Then open and close the dishwasher door a few times to make sure it operates smoothly.
9. Check if the Dishwasher is Level
Making sure that the dishwasher is level, prevents damage and unnecessary repair expenses. Remove the lower dish rack and place a level on the door and lower rack track (see Figure 20). The adjustable leveling legs come in handy here. If the dishwasher is not level, twist the legs clockwise to raise and counter-clockwise to lower the height.
Adjust the two front legs first, and one or two back legs next. The dishwasher is level if the bubble in both levels is in the center.

Figure 20
10. Anchor the Dishwasher
When you are satisfied with the dishwasher’s position, you can secure it in place. The mounting brackets that you attached to the dishwasher in step 7 are accessible by opening the dishwasher door. Use the supplied screws and attach the brackets to the cabinet. Then cover the screws with plug buttons if provided (see Figure 21).
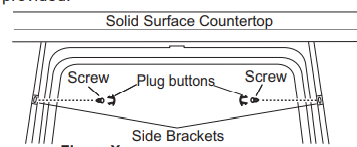
Figure 21
11. Connect the Water Line to the Water Supply
Now that you have your dishwasher in place you can connect the water line to the water supply (see Figure 22). Refer to step 1 to see how to secure this connection.

Figure 22
12. Connect the Drain Hose to the Drain System
As we explained earlier, there are two drain methods. Here we explain how to connect the drain hose to the sink drain with a waste tee in the high-loop system.
In this system, you should hang the drain hose in the cabinet with a drain hanger and then connect it to the waste tee with a hose clamp (see Figure 23).
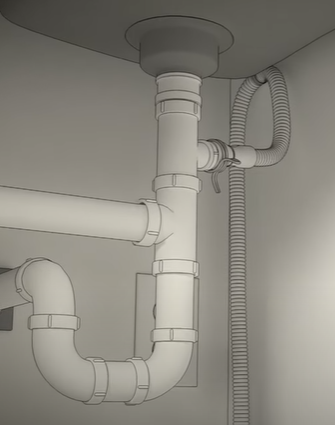
Figure 23
You can also cut the hose or add extension hoses to make it shorter or longer if needed. For complete details, refer to your dishwasher installation manual.
To prevent the excess drain hose from becoming kinked or crushed by the dishwasher, pull the excess drain hose through the cabinet opening. (see Figure 24)

Figure 24
13. Connect the Power Line to the Power Supply
In step 3 you installed the power line to the dishwasher. There could be two options to connect the power line to the household wiring. You can hardwire the dishwasher or plug it in. It is not a decision that you make on your own. You should follow the manufacturer’s recommendations.
Here we used a plug but if you need to connect your dishwasher using the hardwiring method, connect the wires as described in step 3 above.
14. Testing after Installation
Now you are ready to run the final test and make sure the dishwasher works perfectly. First, open the door and remove all foam and paper packaging. Then, check the door and make sure it opens and closes smoothly. Next, add one quart of water to the bottom of the dishwasher to lubricate the pump seal.
To run the wet test, turn on the power supply, and run the dishwasher through an entire cycle. Make sure fresh water is being pumped in and draining appropriately and there are no leaks at any of the connections. If you see any leaks, turn off the power at the breaker and tighten the connections. If you find leaks around the door, it might be because the door is rubbing or is not level. If the dishwasher is not level, the door may not close properly and may leak.
In this step, you should troubleshoot any problems with the dishwasher.
15. Install the Sound Insulation Piece and Toe-kick
The last step of the dishwasher installation process is installing the toe-kick. Some models also have a sound insulation piece that should be placed behind the toe-kick. If your dishwasher has this piece, put it in place now. Then, hold the toe-kick in place and secure it using provided screws (see Figure 25).
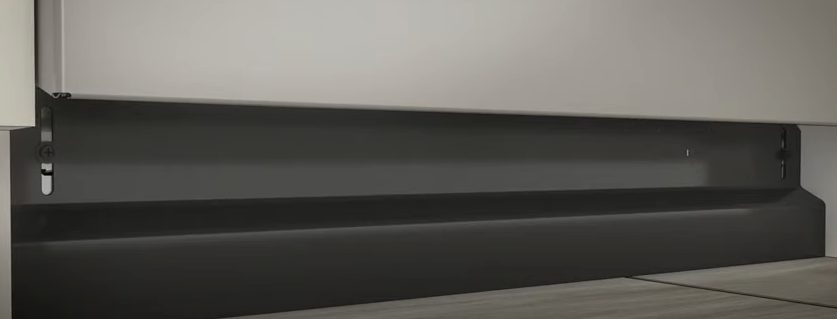
Figure 25
Conclusion
In short, it is fairly easy to install a dishwasher. The process may seem daunting at first, but it is quite straightforward and easy once you know what to do. However, there are some things to consider before diving in and getting started. Other than the things we mentioned as difficult steps, installation is mostly just a matter of following the provided instructions. If you follow the steps above, you should be able to install your dishwasher. And once it is done, you will be glad you did. If you run into any problems, just contact your dishwasher’s manufacturer support and they should be able to help out.


0 Comments