Pex pipe has emerged as a reliable option for hot and cold water supply lines in both residential and commercial buildings. Using Pex pipes has many benefits over traditional copper and CPVC pipes. The most important reason they are popular is their ease of installation. In our previous articles, we have talked about the different types of Pex tubing and how to design Pex systems. It is now time to talk about Pex pipe installation. If you are interested in learning how to install Pex pipes, don’t miss this article. Let’s begin!
Tools and Materials
First let’s go over the tools and materials you will need for this job:
- Pex-B Pipe
- Crimping Tool
- Pipe Cutter
- Go/No-Go Gauge
- Crimp Rings
- Proper Fittings
- Shut-off valve
- End caps
- Half clamps
- Pressure test gauge
- Air compressor
- Foam insulation tubing
- Insulation or gaffer tape
- Hammer
- Pliers
- Drill
- Tape measure
- Pencil
Steps to Install Pex Pipe
1. Plan the Design Layout
The first step when installing Pex Pipe is designing the pipes’ configuration. This important step can save you time and money. You must determine the layout of your design, the type of diverter, and the number and configuration of water. (Read more about design layouts here).
If you do not have experience in this area make sure to consult a professional plumber since this is crucial to ensure a good Pex pipe installation.
2. Prepare Proper Fittings
It is important to select appropriate fittings that are specifically designed for use with Pex pipes. Our previous article introduced different types of Pex fittings and methods for securing Pex connections. Refer to that article to determine which fittings you will need for your installation. We highly recommend buying your fittings from the same manufacturer from which you got your Pex tubing.
3. Turn Off the Water
When working on water pipes, it is important to turn off the water and drain the pipes.
Your water system might have branch shut-off valves that let you turn off water only to the part of the pipe you need to replace. Or, you can use the main shut-off valve to stop water to your entire house while you make the repairs. To drain the water from the pipes, open a faucet on the lowest level of your house, such as the basement or first floor. This will allow the water drain and avoid a water mess when working.
4. Place the Pex Tubing
Depending on your design layout, you will connect the Pex to a water supply manifold (see Figure 1) or the main water source pipe which is usually made of copper. Begin the installation process from the water source or manifold. Next, place the first piece of Pex pipe in your predetermined location according to your design layout. Remember to use half clamps to secure the Pex in place to the walls or studs.
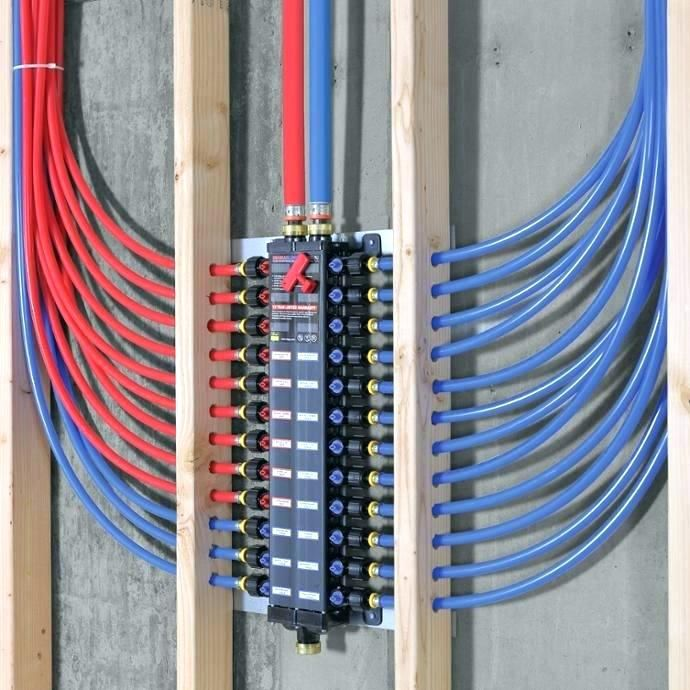
Figure 1
5. Connect Pex Pipes
The next step is to install the Pex pipes. As mentioned earlier, when working with Pex connections, use fittings specifically designed for Pex. Keep in mind that the type of fittings needed depends on the configuration of your Pex system. For instance, when branching off, you need tee fittings, and when changing the direction of Pex pipes, elbow fittings are essential.
To establish a secure connection between Pex pipes, different methods can be used as explained here. Here we will explain the crimping method.
- Begin by cutting the Pex tubing to the desired length using a Pex pipe cutter.
- Slide the crimp ring over the Pex tubing. Position the Pex crimp ring ¼ – ⅛ inch from the end of the tubing.
- Insert the appropriate fitting into the end of the pipe.
- Use a Pex crimping tool to firmly secure the metal ring around the Pex pipe and the fitting (see Figure 2). Remember to use the crimp tool head corresponding to the size of the fitting. For example, if you use a ½ inch fitting, the crimp head also must be ½ inch.
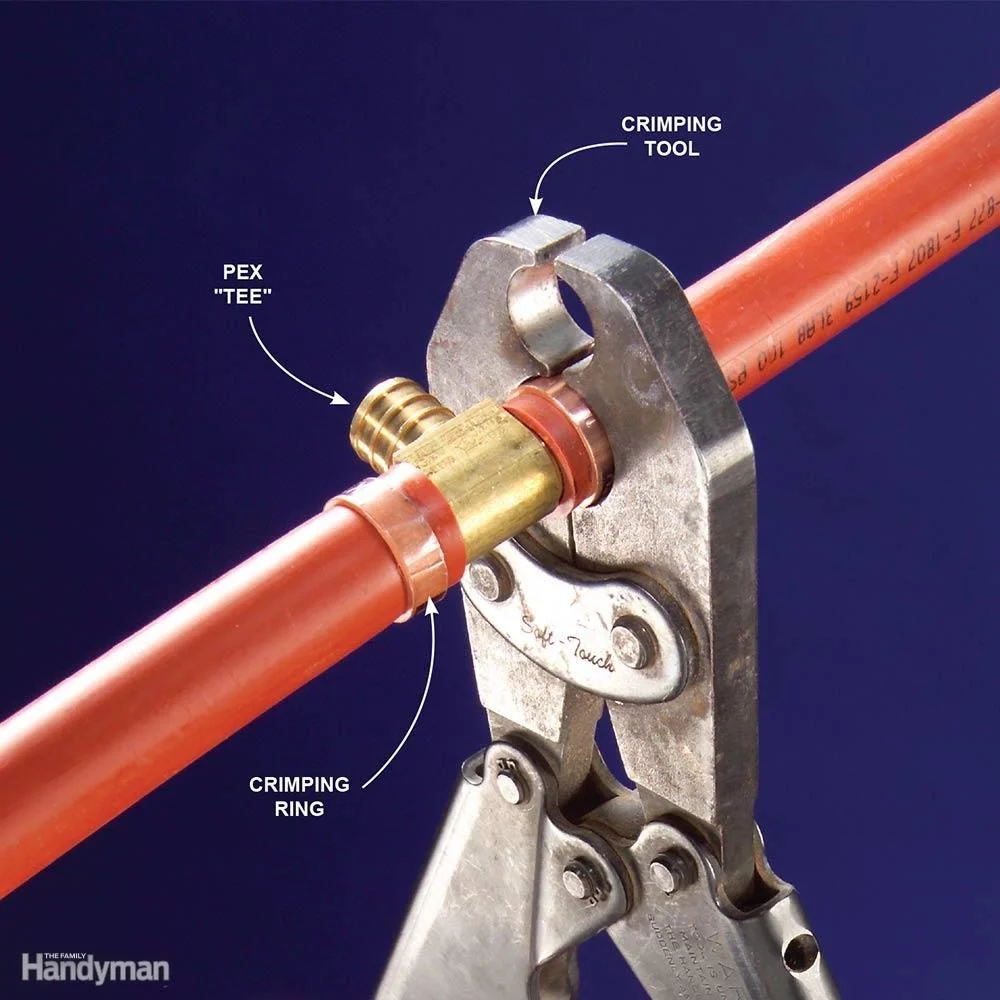
Figure 2
- Inspect the crimped connection using a go/no-go gauge to confirm the connection is tight. If the connection was made correctly, you should be able to slide the gauge over the fitting, while seeing a gap between the top of the fitting and the gauge (see Figure 3).
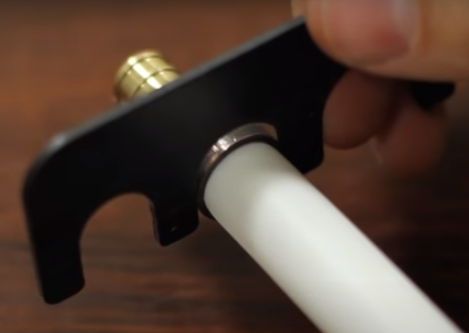
Figure 3
If the gauge does not slide over the fitting or slides all the way down, the connection has not been made correctly (see Figure 4).
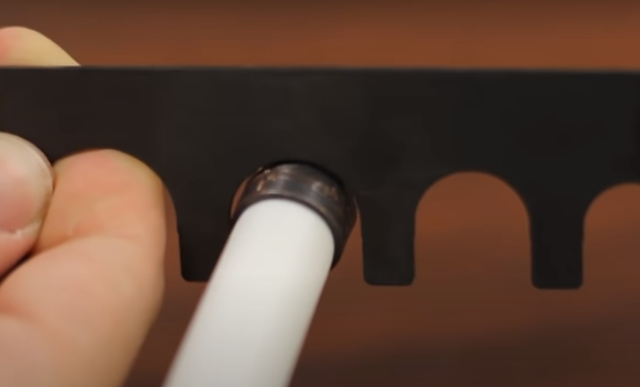
Figure 4
If connecting Pex to existing water pipes during a renovation project, you may need to connect the Pex to other pipe materials, such as copper or CPVC. The most straightforward method for connecting Pex to copper or CPVC is to use push-fit fittings. These push-fit connectors are easy to use. Simply insert the cut ends of each pipe into the corresponding end of the fitting (see Figure 5).
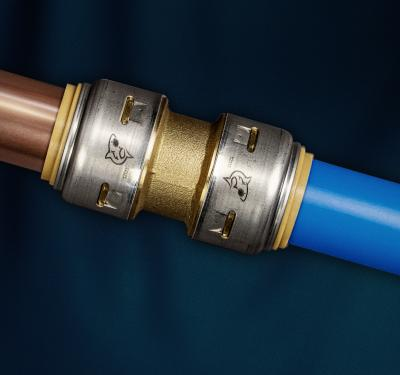
Figure 5
6. Run a Test
Once you install the Pex water lines, pressure test the system to ensure that there are no leaks. There are two ways to run a pressure test: Testing with compressed gas or hydrostatic testing.
Note: According to the 2018 International Building Code (IRC), Air testing for Pex pipes is permitted only when air testing is authorized by the manufacturer of Pex piping.
A. Testing with Compressed Gas
- Connect the hot water tank’s hot and cold lines together (see Figure 6).
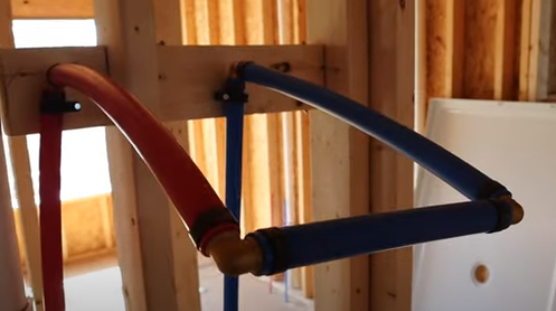
Figure 6
- Cap off the ends of the Pex tubing using Pex end caps. Leave one hot and cold water Pex open in the kitchen.
- Connect an air compressor to one of the open Pex tubes and the air pressure gauge to the other Pex tube (see Figure 7).
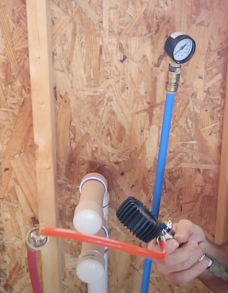
Figure 7
- Turn on the air compressor and gradually increase the air pressure in the Pex pipes until it reaches 50 psi (see Figure 8).
Note: As per the Philadelphia Plumbing Code, Chapter 15 Inspections and tests, retrieved Oct. 13, 2023, from https://up.codes/viewer/philadelphia/philadelphia-plumbing-code/chapter/15/inspections-and-tests#P-1507.1 “The supply water system shall be tested and proved tight under a water pressure not less than the working pressure under which it is to be used.”
50 psi is the common working pressure, but if the working pressure is higher than 50 psi it should be tested with higher pressure.
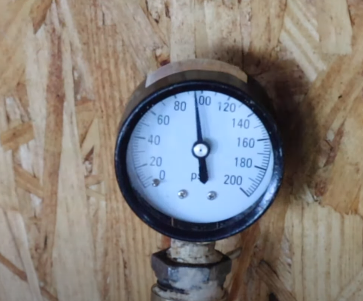
Figure 8
- Turn off the air compressor and monitor the air pressure gauge for 15 minutes. If the air pressure remains at 50 psi, then the Pex pipes have passed the pressure test.
If the air pressure drops below 50 psi, then there is a leak in the Pex pipes. Use a soap and water solution to identify the location of the leak. Repair the leak and then repeat the pressure test.
- Once the Pex pipes have passed the pressure test, you can turn on the water supply and start using the plumbing system.
B. Hydrostatic Testing
- Connect the hot water tank’s hot and cold lines together.
- Cap off the ends of the Pex tubing using the Pex end caps. Leave one Pex tubing open in the kitchen.
- Connect the water pressure gauge to the Pex tubing.
- Turn on the water from the main shut-off valve and let the water flow at full force. The needle of the gauge will start to move. The needle of the pressure gauge (Figure 8) should show 50 psi. This is standard pressure for Pex pipelines.
- Remember that sometimes the water pressure at your property is lower than 50 psi. So, if the pressure gauge reads lower than 50 psi, it might be due to low water pressure, not a plumbing issue. In this case, provide extra pressure up to 50 psi with an air compressor.
- If the water pressure remains at 50 psi for 15 minutes, then the Pex pipes have passed the pressure test.
- If the water pressure drops below 50 psi, then there is a leak in the Pex pipes. Look for water dripping from fittings to identify the location of the leak. Repair the leak and then repeat the pressure test.
- Once the Pex pipes have passed the pressure test, you can turn on the water supply and start using the plumbing system.
7. Insulate the Pipes
Insulating Pex pipes serves multiple purposes. It prevents heat loss, protects against freezing in colder climates, and reduces overall energy consumption. Insulating Pex pipes is essential for maintaining their performance and energy efficiency, especially when they are located in crawl spaces, attics, or outdoors.For areas inside the living space, Pex pipes typically do not require insulation.
A cost-effective and commonly used option for insulating Pex pipes is foam insulation tubing (see Figure 9). These tubes are readily available in various sizes to accommodate different pipe diameters and are designed with a split configuration for easy installation. To install foam tubing, use a knife or scissors to cut it to the appropriate length and then fasten it at 1-foot intervals with insulation tape. This method effectively enhances the thermal efficiency of your Pex piping system.
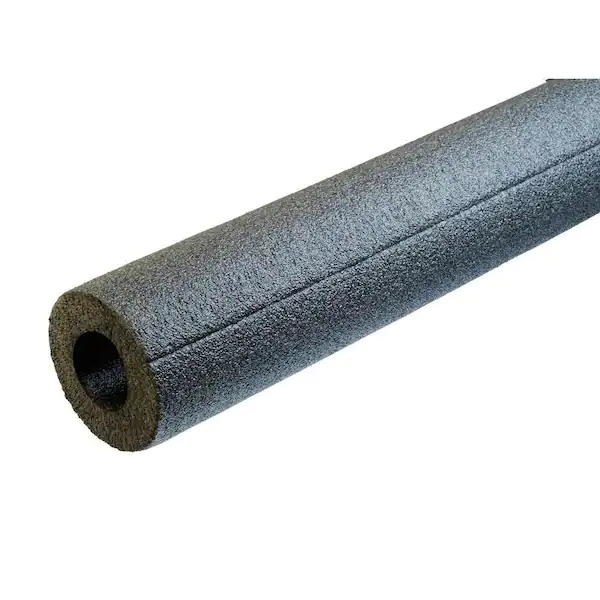
Figure 9
Additional Tips
- Use the proper tools: Pex pipe installation requires specialized tools such as Pex cutters and crimping tools. It is important to use the right tools for the job to ensure proper installation and avoid damage to the Pex pipes.
- Protect against UV rays: These pipes can be damaged by prolonged exposure to sunlight or other sources of UV radiation. If you install Pex pipes in areas where they will be exposed to UV rays, such as outdoors or in attics, it is important to protect them with insulation or other UV-resistant materials.
- Use the proper fittings: Pex pipes require specific fittings for use with Pex. Fittings that are not designed for use with Pex can result in leaks or other problems.
- Follow local codes and regulations: Pex pipe installation is subject to local building codes and regulations. Be sure to follow all applicable codes and obtain any necessary permits before beginning installation.
Philadelphia code: https://up.codes/viewer/philadelphia/ipc-2018
- Hire a licensed professional: If you are not skilled at installing Pex pipes, or if the installation is complex or requires special tools, it is best to hire a licensed professional who is experienced in Pex pipe installation. This will ensure the system is properly installed and meets all safety requirements.
Conclusion
In conclusion, if you have reached this point, you have gained valuable insights into the world of Pex pipe installation. While each Pex installation project may present its unique challenges and intricacies, this article has provided you with a solid foundation to begin your journey. Remember, becoming a true professional in this field takes hands-on experience and learning from each project you undertake.
We hope that you have found this article to be a helpful resource to master Pex pipe installation. If you require renovation services in the Philadelphia area or South Jersey, consider reaching out to Matrix Company Solutions Corp. for all your renovation needs. Contact us for a FREE Consultation and Estimate.


0 Comments