When you remodel or build a new shower, one of the most crucial tasks is to install a shower pan base and drain that is sturdy, leak-proof, and properly connected to the drain system. The installation process can seem intimidating if you have never done it before, but with the right tools and instructions, you can easily complete this task and set up your shower properly.
This step-by-step guide will walk you through the entire process, ensuring a smooth and efficient installation. Let’s get started!
Understanding The Basics of Shower Pan Base and Drain Installation
Before you dive into the installation process, it’s important to understand the role of the shower pan and the drain. The shower pan is the foundation that supports the floor of your shower, keeping water contained and preventing leaks. The drain, on the other hand, directs the water out of the shower and into the home’s plumbing system.
The installation of a shower pan and drain system is critical for ensuring water doesn’t leak, creating a potential for mold or structural damage. A poorly installed shower pan can lead to water damage in the surrounding areas, which is a costly and inconvenient issue. Therefore, it’s essential to follow all steps carefully to achieve a professional and leak-free result.
Tools and Materials
Make sure you have the following tools and materials to install a shower pan base and drain:
- Shower Pan Kit (includes the base, liner, and drain assembly)Shower Pan Kit (base, waterproof liner, drain assembly)
- Shower drain (center or offset) and full drain-kit components: plastic body, rubber gasket, paper ring, screw-in collar
- Plumber’s putty
- Level
- Measuring tape
- Shovel & finishing trowel
- Utility knife or razor knife
- Circular saw or jigsaw
- Bucket (10 gal. capacity is ideal)
- Mortar or thin-set + mixing ingredients (Type S cement, clean sand, clean water in a 3 : 1 sand-to-cement ratio)
- Felt paper (30-lb roofing paper)
- Shims (composite or cedar)
- Liquid Nails (just a dab for each shim)
- Drill with ⅛-in. Bit
- Standard galvanized roofing nails or drywall screws
- Hammer or driver
- Screws & anchors for flange fastening
- Silicone caulk / plumbing-grade adhesive
- Cloth or rag for wiping surfaces
Pro Tip: A 36 in. level is long enough to bridge the pan legs yet short enough to maneuver in a tight shower stall.
Preparation to Install a Shower Pan Base And Drain
Preparation involves setting up the drain, the floor, and the shower pan itself before the final setting:
1. Confirm The Drain Opening
First, set the pan in place and verify that its drain opening sits directly over the existing drain pipe. If it doesn’t line up, mark the exact drain-hole outline on the subfloor, then remove the pan. Cut the opening with a jigsaw or circular saw; keep it no larger than 5 inches unless your pan manufacturer specifies otherwise.
From below, shift the P-trap and waste pipe so the pipe rises straight through the new hole, finishing about 1 ¾ inches above the subfloor (follow the manufacturer’s required height).
2. Choose the Drain Style
First, determine which type of shower drain is needed (offset or standard center). Center drains work for joist-free layouts; offset drains dodge a joist without notching structural lumber.
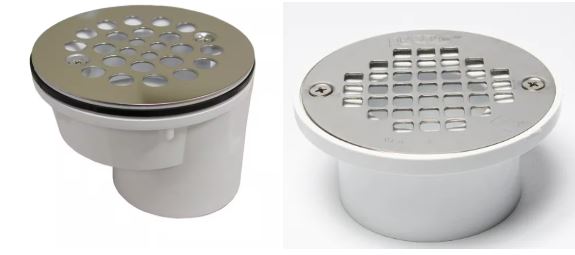
Figure 1: left: offset drain, right: center drain
3. Dry-Fit and Mark Everything
- Remove old tile, pan, or subfloor debris.
- Set the pan in place, align it with studs, and scribe level marks on each stud.
- Use a level on the dry-fit shower base to see how level it is and determine if any side needs to come up. If it’s not level, you need to use shims under the pans.
- Remove the shower pan after the dry fit.
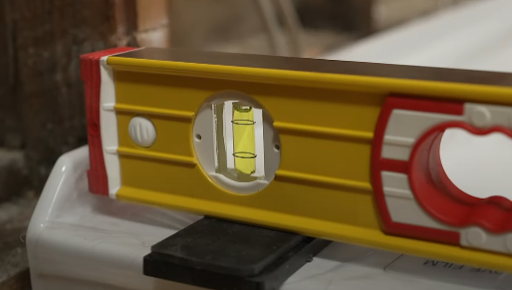
Figure 2
4. Shim and Felt Paper the Subfloor
- Cover the subfloor with a sheet of 30-lb roofing felt; this keeps the mortar bed from losing moisture to the plywood.
- Most shower pans have legs. Locate each molded “leg” on the underside of the pan and mark its footprint on the floor, along with a reference line for the front edge of the pan.
- Slide shims under every leg mark and use a level to verify each spot is perfectly flat; double-check the level from shim to shim.
- Dab a small amount of Liquid Nails on each shim, then press it back into position so it can’t drift when you set the pan in the mortar.
![]()
Figure 3
5. Mix the Mortar Bed
- In a bucket, combine 3 parts sand: 1 part Type S cement.
- Add water gradually and mix to a peanut-butter consistency-stiff enough to stand but workable with a trowel. Ten gallons (≈38 L) is typical for a 36 × 36 in. pan.
6. Prep the Drain Pieces
- Disassemble the shower drain by unscrewing the drain from its plastic body. Keep the parts separate, specifically noting the paper ring and the rubber gasket.
- Clean the section of the drain where the putty will be applied using a hand or cloth to ensure no dust is present.
- Warm a palm-sized wad of plumber’s putty; roll it into a rope and wrap it around the underside lip of the drain’s top flange.
- Wipe dust from the drain well in the pan so the flange seats tightly.

Figure 4
Step-by-Step Guide to Install a Shower Pan Base And Drain
The installation process involves installing the drain onto the pan, then setting the pan onto the prepared floor:
1.Set the Drain Flange in the Pan
Drop the top flange, which is already wrapped with plumber’s putty, straight through the drain hole. A thin putty bead should squeeze out evenly all around.
2. Slide on the Rubber Gasket and Paper Ring
Working beneath the pan, push the rubber gasket up the threaded pipe until it seats tightly against the pan’s underside. Follow with the paper ring, which acts as a lubricant for the next piece.
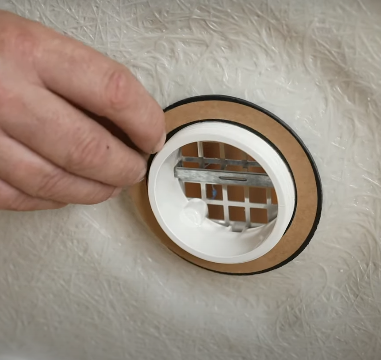
Figure 5
3. Thread on the Lower Drain Collar
Hold the upper flange with one hand while screwing the collar on with the other. If you’re using an offset drain, keep the outlet pointed toward the trap as you tighten. Hand-tight is enough; over-torque can crack acrylic.
4. Scrape Away Excess Putty
Back on top, peel off the putty squeezed out around the flange and wipe the surface clean.
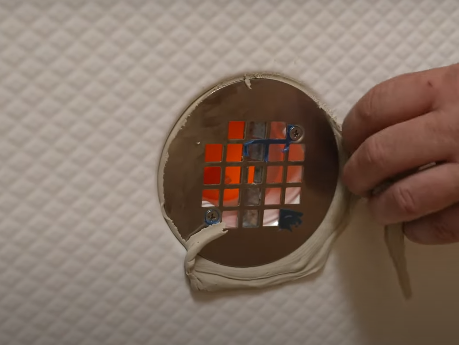
Figure 6
5. Trowel in the Mortar Bed
Spread at least a ½-inch layer of mortar over the felt-paper-covered subfloor. Make sure every molded “leg” on the pan will land on mortar.
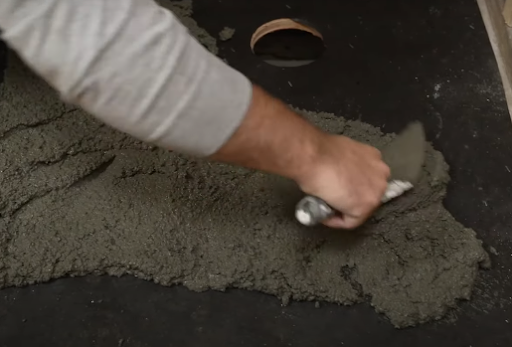
Figure 7
6. Lower the Shower Pan into Place
Gently set the pan onto the mortar, aligning each leg to its shim and matching the marks you made on the wall studs. Rock it a little until the bubble on your level centers in both directions.
7. Fasten the Flange to the Studs
Pre-drill ⅛-inch holes through the pan flange, then tap in galvanized roofing nails (or drive thin screws) so the edge is snug against every stud.
8. Run a Continuous Bead of Silicone
Caulk where the pan meets the walls and completely encircle the drain flange. An unbroken bead blocks stray water from sneaking under the pan.
9. Let the Mortar Cure and Double-Check the Level
Leave the pan undisturbed for the manufacturer’s recommended cure time (usually 24 hours). When you return, set your level across the floor; if the bubble hasn’t moved, you’ve locked in a rock-solid foundation ready for wallboard and tile.
Common Mistakes to Avoid
Even though installing a shower pan base and drain may seem straightforward, there are common mistakes you should avoid:
- Not Checking for Level: Ensure the pan is level in all directions to avoid water pooling in certain areas.
- Over-tightening the Drain: This can crack the shower pan base or cause misalignment with the drain.
- Ignoring Manufacturer Instructions: Always follow the manufacturer’s instructions for both the shower pan and the drain.
Conclusion
A perfect, leak-free shower always starts at the bottom. By following this comprehensive guide to install a shower pan base and drain, you’ll set a rock-solid foundation that keeps water where it belongs and spares you future headaches. Gather every tool, double-check your prep, and take each step slowly, your newly installed pan will reward you with decades of trouble-free showers.
For expert renovation services in Philadelphia and South Jersey, contact us for a FREE Consultation!
FAQs
What is a shower pan base, and why is it necessary?
A shower pan base is a waterproof foundation that forms the floor of your shower. It’s essential for directing water toward the drain and preventing water from leaking into the rest of the bathroom.
Can I install a shower pan base and drain myself?
Yes, installing a shower pan and drain is a DIY-friendly project if you have the right tools and follow the instructions carefully.
How do I know if my shower pan is level?
Use a level tool to ensure the pan is positioned evenly in all directions. The drain should also be level for proper water flow.
What type of mortar should I use?
A standard thin-set mortar is typically used for shower pan installations, but check the manufacturer’s recommendations for your specific shower pan.
Do I need a professional to install the shower pan and drain?
If you follow the steps carefully and have some basic DIY experience, you can install a shower pan and drain yourself. However, if you’re unsure, hiring a professional plumber can ensure proper installation.
How long does it take to install a shower pan and drain?
Typically, the process can take a few hours, depending on your experience and the complexity of the installation. Make sure to allow for additional time for drying and setting the mortar.

![Top 20 Reasons for Failing a Plumbing Inspection in Philadelphia [2025 Guide]](https://matrixgc.com/wp-content/uploads/2025/05/Common-issues-causing-failing-a-plumbing-inspection-in-Philadelphia.png)

0 Comments